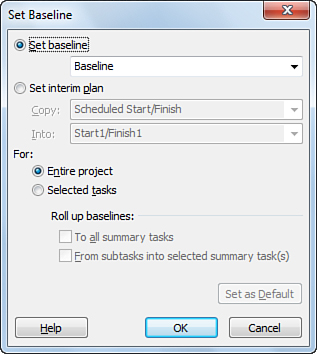
IT tutorials
 
Office
 

Microsoft Project 2010 : Capturing Project Progress (part 1) - Baselining Your Project

- Free product key for windows 10
- Free Product Key for Microsoft office 365
- Product Key Free : Microsoft Office 2019 – Serial Number
3/3/2015 7:20:37 PM

After your project is at the beginning installed, it can be useful to place a base line of project. A base line is instantaneous of your data of project, including dates, durations, evaluations of work, and estimates of the costs. By establishment of the references your project, you capture your plan of project so that later, because your project progresses, you can compare what really continues in your project with what you had at the beginning envisaged.


You can also place the distinct base lines at certain points in your project, such as big steps and doors of stage, for example. The project 2010 allows you to install with 11 different base lines in each project.

To set a baseline in your project, follow these steps:

1.
In the Gantt Chart view, press Ctrl and click each row header for the tasks you want to baseline. If you want to baseline the whole project, skip this step.

2.
On the Project tab, in the Schedule group, click Set Baseline and then click Set Baseline on the menu that appears.

3.
Click Set Baseline and then choose the baseline number that you want to set from the drop-down list, as shown in Figure 1.


Figure 1. Use the Set Baseline dialog box to choose baseline options.

Use the Set Baseline dialog box to choose baseline options.


If you need to capture only the start and finish dates for the project or the selected tasks, you can use an interim plan instead of a baseline. Click Set interim plan, choose which date fields you want to Copy, and then, from the Into list, choose the interim plan number where you want to capture the selected dates.


4.
Under For, click Entire project if you want to set the baseline for the project or click Selected tasks if you want to copy only the tasks you selected in the Gantt Chart view.

5.
If you chose Selected tasks, under Roll up baselines, select the appropriate options:

  • To all summary tasks— Select this check box if you want the baselined data to be rolled up to the summary task level for all tasks, regardless of whether you selected the summary tasks for baselining.

  • From subtasks into selected summary task(s)— Select this check box if you want only baseline data to be rolled up to summary tasks that you selected in the Gantt Chart view.

6.
Click OK to set the baseline in your project.

With a baseline set, you can start work in your project and then use the baseline fields to compare data later in your project’s timeline. Baseline fields include the following:

  • Baseline Budget Cost

  • Baseline Budget Work

  • Baseline Cost

  • Baseline Deliverable Finish

  • Baseline Deliverable Start

  • Baseline Duration

  • Baseline Estimated Duration

  • Baseline Estimated Finish

  • Baseline Estimated Start

  • Baseline Finish

  • Baseline Fixed Cost

  • Baseline Fixed Cost Accrual

  • Baseline Start

  • Baseline Work

 
Others
 
- Microsoft Access 2010 : Create Custom Forms (part 4) - Using E-Mail Forms to Collect Data
- Microsoft Access 2010 : Create Custom Forms (part 3) - Adding Subforms
- Microsoft Access 2010 : Create Custom Forms (part 2) - Adding Controls
- Microsoft Access 2010 : Create Custom Forms (part 1) - Modifying Forms Created by Using a Wizard
- Microsoft Word 2010 : Creating Mail Merge Documents - Creating a Data Document
- Microsoft Word 2010 : Creating Mail Merge Documents - Importing Data from Outlook
- Microsoft Word 2010 : Creating Mail Merge Documents - Importing Data from a Database
- Microsoft Word 2010 : Starting the Mail Merge
- Microsoft Visio 2013 : Adding Sophistication to Your Drawings - Understanding and using layers
- Microsoft Visio 2013 : Adding Sophistication to Your Drawings - Inserting pictures
 
 
Top 10
 
- Microsoft Visio 2013 : Adding Structure to Your Diagrams - Finding containers and lists in Visio (part 2) - Wireframes,Legends
- Microsoft Visio 2013 : Adding Structure to Your Diagrams - Finding containers and lists in Visio (part 1) - Swimlanes
- Microsoft Visio 2013 : Adding Structure to Your Diagrams - Formatting and sizing lists
- Microsoft Visio 2013 : Adding Structure to Your Diagrams - Adding shapes to lists
- Microsoft Visio 2013 : Adding Structure to Your Diagrams - Sizing containers
- Microsoft Access 2010 : Control Properties and Why to Use Them (part 3) - The Other Properties of a Control
- Microsoft Access 2010 : Control Properties and Why to Use Them (part 2) - The Data Properties of a Control
- Microsoft Access 2010 : Control Properties and Why to Use Them (part 1) - The Format Properties of a Control
- Microsoft Access 2010 : Form Properties and Why Should You Use Them - Working with the Properties Window
- Microsoft Visio 2013 : Using the Organization Chart Wizard with new data
Technology FAQ
- Is possible to just to use a wireless router to extend wireless access to wireless access points?
- Ruby - Insert Struct to MySql
- how to find my Symantec pcAnywhere serial number
- About direct X / Open GL issue
- How to determine eclipse version?
- What SAN cert Exchange 2010 for UM, OA?
- How do I populate a SQL Express table from Excel file?
- code for express check out with Paypal.
- Problem with Templated User Control
- ShellExecute SW_HIDE
programming4us programming4us