One of the last steps in preparing your
project for execution is baselining it. A baseline represents a
snapshot of all the planned data as it was outlined within the contract
and approved by project stakeholders. Microsoft Project includes 11
baselines you can use to track authorized changes made to the project
planned data. In addition, the baseline plays a very important role in
the tracking and analysis of your project schedule. Microsoft Project
uses the baseline values to derive variances in cost and schedule while
comparing them to the actual data you record.
A baseline, according to the PMI’s PMBOK Guide, is defined as “the original plan, plus or minus approved changes.”
Baselining copies several key data types in your
schedule and saves them for future reference and analysis. These data
types include all tasks, start and finish dates, durations, costs,
assigned work, budget cost, budget work, fixed cost, accrued cost,
deliverable start, and deliverable finish.
Saving Your Project Baseline
You can set the project baseline by performing the following steps:
1. | Open the Set Baseline dialog box by selecting the Project tab, Schedule, Set Baseline, Set Baseline.
|
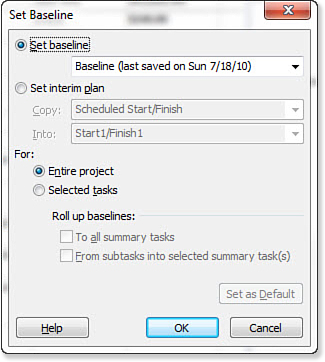
2. | In
the Set Baseline dialog box, you can select to either save the entire
project baseline or save the interim plan. Select the appropriate
options and click the OK button, as shown in Figure 1.

|
When Project records a baseline, it saves the
current schedule for all tasks, plus the start and finish date,
duration, costs, assigned work, budget cost, budget work, fixed cost,
accrued cost, deliverable start, and deliverable finish.
Note
Although Project records task
splits, there is no explicit data field to show the split conditions.
However, you can view these task splits in addition to the milestones
and tasks that the baseline records using the Gantt Chart. In addition,
task splits appear as time periods with zero hours of work in the
time-phased data of the Usage views. The overall task duration shows
the accumulated working periods disregarding the split sections. |
You can save up to 11 different baselines. The first
time you save a baseline, Project records it in the default baseline,
named Baseline. If you create additional baselines after that,
Microsoft Project names them Baseline 1, Baseline 2, and so on.
Microsoft Project records the same fields for each baseline, so that
you can compare them later. You can use additional baselines to track
additional authorized changes to the project after the execution has
started. Often the changes reflected in the following baselines reflect
change requests that are amendments to the original contract. This
enables you to keep track of all changes, including the original plan
that your project goes through. The process of revising your project
schedule is known as rebaselining. If
you do rebaseline, you should save the current baseline to one of the
other available baselines and then set the new current baseline from
your project schedule. To do so, select Tools, Tracking, Set Baseline,
which opens the Set Baseline dialog box. The Set Baseline dialog box
provides you with four different options, as follows:
Set Baseline—
This is the default selection when you open the Set Baseline dialog
box. It saves the date from the current schedule into the baseline
default setting. You can, however, select the down arrow to choose
another baseline to save to.
Set Interim Plan—
This option is used for copying data from one version to another. For
example, if you wanted to save the current default baseline to Baseline
1, you can select Baseline in the Copy text box and Baseline 1 in the
Into text box.
For— This option enables you to choose whether the baseline you are saving is for the entire project or for selected tasks only.
Roll Up Baselines—
This option is available only when you choose the For Selected Tasks
option. When a baseline is saved, Project, by default, does not update
that baseline for a summary task when a subtask is added, deleted, or
modified. The two options under Roll Up Baselines enable you to choose
to roll up the baseline changes for subtasks into their parent summary
tasks. Select the To All Summary Tasks option, which includes the
rebaselined subtask. If you want to update only the selected summary
tasks, choose those summary tasks along with the subtask(s) that you
want to rebaseline (use Ctrl+click to add more than one subtask). Then
choose From Subtasks into Selected Summary Task(s). You can click the
Set as Default button to make your selection the default for either or
both of these options on all new projects.
Caution
The Multiple Undo feature of
Project enables you to undo the setting of a baseline. However, be
cautious because some actions in Project, such as a Save operation,
will clear the Undo list, after which you will no longer be able to
undo the changes you have made. |
The already-used baselines have the “last saved”
date next to the baseline version name. If you attempt to save your
current baseline to the already-used baseline version, Microsoft
Project displays an overwrite warning message, as shown in Figure 2.
If you are still in the process of making changes to the original
project schedule plan, you can safely overwrite the baseline. However,
if you are executing the project, it is recommended that you save your
data to the next available baseline version.

It is a project management best practice to
save the baseline after the project has been approved and before it has
started execution. Also, the original approved baseline should always
remain unchanged.