IT tutorials
 
Office
 

Microsoft Word 2010 : Creating an Outline (part 2) - Building an Outline - Adding Headings to an Outline, Promoting and Demoting Headings

- Free product key for windows 10
- Free Product Key for Microsoft office 365
- Product Key Free : Microsoft Office 2019 – Serial Number
10/15/2014 3:26:29 AM

Building an Outline

Creating an outline is a lot like creating a normal document: just start typing. When you’re in Outline view, however, you need to type only the document’s headings, and Word automatically formats them. When you press Enter at the end of a heading, Word creates a new paragraph formatted with the same heading level. You can promote any heading to a higher level or demote it to a lower (subordinate) level. You can also reorganize an outline by dragging headings, and expand or collapse sections that are divided into subsections.

Adding Headings to an Outline

Here’s how to start building an outline. All the headings will be the same level, but you’ll learn to change heading levels in the next section.

1.
Open a new, blank document, just to keep things tidy.

2.
On the Home tab, click Show/Hide ¶ (if necessary) so that you can see paragraph marks and other nonprinting characters. These characters can help you keep track of things in your outline, so it’s a good idea to display them.

3.
Switch to Outline view, as described in the previous section. The insertion point appears at the first blank paragraph.
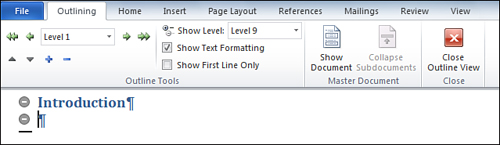
4.
Type your first heading; then press Enter. Word formats the paragraph as a level 1 heading (by applying the Heading 1 style). The insertion point jumps down to a new paragraph, which also is formatted as a level 1 heading, as shown in Figure 3.

Figure 3. Adding headings to an outline.

5.
Type a few more headings, pressing Enter after each one. When you finish, you should have a bunch of level 1 headings.

Promoting and Demoting Headings

Word supports nine heading levels, and you can assign any level to any heading. To do this, you can promote the heading to a higher level (say, from level 3 to level 2) or demote it to a lower level (for example, from level 1 to level 2). Here’s how:

1.
In your outline, click the heading you want to change.

2.
On the Outline tab, do one of the following:

  • To promote the heading to a higher level, click the Promote button.

  • To demote the heading to a lower level, click the Demote button.

In either case, clicking the button once promotes or demotes the heading by one level. You may need to click multiple times to reach the desired level.

3.
Repeat steps 1 and 2 for any other heading you want to promote or demote.

Aside from using the Promote and Demote buttons, you can change a heading’s level in the following ways:

  • To promote a heading one level, press Tab or Alt+Shift+Right Arrow.

  • To demote a heading one level, press Shift+Tab or Alt+Shift+Left Arrow.

  • To promote any heading all the way to the highest level, click Promote to Heading 1.

  • To demote any heading all the way down to body text, click Demote to Body Text.
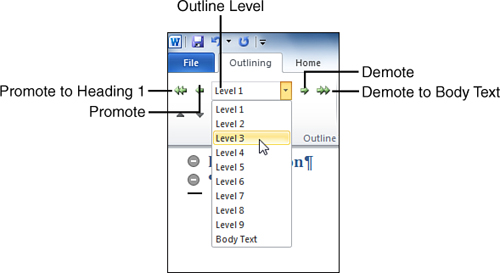
  • To avoid some of the clicking, select a heading, click the Outline Level drop-down arrow, and then click the desired level, as shown in Figure 4.

    Figure 4. Options for promoting and demoting headings on the Outlining tab.

 
Others
 
- Microsoft Word 2010 : Creating an Outline (part 1) - Working in Outline View
- Microsoft Excel 2010 : Working with Graphics - Inserting a Diagram,Inserting an Object
- Microsoft Excel 2010 : Working with Graphics - Inserting WordArt, Using Smart Art in Excel
- Microsoft Excel 2010 : Working with Graphics - Using AutoShapes
- Microsoft PowerPoint 2010 : Preparing a Slide Show - Working with Fonts
- Microsoft PowerPoint 2010 : Preparing a Slide Show - Creating a Self-Running Presentation
- Microsoft PowerPoint 2010 : Preparing a Slide Show - Hiding Slides
- Microsoft PowerPoint 2010 : Preparing a Slide Show - Creating a Custom Slide Show
- Microsoft Project 2010 : Work Breakdown Structure Numbering (part 2) - Editing Custom WBS Codes, Renumbering the Custom WBS Codes
- Microsoft Project 2010 : Work Breakdown Structure Numbering (part 1) - Creating Custom WBS Codes
 
 
Top 10
 
- Microsoft Visio 2013 : Adding Structure to Your Diagrams - Finding containers and lists in Visio (part 2) - Wireframes,Legends
- Microsoft Visio 2013 : Adding Structure to Your Diagrams - Finding containers and lists in Visio (part 1) - Swimlanes
- Microsoft Visio 2013 : Adding Structure to Your Diagrams - Formatting and sizing lists
- Microsoft Visio 2013 : Adding Structure to Your Diagrams - Adding shapes to lists
- Microsoft Visio 2013 : Adding Structure to Your Diagrams - Sizing containers
- Microsoft Access 2010 : Control Properties and Why to Use Them (part 3) - The Other Properties of a Control
- Microsoft Access 2010 : Control Properties and Why to Use Them (part 2) - The Data Properties of a Control
- Microsoft Access 2010 : Control Properties and Why to Use Them (part 1) - The Format Properties of a Control
- Microsoft Access 2010 : Form Properties and Why Should You Use Them - Working with the Properties Window
- Microsoft Visio 2013 : Using the Organization Chart Wizard with new data
Technology FAQ
- Is possible to just to use a wireless router to extend wireless access to wireless access points?
- Ruby - Insert Struct to MySql
- how to find my Symantec pcAnywhere serial number
- About direct X / Open GL issue
- How to determine eclipse version?
- What SAN cert Exchange 2010 for UM, OA?
- How do I populate a SQL Express table from Excel file?
- code for express check out with Paypal.
- Problem with Templated User Control
- ShellExecute SW_HIDE
programming4us programming4us