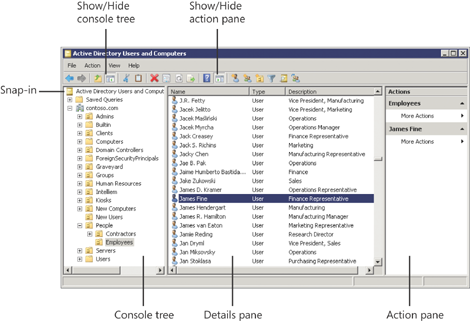
1. Understanding the Microsoft Management Console
Windows administrative tools share a common framework called the
Microsoft Management Console (MMC). The MMC displays administrative
tools, called snap-ins, in a customizable window,
with a left pane that displays the console tree (similar to the Windows Explorer tree) and
a center pane that displays details. An Action pane on the right exposes commands, called
actions by MMC. Figure 2-1 labels the components of the
MMC.
In Figure 1, you can see the major
components of the MMC, including the following:
The console tree The left
pane that displays the console tree; also called the scope
pane
The Show/Hide Console Tree toolbar
button Turns the console tree pane on and off
Snap-ins Tools that provide
administrative functionality
The details pane Displays the details of the scope selected in the
console tree
The Action pane Displays
commands that can be performed on the scope selected in the
console tree, or on the item or items selected in the details
pane
The Action menu Also displays commands that can be performed on the
selected scope or items
The context menu (not
shown) Appears when you right-click an item in the scope
or details pane; a third location from which actions can be
initiated
The Show/Hide Action Pane toolbar
button Turns the Action pane on and off
To control the visibility of the left and right panes, use the
Show/Hide Console Tree and Show/Hide Action Pane buttons or the Customize command
on the View menu.
Administrative tools—snap-ins—appear in the console tree. The
details pane exposes the administrative functionality of the selected
snap-in. You can think of an MMC as a tool belt to which you can
attach one or more tools (snap-ins). Snap-ins cannot be launched
directly; they can function within the context of an MMC only. Most of
the tools in the Administrative Tools folder constitute a single
console with a single snap-in. These tools include Event Viewer,
Services, and Task Scheduler. Other tools, such as Computer
Management, are consoles that contain multiple snap-ins, including
some that exist as stand-alone consoles. For example, the Computer
Management console contains Event Viewer, Services, and
Task Scheduler.
As you are administering Windows with snap-ins, you are
performing commands, called actions by the MMC,
that you can find in the console’s Action menu, on the short-cut menu that appears when you
right-click an item, and in the Action pane on the right side of the
console. Most experienced administrators find the context menu the
most productive way to perform actions in an MMC snap-in. If you use
the context menu exclusively, you can turn off the Action pane so that
you have a larger area to display information in the details
pane.
There are two types of MMC: preconfigured and custom.
Preconfigured consoles are installed automatically when you add a role
or feature, to support administration of that role or feature. They
function in user mode, so you cannot modify them or save them. The
user, however, can create custom consoles to provide exactly the tools
and functionality required. The following sections examine both
preconfigured and custom consoles.
2. Active Directory Administration Tools
Most Active Directory administration is performed with the
following snap-ins and consoles:
Active Directory Users And
Computers Manage most common day-to-day resources, including
users, groups, computers, printers, and shared folders. This is likely the most heavily used
snap-in for an Active Directory administrator.
Active Directory Sites And
Services Manage replication, network topology, and related services.
Active Directory Domains And
Trusts Configure and maintain trust relationships and the
domain and forest functional levels.
Active Directory Schema
Examine and modify the definition of Active Directory attributes
and object classes. This schema is the “blueprint” for Active
Directory. It is rarely viewed and even more rarely changed.
Therefore, the Active Directory Schema snap-in is not installed by
default.
3. Finding the Active Directory Administrative Tools
Active Directory snap-ins and consoles are installed when you
add the AD DS role to a server. Two commonly used Active Directory
administrative tools are added to Server Manager when you install the
AD DS role: the Active Directory Users And Computers snap-in and the
Active Directory Sites And Services snap-in.
To administer Active Directory from a system that is not a
domain controller, you must install the Remote Server Administration Tools (RSAT). The RSAT is a feature that
can be installed from the Features node of Server Manager on Windows
Server 2008 or Windows Server 2008 R2.
The RSAT can also be installed on Windows clients including
Windows Vista Service Pack 1 (or later) and Windows 7. Simply download
the RSAT installation files from http://www.microsoft.com/downloads and follow the Setup
Wizard. After installation, you must also turn on the tool or tools
you want to have visible. Use the Turn Windows Features On Or Off
command in the Programs And Features application in Control Panel to
do this.
Once installed and turned on, all Active Directory
administrative consoles can be found in the Administrative Tools
folder, which itself is found in Control Panel. In the classic view of
Control Panel, you see the Administrative Tools folder displayed. In
the Control Panel Home view, administrative tools are found in System
And Maintenance.
The Active Directory Schema snap-in must be registered before
you can add it to a console. The procedure for registering the snap-in
is covered later in this lesson.
4. Adding the Administrative Tools to Your Start Menu
By default, administrative tools are not added to the Start menu
on Windows Vista or Windows 7 clients. You can make the administrative
tools easier to access by adding them to your Start menu.
Right-click the Start button and click Properties.
If you are using the default Start menu, scroll to System
Administrative Tools and select Display On The All Programs Menu
And The Start Menu or Display On The All Programs Menu. If you are
using the Classic Start menu, select Display Administrative
Tools.
5. Creating a Custom Console with Active Directory
Snap-ins
It’s easier to administer Windows when the tools you need are in
one place and can be customized to meet your needs. This is achieved
by creating a customized MMC administrative console that contains the snap-ins
you need to perform your administrative tasks. When you create a
customized MMC console, you can:
Add multiple snap-ins so that you do not have to switch
between consoles to perform your job tasks, and so that you must
launch only one console to perform any of your administrative
tasks.
Save the console so it can be used regularly.
Distribute the console to other administrators.
Save the console, and other consoles, to a shared location
for unified, customized administration.
To create a customized MMC console:
Click Start. Then, in the Start Search box, type mmc.exe and press ENTER.
Click the File menu, then click Add/Remove Snap-ins.
The Add/Remove Snap-ins dialog box allows you to add, remove,
reorder, and manage the console’s snap-ins.
After you have installed the RSAT, all four Active Directory
management snap-ins are installed; however, the Active Directory
Schema snap-in does not appear in the Add/Remove Snap-ins dialog box
until after you have registered the snap-in.
To register Active Directory Schema:
Open Command Prompt with the Run As Administrator
option.
Type regsvr32.exe
schmmgmt.dll and press ENTER.
6. Running Administrative Tools with Alternate Credentials
Many administrators log on to their computer by using their
administrative accounts. This practice is dangerous, because an
administrative account has more privileges and access to more of the
network than a standard user account does. Therefore, malware that is launched with administrative credentials
can cause significant damage. To avoid this problem, do not log on as
an administrator. Instead, log on as a standard user and use the
Run As Administrator feature to launch administrative
tools in the security context of an administrative account:
Right-click the shortcut for an executable, Control Panel
applet, or MMC console that you want to launch, and then click Run
As Administrator. If you do not see the command, try holding down
the Shift key and right-clicking.
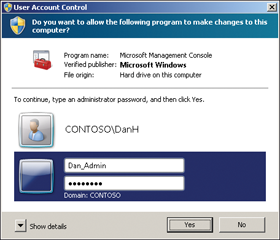
The User Account Control dialog box appears.
Click Use Another Account.
Enter the user name and password of your administrative
account, as shown in Figure 2.
Tip:
REDUCE THE STEPS NECESSARY TO RUN WITH
ADMINISTRATIVE CREDENTIALS
If you will be running an application regularly as an
administrator, create a new shortcut that preconfigures Run As Administrator. Create a shortcut and open the
Properties dialog box for the shortcut. Click Advanced, and select
Run As Administrator. When you launch the shortcut, the User Account Control dialog box appears.
Windows 7 and Windows Server 2008 R2 have an additional method
with which to run administrative tools. Press and hold the Shift key and
right-click the shortcut to an administrative tool on the Start menu,
and then click Run As Different User.