Adding New Dimensions to a Table
To store transactions with the new inventory dimensions, the dimensions must be added to the InventDim table. You do this by creating two new fields, BikeFrameSize and BikeWheelSize, of the corresponding type on the InventDim table. You should also add these fields to the unique DimIdx index because any combination of inventory dimensions can exist only once in the InventDim table.
The display
of inventory dimensions in almost any form in the Dynamics AX
application is based on field groups and where the content of the field
group in the form is built at run time. The forms runtime in Dynamics AX
builds the group from the list of fields in the associated field group
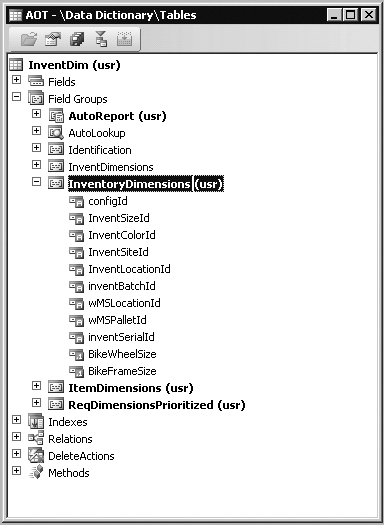
defined on the InventDim table. Therefore, by adding the new fields to the InventoryDimensions field group on the InventDim
table, you make the two new fields available in almost any form that
displays inventory dimensions. Position the fields in the field group
based on where you want them to appear relative to the other dimensions,
as shown in Figure 5.

Figure 5-5 shows usr flags on the AutoReport and ItemDimensions field groups, indicating that the custom fields have been added to these groups as well. The AutoReport group is modified so that it prints the new dimensions if you create an auto report by clicking Print on a form; the ItemDimensions group is modified because the new dimensions are considered to be item dimensions.
Although
the inventory dimensions are now available in any form because of the
interpretation of the field groups by the Dynamics AX forms runtime, the
fields still aren’t visible or editable because they aren’t enabled in
any inventory dimension group. Moreover, the two new inventory
dimensions automatically appear in the Dimension Groups form because the
inventory dimension feature also interprets the InventoryDimensions field group on the InventDim
table to find all the currently available inventory dimensions. To make
the form work with the new dimensions, you merely state whether the new
dimensions are item dimensions. You do this by adding the new
dimensions to the isFieldItemDim method on the InventDim table, as shown in the following X++ code. The added lines are shown in bold.
static public boolean isFieldIdItemDim(fieldId dimFieldId)
{
    ;
    #InventDimDevelop

    switch (dimFieldId)
    {
        case (fieldnum(InventDim,ConfigId))         :
        case (fieldnum(InventDim,InventSizeId))     :
        case (fieldnum(InventDim,InventColorId))    :
        case (fieldnum(InventDim,BikeFrameSize))    : // Frame size added
case (fieldnum(InventDim,BikeWheelSize)) : // Wheel size added
            return true;

        case (fieldnum(InventDim,InventSiteId))     :
        case (fieldnum(InventDim,InventLocationId)) :
        case (fieldnum(InventDim,InventBatchId))    :
        case (fieldnum(InventDim,wMSLocationId))    :
        case (fieldnum(InventDim,wMSPalletId))      :
        case (fieldnum(InventDim,InventSerialId))   :
            return false;
    }

    throw error("@SYS70108");
}
|
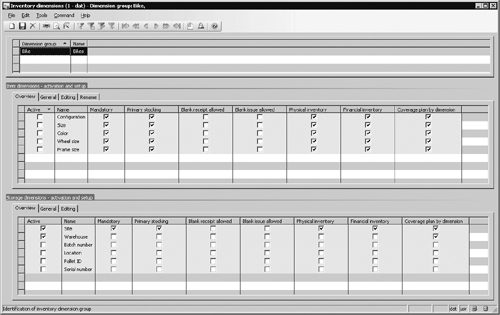
The new dimensions will be
available for setup in the Dimension Groups form, which is reached
through the navigation pane under Inventory Management\Setup\Dimensions\
Dimension Groups. The dimensions are located in the Item Dimensions
grid, as shown in Figure 6.

Important
You need to restart the Application Object Server (AOS) after adding fields to the InventoryDimensions field group because the list of fields in the group is cached in memory on both the client and the server tiers. |