Reverse proxies, such as ISA
2006 SP1 or Forefront Threat Management Gateway (TMG), are excellent
ways to securely publish applications, such as Lync Server, to users on
the Internet. By controlling specific ports to pass traffic and limiting
destination URLs to only the desired paths, you can safely pass traffic
from the Internet to Lync Server roles. The following sections discuss
how to configure reverse proxies to work with Lync Server.
Configuring ISA 2006 SP1 to Support Lync Server
Although it has been around for a while, many
environments already have ISA 2006 SP1 deployed for protecting
applications, such as Exchange, SharePoint, or IIS. As such, it is
typical for these environments to leverage their existing ISA
implementation to publish Lync Server. The typical reasons for deploying
a reverse proxy, such as ISA for Lync Server, include the following:
Enabling external users to expand distribution groups Enabling external users to download meeting content Enabling external devices to connect to Device Update Service for updates Enabling remote users to download files from the Address Book Service
Assuming ISA 2006 SP1 is already installed and
network cards are already configured, the following steps outline how to
publish a Lync Server Edge Server deployment through ISA 2006 SP1:
Configure Web Farm FQDN
During
the setup of Enterprise pools and Standard Editions servers, there is
an option to configure an external web farm Fully Qualified Domain Name
(FQDN) on the web farm FQDN’s page during the Create Pool Wizard (or the
Deploy Server Wizard). If an URL was not chosen during this process, it
is necessary to configure the settings using the following procedure:
1. | Click Start, App Programs, Microsoft Communications Server 2010, and Communications Server Topology Builder.
| 2. | Choose Download Topology from existing deployment and click OK.
| 3. | In Topology Builder, in the console tree, navigate to your Enterprise or Standard pool, and right-click the name of the pool.
| 4. | Click Edit Properties.
| 5. | In
the middle of the Edit Properties screen, there is a field under
external web services titled FQDN. Enter the FQDN to be used for Web
Services and click OK.
| 6. | In the left pane, right-click Lync Server, and click Publish topology.
| 7. | Click Next.
| 8. | Select the database where the topology will live, and click Next.
| 9. | Click Finish.
|
Request and Configure SSL Certificates
Depending on where your SSL certificates are coming
from, it might be necessary to install the Root Certificate Authority’s
certificate into the Root Trust Container on the ISA 2006 SP1 server.
In the case of an SSL certificate that comes from a
well-known vendor, odds are the Root CA is already in the Windows trust
list. If the SSL certificate comes from a lesser known third-party CA,
you can typically download the Root CA’s certificate from the vendor in
question. In the case of an internal PKI, export the Root CA’s
certificate with these steps:
1. | Log on to the Root CA.
| 2. | From the Start menu, go to the run line, type MMC, and press Enter.
| 3. | From the File menu, click Add/Remove Snap-in.
| 4. | Click Add.
| 5. | Select Certificates, and then click Add.
| 6. | Choose Computer account and click Finish.
| 7. | Click Close and then click OK.
| 8. | Expand Certificates (Local Computer), Personal, and Certificates.
| 9. | In the right pane, look for the Root CA certificate. It will be issued to itself and issued by itself. Right-click the Root CA certificate.
| 10. | Click All Tasks, and choose Export.
| 11. | When the Certificate Export Wizard launches, click Next.
| 12. | When asked about exporting the private key, click NO, do not export the private key. Click Next.
Warning
In step 12, it is important not to export the private key or else it could potentially be used to impersonate the Root CA.
| 13. | Select the format for the export, typically DER Encoded Binary X.509 (CER), and click Next.
| 14. | Browse to a location where you will save the certificate, and give it a name to save under. Click Next.
| 15. | Click Finish, and click OK.
|
The .cer file that was exported is the public key
certificate of the Root CA. This is used to identify the Root CA. This
certificate will be imported into any system that needs to trust
certificates whose chains are initially anchored by this CA.
In the case of an Active Directory–integrated Root CA, often called an Enterprise Root CA,
the root certificate is already trusted by all domain members. Because
PKI best practices call for the Root CA to be offline when not in use,
it is often necessary to perform the import manually or else to push out
the root certificate through Group Policy. Because ISA 2006 SP1 is
typically deployed in a workgroup rather than a domain, it can’t benefit
from the Group Policy method, so it is necessary to manually install
the Root CA certificate with the following steps:
1. | Log on to the ISA 2006 SP1 server.
| 2. | From the Start menu, go to the run line, type MMC, and press Enter.
| 3. | From the File menu, click Add/Remove Snap-in.
| 4. | Click Add.
| 5. | Select Certificates, and click Add.
| 6. | Choose Computer account, and click Finish.
| 7. | Click Close, and click OK.
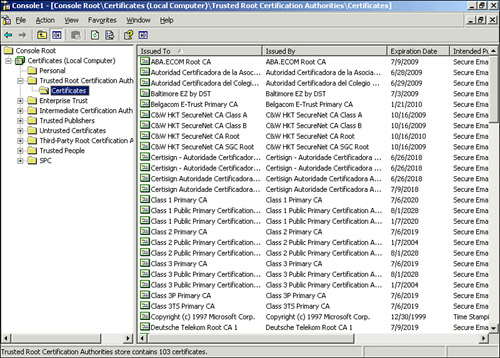
| 8. | Expand Certificates (Local Computer), Trusted Root Certification Authorities, and Certificates, as shown in Figure 1.
| 9. | In the right pane, right-click on an empty space, click All Tasks, and select Import.
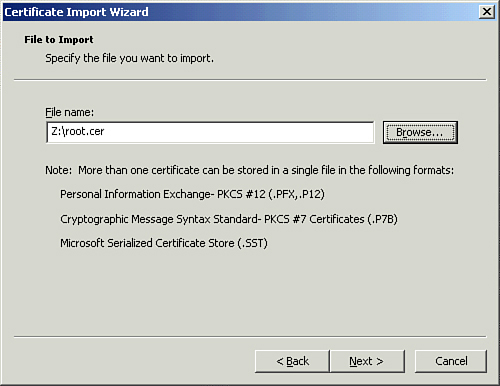
| 10. | When the Certificate Import Wizard appears, click Next.
| 11. | Browse to the location where the Root CA certificate is located, as shown in Figure 2.
Typically, this is removable media because the ISA 2006 SP1 server
likely doesn’t have connectivity to a location where such a certificate
would usually be stored. Click Next.
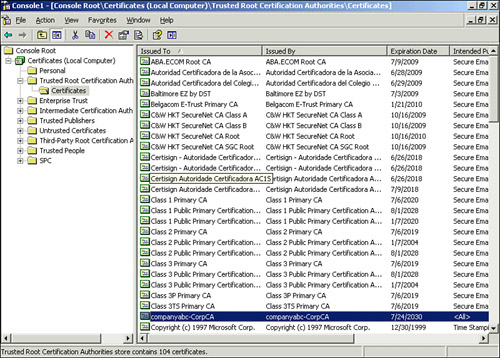
| 12. | Select Place all certificates in the following store and leave the value set to Trusted Root Certification Authorities, and click Next.
| 13. | Click Finish, and OK and the Root CA will appear in the trusted container, as shown in Figure 3.
|
The
next step is to export the Edge Server’s SSL certificates in the same
manner as the Root CA’s certificate was exported in the previous
example. It is then copied to the ISA 2006 SP1 server and imported into
its Personal store for the computer account, using essentially the same
steps as the Root CA certificate import in the previous example. This
makes the certificate available for later configuration of ISA 2006 SP1.
Configure Web Publishing Rules
Web publishing rules are used by ISA Server to
securely publish internal resources over the Internet. In addition to
providing web service URLs for the various Lync Server virtual IIS
directories, it is necessary to create publishing rules for simple URLs.
For each simple URL, it is necessary to create an individual rule on
the reverse proxy that references that URL. The following procedures can
be used to create web publishing rules:
1. | Log on to the ISA 2006 SP1 server.
| 2. | Click Start, All Programs, Microsoft ISA Server, and ISA Server Management.
| 3. | In the left pane, expand the name of the ISA Server.
| 4. | Right-click Firewall Policy, click New, and click Web Site Publishing Rule.
| 5. | On
the Welcome to the New Web Publishing Rule page, enter a name for the
publishing rule that will be easy to reference in the future. Click Next.
| 6. | On the Select Rule Action page, choose Allow. Click Next.
| 7. | On the Publishing Type page, choose Publish a single Web site or load balancer. Click Next.
| 8. | On the Server Connection Security page, choose Use SSL to connect to the published Web server or server farm. Click Next.
| 9. | On
the internal Publishing Details page, enter the FQDN of the internal
web farm where meeting content and the Address Book are hosted in the
internal Site name box.
Note
The ISA Server must be able to resolve the FQDN
entered in step 9. If the ISA Server will not be able to reach a DNS
server that can resolve the FQDN, you will need to select Use a computer name or IP address to connect to the published server and then enter the IP address in the Computer name or IP address box.
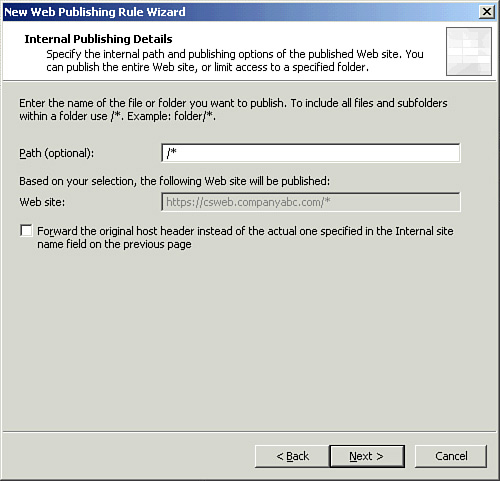
| 10. | On the internal Publishing Details page, enter /* as the path of the published folder, as shown in Figure 4. Click Next.
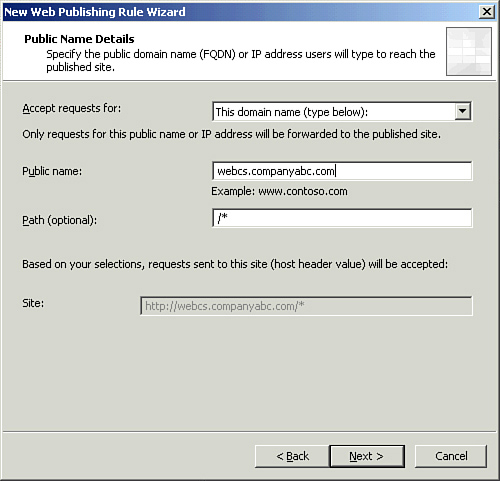
| 11. | On the Public Name Details page, verify that This domain name is selected under Accept Requests for. Type the FQDN of the external web farm into the Public Name box, as shown in Figure 5. Click Next.
| 12. | On the Select Web Listener page, click New.
| 13. | On the Welcome to the New Web Listener Wizard page, enter a name for the new web listener in the Web listener name box. Click Next.
| 14. | On the Client Connection Security page, choose Require SSL secured connections with clients. Click Next.
| 15. | On the Web Listener IP address page, select external, and click Select IP Addresses.
| 16. | On the external Listener IP selection page, select Specified IP address on the ISA Server computer in the selected network, select the IP address, and click Add. Click Next.
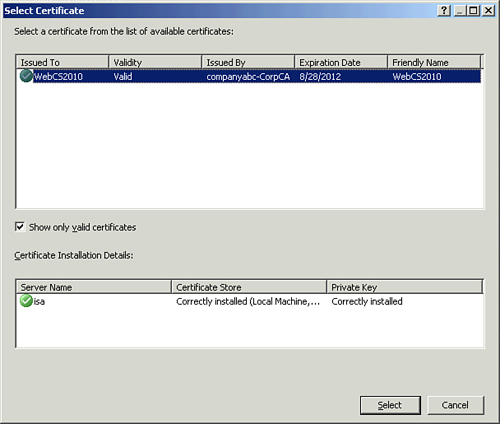
| 17. | On the Listener SSL Certificates page, click Assign a certificate for each IP address, and select the IP address that was added in step 16. Click Select Certificate.
| 18. | On the Select Certificate page, select the certificate matching the public name selected in step 11, as shown in Figure 6 and click Select. Click Next.
| 19. | On the Authentication Setting page, select No Authentication. Click Next.
| 20. | On the Single Sign On Setting page, click Next.
| 21. | On the Completing the Web Listener Wizard page, verify the information and click Finish.
| 22. | On the Authentication Delegation page, select No Delegation, but client may authenticate directly. Click Next.
| 23. | On the User Set page, click Next.
| 24. | On the Completing the New Web Publishing Rule Wizard page, verify the rule settings and click Finish.
| 25. | Click Apply, as shown in Figure 7 to save the changes and update the configuration.

|
To modify the properties of the web publishing rule, perform the following steps:
1. | Log on to the ISA 2006 SP1 server.
| 2. | Click Start, All Programs, Microsoft ISA Server, and ISA Server Management.
| 3. | In the left pane, expand the name of the ISA Server and click Firewall Policy.
| 4. | In the details page, right-click the secure web server publishing rule, and click Properties.
| 5. | On the Properties page, click the From tab.
| 6. | In the This rule applies to traffic from these sources list, click Anywhere, and click Remove.
| 7. | Click Add.
| 8. | In the Add Network Entities dialog box, expand Networks, click external, click Add, and click Close.
| 9. | Click the To tab.
| 10. | Select the Forward the original host header instead of the actual one check box.
| 11. | Click the Bridging tab.
| 12. | Select the Redirect request to SSL port check box and specify port 443.
| 13. | Click the Public Name tab.
| 14. | Add the Subject Alternate Names to this field.
| 15. | Click Apply, and click OK.
| 16. | Click Apply in the details pane to save and update the configuration.
|
Configure Authentication and Certification on IIS Virtual Directories
To correctly pass SSL encrypted packets through the
reverse proxy into the IIS directories on the Lync Server servers, make
sure that certification is properly configured on IIS. This task can be
performed with the following steps:
1. | Log in to a published Lync Server server.
| 2. | Click Start, All Programs, Administrative Tools and select Internet Information Services (IIS) Manager.
| 3. | In the IIS manager, expand the ServerName, and expand Sites.
| 4. | Click Communications Server external Web Site.
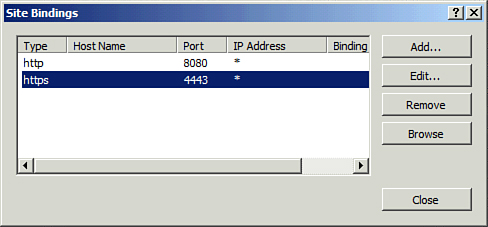
| 5. | In the Actions pane, click Bindings. Verify that the HTTPS is associated with port 4443, as shown in Figure 8 and click HTTPS.
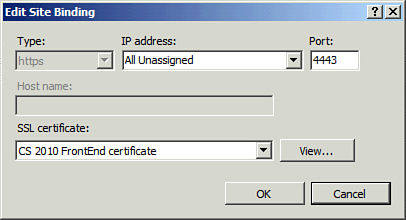
| 6. | In the Edit Site Binding dialog box, verify that the correct certificate is associated, as shown in Figure 9. This should be the certificate used in the previous ISA 2006 SP1 Listener configuration.
| 7. | On the Directory Security tab, click Server Certificate located under Secure Communications.
| 8. | On the Welcome to the Web Server Certificate Wizard page, click Next.
| 9. | On the Server Certificate page, click Assign an existing certificate, and click Next.
| 10. | On the SSL Port page, verify that the value is set to 4443 in the SSL port this Web site should use box and click Next.
| 11. | On the Certificate Summary page, verify the settings, and click Next.
| 12. | Click Finish.
| 13. | Click OK to close the Default Web Site Properties dialog box.
|
Create a DNS Record in the External DNS
For clients on the Internet to find Lync Server
services, add an Address (A) record to an external DNS that is
authoritative for the DNS domain that services Lync Server externally.
This includes (A) or (SRV) records.
Note
The procedure for creating records depends on the DNS
server used. In the case of an externally hosted DNS, it might be as
simple as calling your service provider and requesting the records.
Keep in mind that it might take several minutes to as
much as a few hours for the new records to propagate to an external DNS
server and become available to clients.
Verify Access
Before
making Lync Server available externally, the administrator should
verify that the environment is working correctly through the reverse
proxy. Assuming the firewall rules are in place and that the necessary
DNS records are available externally, the following procedure helps
administrators determine whether their environment is configured
correctly:
1. | From an externally connected computer, open a web browser and type https://externalwebfarmFQDN/abs/
where externalwebfarmFQDN is the external FQDN of the web farm that
hosts the Address Book Service. If the URL returns an HTTP challenge,
the site is configured correctly. You receive this challenge because the
Address Book Server folder is configured to use Microsoft Windows
Integrated Authentication.
| 2. | From an externally connected computer, open a web browser and type https://externalwebfarmFQDN/conf/Tshoot.html
where externalwebfarmFQDN is the external FQDN of the web farm that
hosts meeting content. This URL should display the troubleshooting page
for web conferencing if it is configured correctly.
| 3. | From an externally connected computer, open a web browser and type https://externalwebfarmFQDN/GroupExpansion/service.asmx
where externalwebfarmFQDN is the external FQDN of the web farm that
hosts Group Expansion. If the URL returns an HTTP challenge, the site is
configured correctly. You receive this challenge because the Address
Book Server folder is configured to use Microsoft Windows Integrated
Authentication.
|
|