SharePoint 2010 features a new and improved editing
framework. With these enhancements, editing functionality becomes easier
than it was in previous versions. One comment repeated over and over by
power users when they start using SharePoint 2010 is “I didn’t know
SharePoint could do that!” SharePoint 2010 includes many common
Microsoft Office functionalities, and as a result, users are more aware
of the platform capabilities. Power users can modify and enhance the
sites’ content to provide collaboration and information to the user
base. By default, the new Team Site home page has a Click
To Edit feature, making content changes simple. These new editing
features encourage data and information collaboration among users that
is easy to create, find, and use. In addition, these features will
encourage you to make SharePoint your principal choice for
collaboration.
1. Rich Text Editing
The new Team Site home page contains a Click
To Edit feature that makes content changes simple. Power users can
easily upload images, create links, and add Web Parts with a click of
the mouse. Users with design or higher access can click the Page tab on the Ribbon or choose Edit Page from the Site Actions menu. In SharePoint 2010, the Edit
Page command opens the Wiki Page Home Page feature; it is enabled or
disabled as requirements dictate. If the Wiki Page is disabled, the Team
Site will display as the traditional SharePoint Server 2007 home page.
To check if this feature is enabled or disabled, complete the following
steps.
Click Site Actions and then select Site Settings.
Under the Site Actions group, click Manage Site Features.
Click Active or Deactivate, as shown in Figure 3.

2. The SharePoint Ribbon
SharePoint 2010 uses a
Ribbon similar to the Microsoft Office 2007 and Office 2010 Ribbon and,
just like Office, items are logically grouped. Further, the SharePoint
2010 Ribbon can be customized as needed and retains the users’ security
context. Figure 4 contains an example of the Ribbon for the Team Site home page.

As a page is edited, the Ribbon changes to make relevant operations available on the page or Web Part. For example, Figure 5 shows operations available for content editing on a page.

3. SharePoint Dialog Boxes
New to SharePoint 2010 are the form dialog
boxes, where functions such as creating a new item utilize forms that
appear in the users’ context window instead of redirecting the browser
to a new page. To add a Web Part, users with proper permissions can click the Insert tab in the Action bar, select the Web
Part button, choose the Web Part, and then click Add. During this
process, the page context doesn’t change. The ease with which power
users can navigate and modify SharePoint sites should increase adoption
and empower such users to do more with their sites. Further, the
SharePoint 2010 wiki page allows users to insert Web Parts practically
anywhere on the page.
Some of the most notable new Web Parts released with SharePoint 2010 are
Silverlight viewer
Media Web Part
Chart Web Part
HTML form Web Part
iView Web Part
Search Web Parts
One of the most frequently used Web Parts in SharePoint websites is the Content
Editor Web Part. In SharePoint Server 2007, this Web Part allows users
to enter information using a Microsoft Write experience. Using this Web
Part, power users can type text inside the box and perform basic
functions using—but not limited to—tables, fonts, and images. However,
Microsoft Write is a very simple word-processing program, and
administrators and users alike needed more features and capabilities
than it could offer. Until SharePoint 2010 was introduced, however, the
choices were either to teach HTML to the broad user base or have
administrators or Web developers write code through the source editor.
SharePoint 2010 revamps
and revitalizes the Content Editor Web Part so that it now resembles
Microsoft Word more than Microsoft Write. No longer will users complain
about broken URLs, tables not aligned when published, and so on.
Business users will like this enhanced Web Part because it is so easy to
use, styles can be applied to tags in Page Edit mode, and the user
still has the ability to edit the HTML as necessary. Further, with the
addition of the Ribbon, the Web Part easily converts to XHTML from the
content editing Ribbon shown in Figure 5.
4. Creating Rich Themes
As companies strive to
brand themselves in an ever-changing marketplace, websites must quickly
adapt. SharePoint 2010 has revised and enhanced the way in which power
users and administrators create and apply themes to sites. One of the
most important changes to site themes is the ability to inherit themes
from the parent site. SharePoint 2010 makes theme changes significantly
easier by providing three different methods for defining and changing
themes.
You can use Microsoft PowerPoint 2010, an application already known by most power users.
You have access to enhanced Web-based site themes.
You can create a CSS style sheet and attach to the master page.
Applying site themes
assists content and Web managers in defining the content space by
unifying the branding experience from other corporate media into the
SharePoint website. Departments, divisions, and product lines can be
defined using specific color palettes as needed.
4.1. Creating Themes Using the User Interface
You can create or change a
basic color theme for a site directly through the UI for a site.
Important feature enhancements to the Web interface include the ability
to change the header and body font; the ability to change texts,
accents, and hyperlinks; and a preview mode to view changes before they
are applied to the site. To create or change a site, use the following
steps.
Open the SharePoint site as a site administrator or Web designer.
Click Site Actions and then select Site Settings.
Under Look And Feel, choose Site Theme.
Click Select A Color to change a color of a specific element, or choose a theme from the list.
Click Preview to view the site changes before publishing.
4.2. Creating Themes with Microsoft PowerPoint 2010
SharePoint 2010 no
longer requires users to know and understand Cascading Style Sheets
(CSS) to create a site theme. By utilizing a known application such as
Microsoft PowerPoint 2010, power users can create and apply site themes
quickly and easily. To change a website theme based on Microsoft
PowerPoint 2010, follow these steps.
Open
Microsoft PowerPoint 2010 and either create a new document or open an
existing document. If you use an existing corporate PowerPoint document
that already defines themes and colors for the enterprise, you might not
need to perform steps 2 and 3.
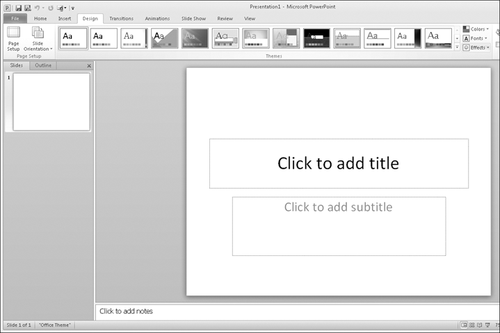
Change
the PowerPoint theme palette, if needed, by clicking the Design tab.
Microsoft PowerPoint has many default themes available for you to use.
Choosing a theme defines styles for the SharePoint site fonts,
hyperlinks, and so on.
Choose
a color palette for the site by clicking Colors. By default, there are
many default color palettes available; choose one of the defaults or
create a new color template. The colors chosen here define the site font
colors for the SharePoint site.
Change the font styles as needed to further refine different text styles. Figure 6 shows a new Microsoft PowerPoint document with customized colors, fonts, and theme.
Save the PowerPoint document as a Microsoft PowerPoint Theme (*.thmx).
Open your SharePoint 2010 top-level site, click Site Actions, and select Site Settings.
Under Galleries, click Themes.
In the new window, browse to your file and keep / as the destination.
Open the SharePoint team site where you want to change the theme, click Site Actions, and then select Site Settings.
Under Look And Feel, choose Site Theme.
Select the newly uploaded theme and click OK.
After completing these
steps, the SharePoint site will refresh to reflect the updated fonts,
colors, and styles defined in the PowerPoint theme file. Additional
customizations can be made, as necessary, by adjusting the theme file,
via the user interface, or by creating customized style sheets.
4.3. Creating Themes Using Style Sheets
You may sometimes need to
modify more than the colors and fonts of a website. You can create site
themes using style sheets and then attach them to master pages through
SharePoint Designer 2010. After you create a style sheet, you attach it
to the master page by following these steps.
Copy
your style sheet to the “14 hive” located by default at
%ProgramFiles%\Common Files\Microsoft Shared\Web Server
Extensions\14\Template\Layout\1033\Styles.
Note:
The exact location of the
CSS style sheet depends on the language pack installed as the default.
In the URL in this step, 1033 has defined English as the language Locale
ID.
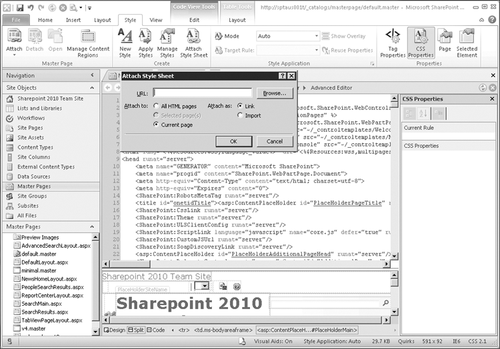
Open the website in SharePoint Designer 2010, as shown in Figure 7.
Open the master page for your site (the default for a site is default.master).
Click Attach Style Sheet from the Ribbon.
Choose whether to apply to all pages or just the current master page and then click OK.
5. Applying the Upgraded 2010 UI to All Sites
Because the UI has changed
significantly in both SharePoint Foundation 2010 and SharePoint 2010,
any customizations that rely on specific CSS classes and UI elements
will work best for users in backward compatibility mode. When you
initiate upgrades to either SharePoint Foundation 2010 or SharePoint
2010, the installer is able to choose either backward compatibility mode
or the upgraded user interface mode. These modes may be toggled between
backward compatibility and the new interface at the site collection
level or site level.
To preserve the look and feel of existing sites, choose the PSConfig or PSConfigUI.
To
preserve the look and feel of existing sites during an upgrade, you can
attach the old content database to a new server farm using Stsadm.
You can use the Web interface
to set all sites in a site collection to the upgraded UI (and prevent
users from using the earlier interface). To do this, follow these steps.
Under Site Settings, click Site Collection Administration.
Click Visual Upgrade to display the page shown in Figure 8.
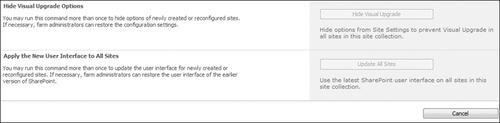
Click
Update All Sites to apply the new interface to all sites. Additionally,
on this page, the site collection administrator can choose to prevent
the upgrade of newly created sites in a site collection to the new
experience. This is important if a SharePoint farm is unable to use the
new look and feel for any reason.
6. Incorporating Rich Media Support
Rich media, a key component
in the collaboration landscape, is another vehicle you can use to get
targeted information to users. Training videos for employees, as opposed
to on-site training sessions, are increasing in popularity as companies
strive to reduce costs. Furthermore, in the “information now” age,
users want information when they need it, where they need it, and within
a few clicks of the mouse. A recent press release from Gartner, Inc.,
was titled “Gartner Predicts That by 2013, More Than 25 Percent of the
Content That Workers See in a Day Will Be Dominated by Pictures, Video
or Audio” (at http://www.gartner.com/it/page.jsp?id=834213).
Clearly there is a growing need for organizations to be able to store,
find, and retrieve media in the same ways as documents. SharePoint 2010
is answering this challenge with rich media capabilities. SharePoint
2010 comes with
The infrastructure to support storing and serving media using the asset library template
Asset library support for RSS/podcasting while still supporting standard document library features
The ability to play videos within SharePoint using the media Web Part or using remote locations
Support for customized skins using Expression Blend 3
Access to playback controls using the JavaScript object model
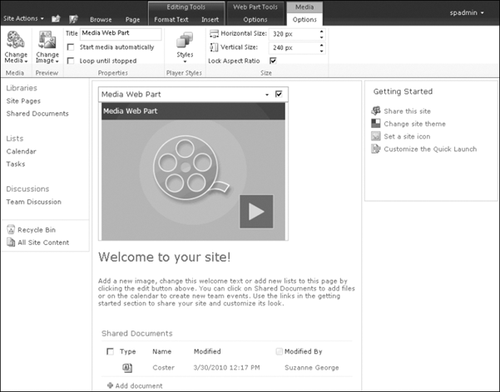
This evolution of rich
media support allows SharePoint 2010 to seamlessly incorporate videos,
audio, and pictures into the collaboration experience without extensive
training or support. For example, the SharePoint Media Player can be
included on any page with a few clicks of the mouse. To insert a
Microsoft Silverlight Web part, complete the following steps.
Click Page in the Site Action toolbar.
Click Edit in the Ribbon.
Under the Editing Tools panel, click Insert.
Click inside the new Web Part to configure player settings. See Figure 9 for Silverlight Player options.