There are two approaches to upgrading your WSS 3.0/MOSS 2007 farm to SharePoint 2010. They are:
In-place upgrade: This is where you will upgrade your current installation on the hardware it currently resides on.
Database attach upgrade:
To perform this type of upgrade, you must have a new SharePoint 2010
farm up and running. You will take the content databases from the MOSS
2007 farm, attach them to the new farm, and upgrade them.
The latter method of
upgrading your MOSS 2007 farm is the preferred method and the one that
this recipe outlines. It has many advantages over the in-place upgrade
method. Some of these advantages are:
It leverages
backup and restore through SQL Server Management Studio. SharePoint IT
Administrators should already be familiar and comfortable using these
tools.
The addcontentdb stsadm
command should already be familiar to many SharePoint Administrators.
It creates a new content database or as in the case outlined in this
recipe, adds a database that needs to be upgraded. Attaching a database
reduces the downtime of your SharePoint installation. This reduces the
pain your customers will feel and enhances the success and acceptance of
your upgrade.
You can
perform the upgrade in an iterative fashion, or even in parallel. The
in-place upgrade is a one-way, don't-look-back upgrade.
You
can have granular control over the steps of your upgrade. You control
what gets upgraded, when, and how. This allows for flexibility, which is
the key to a successful upgrade.
SharePoint 2010 has a
completely different Services architecture as compared to MOSS 2007
Shared Services. This new architecture must be planned carefully and
implemented according to the organization's needs. By doing a database
attach, your farm will correctly consume the new architecture as
architected.
Getting ready
The preupgradecheck
should already have been run on your current installation and any
issues should have been resolved. Be sure to identify the content
database that is being upgraded.
A new SharePoint Server 2010 farm must be set up and configured using a web application.
You must have access to SQL Management Studio with the ability to create databases.
How to do it...
1. Log in to the WSS 3.0/MOSS 2007 database server.
2. Open Microsoft SQL Server Management Studio and connect to the database server hosting the SharePoint content database.
3. In the Object Explorer, click on the folder named Databases.
4. Find the identified content database. By default, this is called wss_content_{guid}. The {guid} is a unique number generated when the database is created but it may not be present.
5. Right-click on the content database and select Tasks | Back Up. A screen similar to the following screenshot appears:
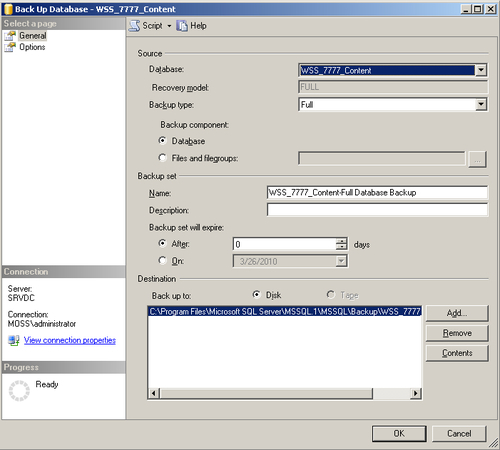
6. Ensure Backup type is set to Full. Also the Name and Destination field should be populated correctly.
7. Click OK. The file should be backed up successfully after a period of time.
8.
Ensure the backup is accessible to the SharePoint 2010 database server.
If the SQL Server is physically not on the same server as SharePoint,
copy the backup to the destination server where it is accessible.
9. Through SQL Server Management Studio, connect to the SQL Server instance where the SharePoint 2010 databases are installed.
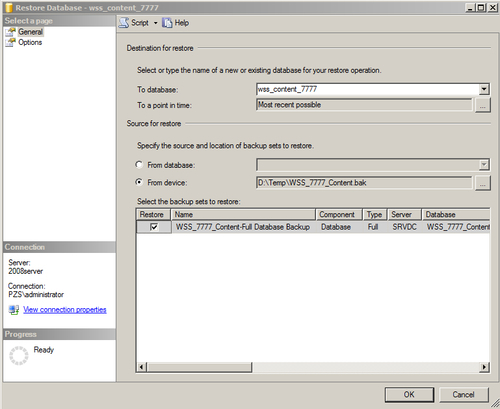
10. In the Object Explorer window, right-click Databases. Navigate and click on Restore Database. The following screenshot appears and must be filled with appropriate values:
11. After the content database is successfully restored, it must be added to the SharePoint 2010 Web Application using addcontentdb, which is an argument to the stsadm command.
12.
Open a command window. Make sure to run it as administrator when you
open it. If you right-click on the command prompt, there is an option
provided to Run as Administrator.
13. Type in the following command:
stsadm o addcontentdb url <url> -databasename <database name>
Here is the screenshot I get when I run this command:

14. When the operation finishes successfully, navigate to the SharePoint 2010 Central Administration site.
15. Click the Application Management option. Under Site Collections, click the Change Site Collection Administrators option.
16. Ensure that there is a valid site collection administrator.
Navigate to the new site.
How it works...
Steps 1 through 7 showed how
to take a backup of the content database that was being upgraded. Step 8
is copying the physical file that is created from the backup to the new
server. Using file storage and rights, the file may not have to be
copied. The important part of this process is that the new SQL instance
for SharePoint 2010 has access to this file.
Steps 9 through 11 performed a restore to put the backup file into the new SQL database instance.
Steps 12 through 14 ran the
command that performs the physical upgrade of the file. An upgrade of
the content database is nothing more than schema changes, table changes,
and stored procedure changes. It also adds the content database to the
specified web application.
In steps 15 and 16, we, as Farm
Administrators, ensured that the Site Collection Administrator from
MOSS 2007 is still a valid account in the now upgraded SharePoint 2010
farm.
The database attach method is
the least intrusive upgrade when it comes to your SharePoint Farms. For
SharePoint 2010, upgrading with addcontentdb can be done only through the stsadm command; its functionality is not found in the Central Administration User Interface.
Finally, there is a parameter called preserveolduserexperience in the addcontentdb command. This is an optional parameter and set to true
by default. When the site is upgraded to SharePoint 2010, it will
contain the same look as it did in MOSS 2007. If you want the site to
use the new SharePoint 2010 look, then ensure that you use this
parameter and set it to false.
Depending on the farm
architecture, you may have more than one content database per web
application. In a case such as this, it is more efficient to upgrade
both simultaneously. This is accomplished by doing multiple attaches in
parallel. Instead of using the addcontentdb command, use PowerShell and the Mount-SPContentDatabase command.
There's more...
Before adding the
content database to the web application, there is an additional tool
that has been added via SharePoint's PowerShell commands. This tool
confirms that the new web application has all the necessary components
to support the upgrade. It functions by comparing the database you are
about to attach/upgrade against the web application you wish to attach.
The command is Test-SPContentDatabase.
1. Click Start | All Programs. Select Microsoft SharePoint 2010 Products and then SharePoint 2010 Management Shell. Refer to the following screenshot:

2. At the command prompt, type in the following command:
test-spcontentdatabase name <database name> webapplication <url>
This
command will produce a report in the window that can be piped to a file
through PowerShell. The report will identify issues such as missing site
definitions, features, or assemblies. The benefit of this command is
that it works read-only against your web application so that it can be
run iteratively. As you resolve issues, you can rerun the command.
Keep this command as part
of the IT Professional toolkit. It is very useful to scan and identify
issues against WSS 3.0/MOSS 2007 and SharePoint 2010 databases.
More info—further upgrade info
After the upgrade and migration
is complete, you will see a successful or unsuccessful indicator in the
command prompt. However, the best place to view the status of your
upgrade is in Central Administration. This is especially true if there
are parallel upgrades happening.
1. Open the SharePoint 2010 Central Administration site.
2. Click Upgrade and Migration.
3. Click Check Upgrade Status. There will be a screenshot similar to the following:
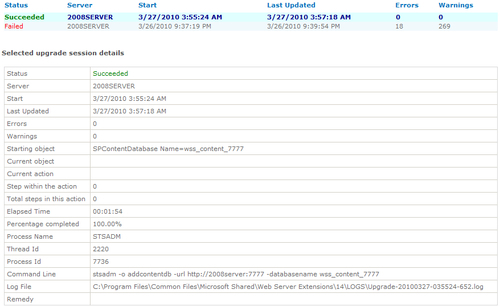
As can be seen in the preceding
screenshot, there were two upgrades that took place. One failed and one
succeeded. One of the items on the report is the location of the log
file, which shows detailed information about the failures.
There is also a custom error log file created that is necessary to look at when there are errors in the upgrade.
Also, there is a category named Remedy. In here is located a hyperlink to a possible resolution for the issues found.
More info—errors when upgrading
There are times when the upgrade fails. If that occurs, you may see a screen similar to the following:

When this occurs, you are directed to the log file in order to determine what the issue is and how to go about resolving it.