6. Creating a Domain Controller
After you add the AD DS role,
the files required to perform the role are installed on the server;
however, the server is not yet acting as a domain
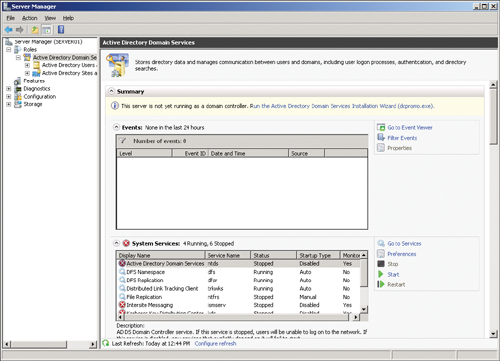
controller. You must subsequently run the Active Directory Domain
Services Installation Wizard, which can be launched by using the Dcpromo.exe command, to configure, initialize, and start Active Directory.
6.1. Practice Creating a Windows Server 2008 R2 Forest
6.1.1. Practice Creating a Windows Server 2008 R2 Forest
In this practice, you create
the AD DS forest for Contoso, Ltd. This forest will be used for
exercises throughout this training kit. You begin by installing Windows
Server 2008 R2 and performing post-installation configuration tasks. You
then add the AD DS role and promote the server to a domain controller
in the contoso.com forest, using the Active Directory Domain Services
Installation Wizard.
EXERCISE 1 Install Windows Server 2008 R2
In this exercise, you install Windows Server 2008 R2 on a computer or virtual machine.
Power on the system and insert the Windows Server 2008 R2 installation DVD. If
you are using a virtual machine (VM), you might have the option to
mount an ISO image of the installation DVD. Consult the VM Help
documentation for guidance. If
the system’s hard disk is empty, the system should boot to the DVD. If
there is data on the disk, you might be prompted to press a key to boot
to the DVD. If the system
does not boot to the DVD or offer you a boot menu, go to the BIOS
settings of the computer and configure the boot order to ensure that the
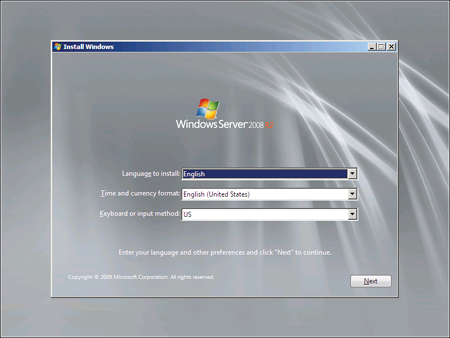
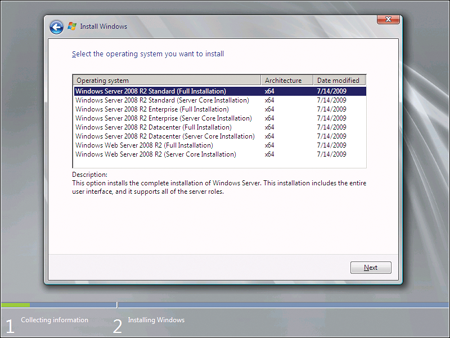
system boots to the DVD. The Install Windows Wizard appears, as shown in Figure 4. Select the language, regional setting, and keyboard layout that are correct for your system, and then click Next. Click Install Now. Setup starts, and a list of versions to install appears, as shown in Figure 5. Select Windows Server 2008 R2 Standard (Full Installation) and click Next. Select the I Accept The License Terms check box and click Next. On the Where Do You Want To Install Windows page, select the partition on which you want to install Windows Server 2008. If
you need to create, delete, extend, or format partitions, or if you
need to load a custom mass storage driver to access the disk subsystem,
click Driver Options (Advanced).
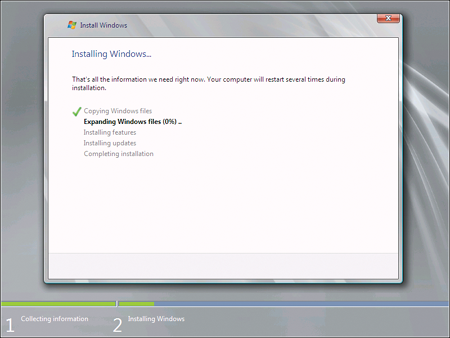
Click Next. The Installing Windows page appears, as shown in Figure 6. The window keeps you apprised of the progress of Windows installation. Note: If you are installing over an existing version of Windows, the installer warns you at this point and prompts you to continue. Installation of Windows
Server 2008 R2 is image based. Therefore, installation is significantly
faster than previous versions of Windows, even though the operating
systems themselves are much larger than earlier versions. The computer
will restart one or more times during installation.
When the installation is complete, you are informed that the user’s password must be changed before logging on the first time. Type a password for the Administrator account in both the New Password and Confirm Password boxes and press Enter. The password must be at least seven characters long and must have at least three of four character types:
Note:
DO NOT FORGET THIS PASSWORD
Without it, you will not be able to log on to the server to perform other exercises in this training kit. Alternately, you can select the Create
A Password Reset Disk option to start a wizard that creates a disk that
you can use to recover the password, should it be misplaced or
forgotten.
Click OK. The desktop for the Administrator account appears.
EXERCISE 2 Perform Post-Installation Configuration
In this exercise, you
perform post-installation configuration of the server to prepare the
server with the name and TCP/IP settings required for exercises in this
training kit.
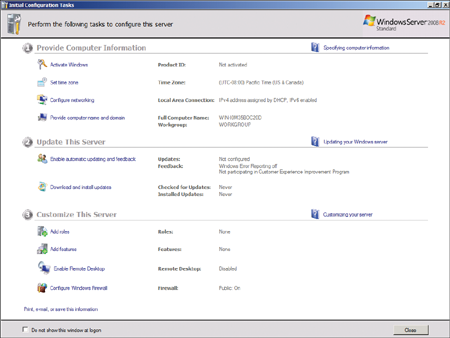
Wait for the desktop for the Administrator account to appear. The Initial Configuration Tasks window appears, as shown in Figure 7. This tool is designed to make it easy for you to perform best practice, post-installation configuration tasks.
In the Initial Configuration Tasks window, click Provide Computer Name And Domain. In the System Properties window on the Computer Name tab, click Change. Change the text in the Computer Name box to SERVER01, and then click OK. In the Computer Name/Domain Changes dialog box, click OK. In the System Properties dialog box, click Close. You
are prompted to restart the computer to apply these changes. Do not
restart this computer until instructed to do so later in this exercise. Click Configure Networking in the Initial Configuration Tasks window. The
remaining exercises in this lesson create a domain using IP addresses
in the 10.0.0.11–10.0.0.20 range, with a subnet mask of 255.255.255.0.
If these addresses are used in your production environment, and if the
server is connected to your production environment, you must change the
IP addresses accordingly so that the contoso.com
domain you create in these practices does not conflict with your
production network. Right-click Local Area Connection, and then click Properties. Click Internet Protocol Version 4 (TCP/IPv4), and then click Properties. Windows Server 2008 R2 also provides native support for Internet Protocol Version 6 (TCP/IPv6). Click Use The Following IP Address. Enter the following configuration: IP address: 10.0.0.11 Subnet mask: 255.255.255.0 Default gateway: 10.0.0.1 Preferred DNS server: 10.0.0.11
Click OK, and then click Close. Close the Network Connections window. Click Set Time Zone, and then configure the time zone as appropriate for your environment. If
the server is connected to the Internet, it is recommended that you
click Download And Install Updates so that you can update the server
with the latest security updates from Microsoft. Note the Add Roles and Add Features links in the Initial Configuration Tasks window. In
the next exercise, you use Server Manager to add roles and features to
SERVER01. These links are another way to perform the same tasks. The default behavior for the Initial Configuration Tasks window is to appear each time you log on to the server. Select
the Do Not Show This Window At Logon check box to prevent the Initial
Configuration Tasks window from appearing the next time you log on. If you need to open the Initial Configuration Tasks window in the future, run the Oobe.exe command. When prompted to restart, click Yes.
Note:
CREATE A SNAPSHOT OF YOUR VIRTUAL MACHINE AFTER RESTART
If you are using a virtual
machine to perform this exercise, and the virtual machine enables you
to create point-in-time snapshots of the machine’s state, create a
snapshot at this time. This baseline installation of Windows
Server 2008 R2 can be used to perform the exercises in this article ,
which allow you to experiment with the variety of methods of adding the
AD DS role.
EXERCISE 3 Install a New Windows Server 2008 R2 Forest with the Windows Interface
In this exercise, you add the AD
DS role to the server you installed and configured in Exercise 1,
“Install Windows Server 2008 R2,” and Exercise 2, “Perform
Post-Installation Configuration.”
Log on to the server with the Administrator account and password used in Exercise 1. If Server Manager does not open automatically, open it from the Administrative Tools program group. In
the Roles Summary section of the home page, click Add Roles. You might
need to scroll down to see the Roles Summary portion of the window. In the first page of the Add Roles Wizard, click Next. On the Select Server Roles page, select the check box next to Active Directory Domain Services. When prompted to add required features for Active Directory Domain Services, click Add Required Features to proceed. On the Select Server Roles page, click Next. On the Active Directory Domain Services page, click Next. On the Confirm Installation Selections page, click Install. The Installation Progress page reports the status of installation tasks. On the Installation Results page, confirm that the installation succeeded, and then click Close. In
the Roles Summary section of the Server Manager home page, you’ll
notice an error message indicated by a red circle with a white x. You’ll
also notice a message in the Active Directory Domain Services section
of the page. Both of these links take you to the Active Directory Domain
Services roles page of Server Manager, shown in Figure 8. The message shown reminds you that it is necessary to run Dcpromo.exe, which you will do in the next exercise.
EXERCISE 4 Install a New Windows Server 2008 R2 Forest
In this exercise, you use the Active Directory Domain Services Installation Wizard (Dcpromo.exe) to create a new Windows Server 2008 forest.
Click Start, click Run, type Dcpromo.exe, and then click OK.
Note:
DCPROMO WILL ADD THE AD DS ROLE IF NECESSARY
In the previous exercise you added the AD DS role by using Server Manager. However, if you run Dcpromo.exe on a server that does not yet have the AD DS role installed, Dcpromo.exe will install the role automatically.
The Active Directory Domain Services Installation Wizard appears. On
the Operating System Compatibility page, review the warning about the
default security settings for Windows Server 2008 R2 domain controllers,
and then click Next. On the Choose A Deployment Configuration page, select Create A New Domain In A New Forest, and then click Next. On the Name The Forest Root Domain page, type contoso.com, and then click Next. The system performs a check to ensure that the DNS and NetBIOS names for the forest are not already in use on the network. On the Set Forest Functional Level page, choose a forest functional level of Windows Server 2008 R2, and then click Next. Each
of the functional levels is described in the Details box on the page.
Choosing Windows Server 2008 R2 forest functional level ensures that all
domains in the forest operate at the Windows Server 2008 R2 domain
functional level, which enables several new features provided by Windows Server 2008 R2.
The Additional
Domain Controller Options page appears. DNS Server is selected by
default. The Active Directory Domain Services Installation Wizard
creates a DNS infrastructure during AD DS installation. The first domain
controller in a forest must be a global catalog (GC) server and cannot
be a read-only domain controller (RODC). Click Next. A
warning appears that informs you that a delegation for the DNS server
cannot be created. In the context of this exercise, you can ignore this
error.
On the Location For Database, Log Files, And SYSVOL page, accept the default locations for the database file, the directory service log files, and the SYSVOL files, and click Next. The best practice
in a production environment is to store these files on three separate
volumes that do not contain applications or other files not related to
AD DS. This best practices design improves performance and increases the
efficiency of backup and restore. On the Directory
Services Restore Mode Administrator Password page, type a strong
password in both the Password and Confirmed Password boxes. Click Next. Do not forget the password you assigned to the Directory Services Restore Mode Administrator. On the Summary page, review your selections. If any settings are incorrect, click Back to make modifications. Click Next, and then click Finish. Configuration of AD DS begins. The server will require a reboot when the process is completed.
|