Maintaining the Lync Server Back End
databases is important to the overall health and performance of a Lync
deployment. Yet this is an aspect that frequently gets overlooked,
primarily because Lync administrators are kept busy caring for other
aspects of the Lync environment.
Fortunately, Microsoft has provided
maintenance plans as a way to automate the tasks required to maintain
SQL database health. A maintenance plan performs a comprehensive set of
SQL Server jobs that run at scheduled intervals. For example, a
maintenance plan can include tasks that ensure that databases are
performing optimally, are regularly backed up, and are checked for
anomalies.
Tip
SQL maintenance plans should be scheduled to run during off-peak hours to minimize the performance impact.
The example SQL Server maintenance plan
configuration below is based on SQL Server 2012, however the steps are
very similar for SQL Server 2008 R2. The following steps are used to
configure a SQL Server database maintenance plan:
1. Log on to the
server where Lync Back End databases are installed using an account
with SQL administrative rights, and open SQL Server Management Studio.
2. At the Connect to
server prompt, keep the default options of connecting to the local
server with Windows Authentication, and click Connect.
3. In the Object Explorer, expand Management, and then right-click on Maintenance Plans and select Maintenance Plan Wizard.
Tip
If the Maintenance Plan Wizard is initiated
on a new instance of SQL Server, an error might occur stating that the
command cannot be executed due to the security configuration for the
server. If this is the case, the SQL Server Agent extended stored
procedures need to be enabled. You can do this by executing the
following statements in the SQL Query window:
sp_configure 'show advanced options', 1;
GO
RECONFIGURE;
GO
sp_configure 'Agent XPs', 1;
GO
RECONFIGURE
GO
4. At the SQL Maintenance Plan Wizard screen, click Next to begin the configuration.
5. At the Select Plan
Properties screen, enter a name and description for the maintenance
plan. Several options are also presented for the scheduling of the
maintenance plan. To configure separate schedules for individual tasks
within a single maintenance plan, select Separate Schedules for Each
Task. To configure a single schedule for the entire plan, select Single
Schedule for the Entire Plan or No Schedule. If this option is
selected, the Change button is available to configure the scheduling
for the plan.
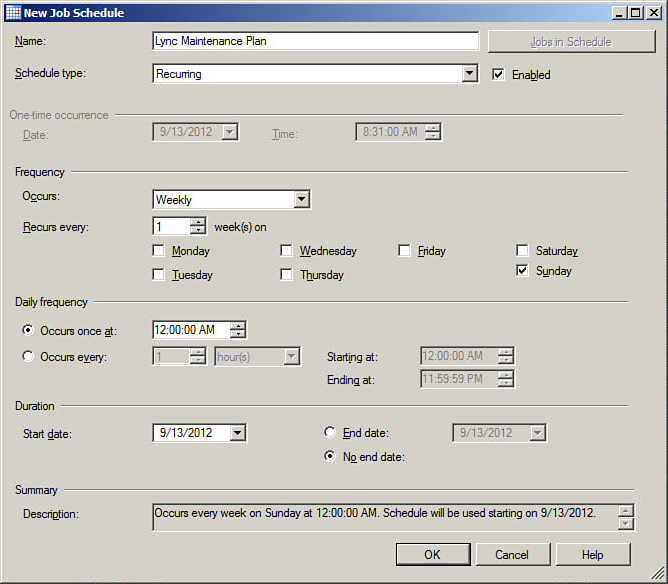
6. Click Change to display the New Job Schedule dialog box, shown in Figure 11.
Select from the available scheduling options to configure the frequency
and timing of the plan. When finished, click OK to save the schedule,
and click Next to continue with the Maintenance Plan Wizard.

Figure 1. SQL maintenance plan scheduling.
7. On the Select Maintenance Tasks screen, select the maintenance tasks to include in the plan, and then click Next to continue.
8. At the Select
Maintenance Task Order page, review the order in which the tasks will
be executed. If necessary, change the order by selecting a task and
then clicking either Move Up or Move Down as needed. When finished,
click Next.
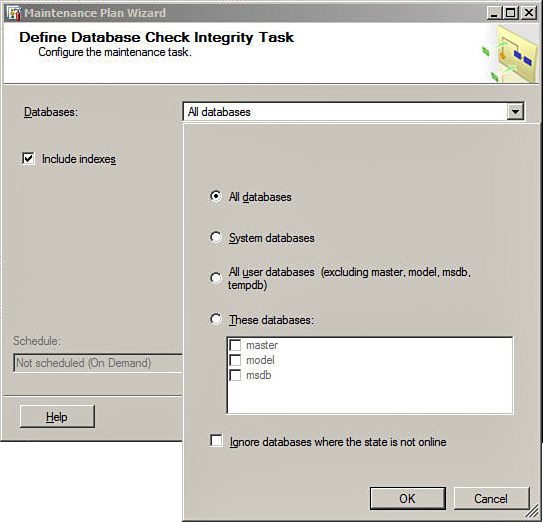
9. The wizard now provides options for each task that was selected. For example, Figure 2
shows the configuration options for the Database Check Integrity task.
Using this example, the All Databases option has been selected for
integrity checking.

Figure 2. Configuration of the Database Check Integrity task.
Tip
From the list of available maintenance tasks,
the Check Database Integrity and Maintenance Cleanup tasks should be
selected for all Lync Server databases. It is also recommended to not
select the Shrink Database task, primarily because the automatic
shrinking of databases on a routine basis leads to excessive
fragmentation as well as excessive I/O, which can negatively impact the
performance of Lync Server.
10. Continue the
configuration of each task that was selected as part of the maintenance
plan on each successive screen, selecting the desired options.
11. At the Select
Report Options page, keep the default option of Write a Report to a
Text File, and change the report file location if necessary. If an
email report is desired, select this option and enter the target email
address. When finished, click Next.
12. At the Complete the Wizard screen, review the listed options for accuracy and then click Finish to complete the Wizard.