The CSS Styles panel is
Dreamweaver's central point for establishing, modifying, and learning
about Cascading Style Sheets. It is, by far, the most complex and
sophisticated of any of Dreamweaver's panels and requires a bit of
explanation to help you to understand how best to use it. You can open
the CSS Styles panel by choosing Window =>
CSS Styles or use the keyboard shortcut, Shift+F11; the CSS Styles
panel is available by default and its title bar can be double-clicked to
expose it as well.
The CSS Styles panel can be viewed in two separate
ways: All mode and Current mode. In brief, All mode displays the
embedded and external CSS styles contained in the current page; it does
not display inline styles. Current mode shows every style rule affecting
the current selection on the page, regardless of whether the source is
defined in an inline, embedded, or external style rule.
Personally, I tend to work in All mode during the
initial development of a page and then switch to Current when I need to
drill down into a particular style. Both modes allow for rapid
modification of any defined CSS properties and the equally speedy
setting of new attributes.
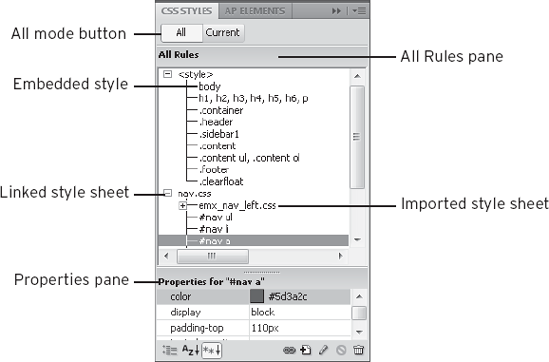
1. All mode
Enter All mode by selecting All at the top of the CSS
Styles panel. Once selected, you'll note that the panel is divided into
two parts, the All Rules pane and the Properties pane. The All Rules
pane shows every embedded and external style rule associated with the
current page. Select any rule to see its properties and values in the
Properties pane (see Figure 1).
Dreamweaver's All mode enables you to tell, at a
glance, where a custom style is from — whether it's from a linked
external style sheet or included in the current document. The CSS Styles
panel displays the containing tag <style> if the styles are embedded or imported; expand the <style>
entry to determine if it contains styles or an imported sheet or both.
You may recall that the code for importing a style sheet is placed
within a <style> tag. Linked style sheets are shown with just the filename, as you can see in Figure 6-1.
NOTE
The style rules are presented in the order they
appear in the embedded style tag or external style sheet. To adjust the
order of the rules, drag the style rule you want to move to its new
location.
Select any rule in the All Rules pane to see its
properties and values in the Properties pane. By default, only the
currently set properties are displayed. There are two other ways to
display the properties, Category view and List view. You can choose the
way you'd like to see the properties by selecting from one of the
buttons on the bottom left of the Properties pane:
Category View:
Separates the CSS properties and values into the same nine categories
found in the CSS Rule Definition dialog: Font, Background, Block,
Border, Box, List, Positioning, Extensions and Tables, and Content and
Quotes. This view is useful when you want to add one or more new
properties in a specific category.
List View:
Shows an alphabetical listing of the properties with the applied ones
listed first. Use this view when you know the name of a property but
don't want to enter it by hand.
Show Only Set Properties:
Displays only the currently set properties as well as an option to add a
new one. Once you've gained familiarity with CSS properties, you'll
find this view the most efficient because it both isolates your current
properties and provides a direct route to defining new ones.
2. Current mode
As the name implies, Current mode focuses on the current selection (see Figure 2);
click Current to enter into this mode. Current mode has three separate
panes rather than the two for All mode — you can change the height of
any by dragging the separating border up or down within the CSS Styles
panel.
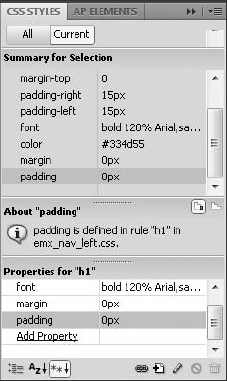
Choose any entry in the Tag Selector or select any
section of the page and the CSS Styles panel under Current mode displays
all the properties applicable to that selection, regardless of their
origin, in the top section known as the Summary for Selection pane. The
next area on the panel is the Rules pane, which either shows information
about the property currently selected in the Summary for Selection pane
or all the rules affecting the current selection; two buttons on the
Rules pane title bar allow you to switch between views. The final area
in Current mode — the Properties pane — works the same way as it does in
All mode.
The Summary for Selection pane lists both properties
and values; each entry is listed in order of specificity, the property
with lowest specificity appearing first. Furthermore, if there are two
conflicting properties, only the one with the highest specificity is
shown. Although subtle, these applications of specificity are a valuable
debugging and teaching tool.
For instance, let's say you're trying to change the
line-height of a particular paragraph where the property is declared in
two different rules: p and .openingParagraph. If you try to change the line-height for the p
rule, you won't see a difference in either Dreamweaver or your browser.
A glance at the Summary for Selection pane while the paragraph in
question is selected will show just the property for the .openingParagraph rule.
How do you tell which rule a displayed property is
from? Dreamweaver offers a number of methods. Hover your cursor over any
property in the Summary for Selection pane and the property's location —
both rule and document — appear in a tooltip. The Rules pane provides
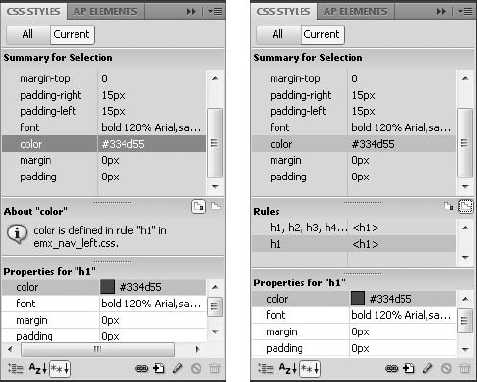
another alternative. Click any property in the Summary for Selection
pane and, if the Rules pane is in the About view, you'll see a brief
sentence describing the property's location. When in Rules view, the
Rules pane shows a cascade of all of the — you guessed it — rules
affecting the current selection; the one containing the property
selected in the Summary for Selection pane is highlighted as shown in Figure 3.
You switch between the About view and the Rules view by clicking the
Show Information about Selected Property button and the Show Cascade of
Rules for Selected Tag button, respectively, located on the right of the
Rules pane title bar.
|
Move your cursor over any property in the Rules pane
while in Rules view to see the tooltip that notes both the property's
location and specificity.
|
|
The final pane, Properties, is almost exactly the
same in the Current mode as it is in All mode. Again, the Show Only Set
Properties option is the default and you can, if desired, switch to
either Category or List view by using the buttons at the bottom of the
CSS Styles panel.
The Properties pane in
Current mode differs from the same pane in All mode in one respect: Both
applied and irrelevant properties are displayed. The irrelevant
properties are noted with a strikethrough. If you place your cursor over
the property, Dreamweaver displays a tooltip explaining why the
property is not relevant. The two most common reasons a property is
marked as irrelevant are because it is overridden by another rule or not
inherited.