IT tutorials
 
Graphics
 

Adobe Illustrator CS5 : Working with Objects - Creating Polygons and Stars, Creating Line Segments

1/13/2013 11:03:58 AM
- Free product key for windows 10
- Free Product Key for Microsoft office 365
- Malwarebytes Premium 3.7.1 Serial Keys (LifeTime) 2019

1. Creating Polygons and Stars

The Polygon and Star tools work in much the same way as the Ellipse and Rectangle tools do to allow you to easily create complex vector shapes. You can use these tools to create either polygons or stars. Polygons are shapes based on a center radius and a number of sides, while stars are shapes based on two center radiuses: one for the distance from the center of the star to the innermost points, and another for the distance from the center to the outermost points. Experiment with several options to get the kind of shape you want.

Draw a Polygon or Star Shape

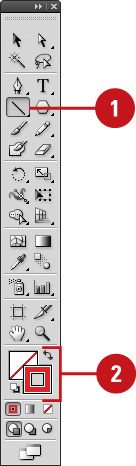
1. Select the Polygon or Star tool on the Tools panel.

The pointer becomes a crosshair that you can drag anywhere on the artboard.

2. Select a Stroke and Fill color from the Colors area of the Tools panel.

3. Click and drag on the artboard, and then release the mouse.

Timesaver

Press and hold Shift while you drag to create a proportional shape.

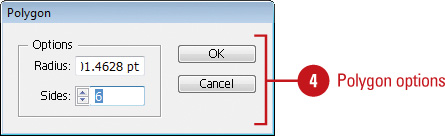
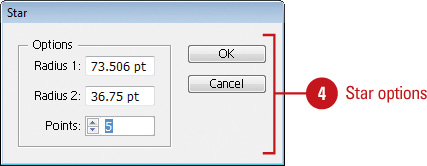
4. To create a shape with a specific radius and number of sides or points, click on the artboard where you want the center of the shape, enter the following values, and then click OK.

  • Polygon. Enter a radius and number of sides for the polygon. To create a triangle, enter 3 sides.

  • Star. Enter radius 1 for the distance from the center of the star to the innermost points and enter radius 2 for the distance from the center to the outermost points.


2. Creating Line Segments

The Line Segment tool draws perfectly straight lines in any direction you drag your mouse. In Illustrator, a line is called a stroke and there is a variety of thicknesses, styles, colors, and fills that can be applied to it. You can also create your own line style for specific types of dashed, dotted or artistic lines. You can constrain the path a line draws to 45-degree angles or create closed shapes by intersecting the lines you draw.

Draw a Line Segment

1. Click the Line Segment tool on the Tools panel.

The pointer becomes a crosshair that you can drag on the artboard.

Timesaver

Press \ to select the Line tool.

2. Select a Stroke color from the Colors area of the Tools panel.

3. Click and drag on the artboard, and then release the mouse when the line is the length you need.

Timesaver

Hold down the Shift key, and then drag to draw a 45, 90, or 180 degree line.

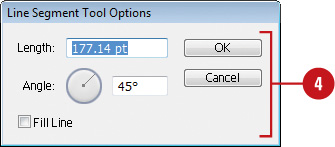
4. To create a line with a specific length and angle, click on the artboard where you want the line to begin, enter length and angle values, select the Fill Line check box to fill the line with the current fill color, and then click OK.

 
Others
 
- Adobe Photoshop CS5 : Sizing Digital Images - Resizing an Image (part 4) - Content-Aware Scaling, Puppet Warp, Using Smart Objects Before Transforming
- Adobe Photoshop CS5 : Sizing Digital Images - Resizing an Image (part 3) - Rotate Canvas Command, Free Transform Command
- Adobe Photoshop CS5 : Sizing Digital Images - Resizing an Image (part 2) - Crop Tool
- Adobe Photoshop CS5 : Sizing Digital Images - Resizing an Image (part 1) - Image Size, Canvas Size
- Adobe Photoshop CS5 : Sizing Digital Images - Resolution Revisited, Resampling
- Adobe After Effects CS5 : Expressions - Creating Expressions
- Adobe Fireworks CS5 : Working with Vector Graphics - Basic vector drawing techniques
- Adobe Fireworks CS5 : Working with Selections - Converting a selection to a path
- Adobe Flash Professional CS5 : Working Within the Flash Environment - Working with Layers
- Adobe Flash Professional CS5 : Working Within the Flash Environment - Using the Timeline
 
 
Top 10
 
- Microsoft Visio 2013 : Adding Structure to Your Diagrams - Finding containers and lists in Visio (part 2) - Wireframes,Legends
- Microsoft Visio 2013 : Adding Structure to Your Diagrams - Finding containers and lists in Visio (part 1) - Swimlanes
- Microsoft Visio 2013 : Adding Structure to Your Diagrams - Formatting and sizing lists
- Microsoft Visio 2013 : Adding Structure to Your Diagrams - Adding shapes to lists
- Microsoft Visio 2013 : Adding Structure to Your Diagrams - Sizing containers
- Microsoft Access 2010 : Control Properties and Why to Use Them (part 3) - The Other Properties of a Control
- Microsoft Access 2010 : Control Properties and Why to Use Them (part 2) - The Data Properties of a Control
- Microsoft Access 2010 : Control Properties and Why to Use Them (part 1) - The Format Properties of a Control
- Microsoft Access 2010 : Form Properties and Why Should You Use Them - Working with the Properties Window
- Microsoft Visio 2013 : Using the Organization Chart Wizard with new data
Technology FAQ
- Is possible to just to use a wireless router to extend wireless access to wireless access points?
- Ruby - Insert Struct to MySql
- how to find my Symantec pcAnywhere serial number
- About direct X / Open GL issue
- How to determine eclipse version?
- What SAN cert Exchange 2010 for UM, OA?
- How do I populate a SQL Express table from Excel file?
- code for express check out with Paypal.
- Problem with Templated User Control
- ShellExecute SW_HIDE
programming4us programming4us