You can create faux-3D effects by skewing and scaling
graphics with the Free Transform tool (as described in the previous
section); however, this task has been made a whole lot easier by the new
3D tools available in Flash CS5. Instead of using your math and
geometry skills to approximate perspective, you can simply click and
drag intuitive handles and Flash applies distortion to your graphics to
give them the appearance of existing in 3D space.
The 3D Rotation tool and the 3D
Translation tool are both found in the Tools panel just below the Free
Transform tool. Settings for these tools can be accessed in the
Transform panel when the 3D tools are active or a 3D symbol is selected
in your Document window. If you haven't worked with 3D tools before, the
various options can be a little disorienting at first, but with a
little trial and error you will soon get your bearings.
NOTE
To use the 3D tools in
Flash, the Publish settings of your FLA file must be set to Flash Player
10 and ActionScript 3.0. All elements must be converted into Movie Clip
instances to apply 3D Rotation or Translation.
To help you get started, I have
included definitions for some of the terms you will come across when
working with Flash symbols in 3D space:
x-axis:
Sets the position of the symbol in relation to the Stage, tracked from
left to right. Rotating (transforming) a symbol around the x-axis is
like flipping a Rolodex. Moving (translating) an object along the x-axis
makes it appear closer to the left or right side of the Stage.
y-axis:
Sets the position of the symbol in relation to the Stage, tracked from
top to bottom. Rotating a symbol around the y-axis is like turning a
revolving door. Moving an object along the y-axis makes it appear closer
to the top or bottom of the Stage.
z-axis:
Sets the position of the symbol in relation to the depth of the space.
This is the third axis that was added to Flash CS5 to support
transformation and rotation of symbols for (faux) 3D. Rotating an object
around the z-axis is like spinning a bicycle tire or moving the hands
of a clock, although the center point can be adjusted so it is not
always in the middle of the symbol. Moving an object along the z-axis
makes it appear larger (closer) or smaller (farther away).
3D Translation:
Changing the location of a symbol in 3D space is called a translation.
The 3D Translation tool provides handles for moving a symbol along the
x, y, and z-axis individually.
3D Transformation:
Rotating an object in 3D space is called a transformation. The 3D
Rotation tool provides handles for rotating a symbol along the x, y, and
z-axis individually or along the x and y-axis at the same time — for
"free rotation."
3D Center point:
By default, the 3D center point is usually the center point of the
symbol, but by moving the 3D center point you can change the way 3D
transformations (rotations) affect the symbol, in the same way that
changing the center point for scaling or rotating an object in 2D space
modifies the outcome of any changes.
Global 3D space:
This is the default setting for the 3D tools and means that any changes
to location or rotation of a symbol are made in relation to the main
Stage drawing area.
Local 3D space:
This is an alternative setting for the 3D tools (a toggle button at the
bottom of the Tools panel appears when 3D tools are active), and it
restricts changes to location or rotation of nested symbols to the
drawing space of the container symbol.
1. Controlling the camera view: Perspective and vanishing point
There is only one camera
view in the authoring environment for your Flash movie. The camera view
consists of a perspective angle and a vanishing point: These global
settings are available in the 3D Position and View section of the
Properties panel when a symbol with 3-D translation or rotation is
selected on the Stage. Changing the settings affects all 3-D symbols in
your Flash movie but does not affect other elements.
NOTE
If you are controlling
3D Movie Clips with ActionScript rather than using the 3D tools in the
authoring environment, you can create multiple vanishing points and
unique camera views for each Movie Clip.
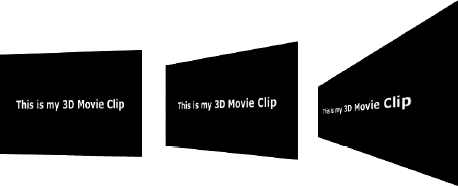
The perspective angle sets the
viewing "lens" for all of your 3D elements. The range of settings for
perspective angle is from 1 degree to 180 degrees. The default
perspective angle is 55 degrees to approximate a standard camera lens
view. Think of the perspective angle setting as the zoom factor of your
viewing lens. Smaller numbers move the view farther away and make 3D
transformations less dramatic — they flatten the view. Larger numbers
move the view closer and make 3D transformations more extreme — they
emphasize any changes in the angle or rotation of an element. Figure 1
shows the same 3D Movie Clip (a rectangle with a 45-degree y-axis
rotation), viewed with three different perspective angle settings.
Another way to understand
this feature is to compare it to our normal perception of objects in
real space. If you are looking at a sculpture from a distance of 30 feet
and you walk 10 steps to the left or right, your view does not change
very much — you still see more or less the same side of the sculpture.
However, if you are standing closer to a sculpture, say, 3 feet away,
and you walk the same 10 steps to the right or left, your view changes
dramatically.
|
If you change the Stage size of
your Flash document, the perspective angle changes automatically to
preserve the appearance of existing 3-D symbols. You can turn this
behavior off in the Document Properties dialog box.
|
|
The Vanishing point
setting determines the endpoint of the z-axis and controls the direction
that 3-D symbols travel if they are moved along their z-axis. Imagine
it as an invisible anchor point in deep space that has a magnetic pull
that makes all of your 3-D translations extend in its direction. In real
space, the vanishing point is that place in your field of vision where
parallel lines seem to come together. If you were looking down a road on
a perfectly flat plain, it would be the spot where the road appeared
narrower and narrower until finally it ended in a dot on the horizon —
that dot is the location of the vanishing point.
By default, the vanishing
point is set in the center of the Stage, but you can modify the setting
at any time to a different x, y location — on or off the Stage. To view
or set the vanishing point in the Properties panel, a 3-D symbol must be
selected on the Stage. Figure 2 illustrates the result of a 45-degree x-axis rotation with vanishing points in different locations. Figure 3 illustrates how the vanishing point affects the direction that a 3-D symbol travels as it moves along the z-axis.
