One of my clients quite regularly wanted to feature
one of his products over the others, so we developed a special logo
exactly for that purpose. Whenever a product was to be highlighted, I
modified the page to include the special logo rather than the standard
one. Typically, this took up to a half-hour every time the change was
made. Not only did I have to find the catalog page with the
to-be-featured item and replace the logo — something else I had to hunt
for — I also had to find the previously featured item page and revert
the special logo placed there to the standard one. Not difficult work,
but certainly tedious.
Dreamweaver's Optional
Region feature is intended to reduce, if not eliminate, such tiresome
chores. Content placed on a template within an optional region is
conditionally shown or not shown on the template-derived page. In the
just-described situation, this feature enables me to put both logos in
the same template, each in its own optional region. By default, the main
logo is shown, but if I decide not to show it, the special logo is
shown in its place. Optional regions are extremely powerful.
Optional regions work
somewhat like a cross between repeating regions and editable attributes.
Like repeating regions, optional regions can surround any portion of a
page; also, they are not editable by default, although it's possible to
create an editable optional region. After an optional region has been
placed on the template page — as with editable attributes — the Template
Properties dialog box is used to set the condition that displays or
hides the content on a template-derived page.
The conditions that control
an optional region range from a basic true-false or Boolean statement
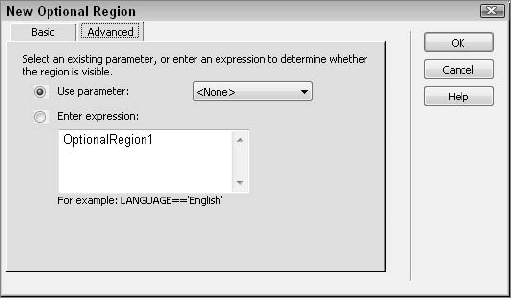
to more complex, evaluated expressions. Reflecting this, the New
Optional Region dialog box contains two tabs, Basic and Advanced. Under
the Basic tab, you simply enter the name for the optional region and
indicate whether to display the region by default. The Advanced tab,
shown in Figure 1,
gives you the opportunity to set the condition dependent on another
existing template parameter or enter a template expression.
NOTE
The Basic and
Advanced tabs are mutually exclusive. The tab showing when OK is
selected determines which template parameter is used.
Now, look at an example to
see how both the Basic and Advanced approaches work together. Take the
situation, described at the beginning of this section, which requires
the use of a special logo every so often. To accomplish this, I create
one optional region using the Basic tab of the New Optional Region
dialog box. In this region, I just enter a name, mainLogoRegion, and
enable the Show By Default option. In this region, I place my standard
logo. The Basic tab creates a template parameter with code like this in
the <head>:
<!-- TemplateParam name="mainLogoRegion" type="boolean" value="true"-->
Next, I create a second
optional region and select the Advanced tab of the New Optional Region
dialog box. I want this region to be displayed only when the other
region is not. To achieve this effect, I select the Enter Expression
option and enter the following in the text area:
mainLogoRegion != true
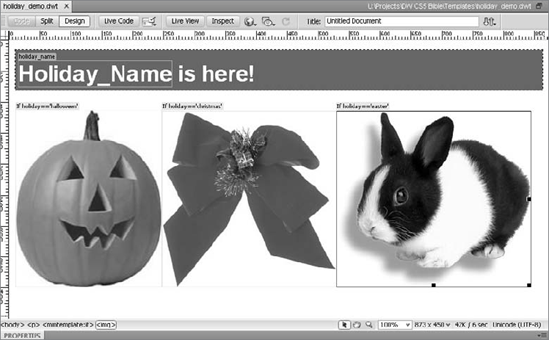
With optional regions, the name
is the same as the condition; so translated into English, this
expression reads, "Show this region if mainLogoRegion is not shown." As shown in Figure 2,
Dreamweaver uses the condition as the name of the optional region, and
this name is represented in the tab above the optional regions.
Dreamweaver template
expressions support a subset of JavaScript operators, so I could have
also written this expression like this:
!mainLogoRegion
In a different situation,
you might want to tie a number of noncontiguous optional regions
together so that if the main region shows, the others would as well. You
achieve this by setting Use Parameter to the name of the main region.
To insert an optional region, follow these steps:
Choose Insert => Template Objects => Optional Region or, from the Templates menu of the Insert panel, click the Optional Region icon.
If you want to create a template parameter, from the Basic tab, follow these steps:
Enter a unique name for the optional region in the Name field.
Choose the Show By Default option if you want to make the region initially viewable.
If you want to link this optional region to the state of another optional region, from the Advanced tab, follow these steps:
Select the Use Parameter option.
Choose an existing optional region from the drop-down list.
If you want to control the optional region display with a template parameter, from the Advanced tab, follow these steps:
Select the Enter Expression option.
Enter the desired expression in the text area.
Click OK when you're finished.
1. Combining editable and optional regions
Similar to repeating
regions, optional regions by themselves are not editable. Many uses
exist for optional regions with the designed content either displayed or
not displayed. However, in certain situations, the optional content
needs to be editable as well. For such situations, Dreamweaver provides
the Editable Optional Region object.
The procedure for adding an
editable optional region is exactly the same as for inserting an
optional region — Dreamweaver automatically includes an editable region
within the optional region. The new editable region is also
automatically named.
|
You can change the
name of the automatically added editable region by selecting the
template region tab or its tag in the Tag Selector and then changing the
name in the Property inspector.
|
|
To add an editable optional region, follow these steps:
Choose Insert => Template Objects => Editable Optional Region or, from the Templates menu of the Insert panel, click the Editable Optional Region icon.
Follow the procedure outlined for inserting an optional region.
Click OK when you're finished.
Of course, if you want to add
an editable region to an optional region containing locked content, you
can always do so when editing the template.
2. Setting optional region properties
Although you set up an area of
the page to be optionally displayed in the template, you actually choose
the display option — whether to show or hide the region — in the
document created from the template. As with editable attributes, the
Template Properties dialog box handles control of the optional regions.
Unlike editable attributes, optional regions only use true/false values
to determine whether a selected region is either shown (true) or not
shown (false).
Instead of the template parameter statement found in templates, Dreamweaver inserts instance parameters into the <head> section of the template-derived document, like this one:
<!-- InstanceParam name="mainLogoRegion" type="boolean" value="true"-->
To set the parameters of an optional region in a template-based document, follow these steps:
Choose Modify => Template Properties. The Template Properties dialog box is displayed.
Select the optional region you want to affect.
If
you want to allow the optional region to be modified in a document
based on a nested template, choose the Allow Nested Templates To Control
This option. If the option is selected, the phrase pass through in parentheses replaces the Show Attribute Name option and appears in the list.
Otherwise, select the Show Attribute Name option to set the value to true and deselect it to set the value to false.
To set the value of any other optional regions on the page, choose the entry from the list and repeat Steps 2 through 4.
Click OK when you're finished.