Three specialized commands found in the application menu (under Modify => Shape) provide modification options that you cannot achieve with any other tools in Flash.
1. Convert Lines to Fills
Lines to Fills does
exactly what its name implies: It converts lines defined by single
points into shapes defined by an outline of editable points. To apply
the Lines to Fills command, simply select any lines that you want to
convert before choosing Modify => Shape =>
Convert Lines to Fills. After a line has been converted in this way,
you can edit it like any other filled shape, including adding bitmap or
gradient fills or applying the Selection or Subselection tools to adjust
the corners and curves of the outlined shape.
|
You can render strokes and lines by using gradients without converting them into fills.
|
|
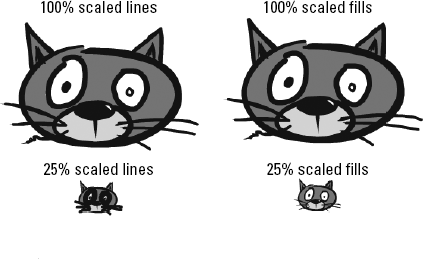
2. Creating scalable artwork
The Lines to Fills
command is especially important because it provides the one solution
for maintaining line-to-fill ratios when scaling raw graphics that would
require lines to appear at smaller than 1 point size. Fills do not have
the same display limitation as lines, and they maintain visual
consistency as they are scaled larger or smaller. In Figure 1,
the image on the left was drawn with the Pencil tool to make lines
around the eyes and on the whiskers of the cat cartoon. When it was
scaled, the lines were not visually consistent with the fills. The image
on the right was modified by using the Lines to Fills command before
scaling it down to 25 percent size. In this case, the ratio between the
outlines around the eyes and the whiskers was consistent with the other
filled shapes in the cartoon.
|
If you convert your raw graphic into a symbol before you scale it, the ratio of lines to fills also stays consistent.
|
|
NOTE
Remember that in
Flash, the smallest line size that can be displayed is 1 point. Lines
with a height of less than 1 point all appear to be the same size
on-screen when viewed at 100 percent scale. The difference in size is
visible only when the view is scaled larger (zoomed in). However, the
lines print correctly on a high-resolution printer and are visible in
the published .swf if the content is zoomed.
3. Expand Fill
The Expand Fill command has two
options you can use to size fills up or down evenly on all sides of a
shape. To apply the command, select the fill(s) that you want to modify,
and then choose Modify => Shape =>
Expand Fill. The Expand Fills dialog box appears, where you can choose
to expand or inset (shrink) the fill by a specific pixel value. Keep in
mind that this command applies differently than a normal scale
modification. The fill expands or shrinks from all sides evenly, so an
extreme modification can cause a shape to bloat to the extent that
unfilled areas are obscured, or conversely it can cause a shape to
shrink to the point that some of the areas are no longer visible. When
applied moderately, the Expand Fill command can be very helpful for
adjusting multiple filled shapes consistently, without scaling lines in
the same area of the artwork.
|
You cannot apply the Expand
Fill command to drawing objects with strokes unless you first break them
apart or open them in Edit mode so that you can select the fill without
also selecting the stroke.
|
|
Figure 2
includes a rectangle, a cartoon cat, and a sketch of some grapes. The
original shapes are shown on the left, the expanded fills in the center,
and the inset fills on the right. As you can see, expanding fills often
obscures the strokes surrounding a shape, whereas choosing to inset a
fill leaves space between the fill and any surrounding stroke.
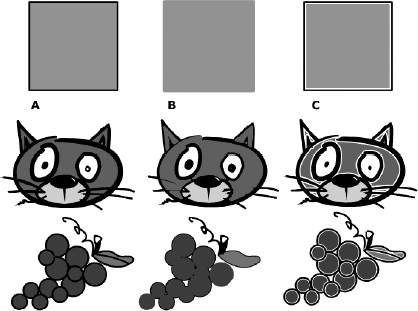
NOTE
Each of the fills in the graphics shown in Figure 2
was added by clicking or Shift+clicking (rather than dragging out a
selection marquee) to avoid including any strokes in the final selection
that were modified with the Expand Fill command.
You can also use the Expand Fill command to create custom text forms. Figure 3
shows how the original text shape (left) can be modified by using
either the Expand or Inset option. To create bloated balloon-like text
(center), or shrunken, eroded text (right), you first have to apply the
Modify => Break Apart command (Ctrl+B/ +B)
twice to reduce the text to simple filled shapes. By selecting all the
letter shapes before applying the Expand Fill command, you can modify
the whole word at the same time.
+B)
twice to reduce the text to simple filled shapes. By selecting all the
letter shapes before applying the Expand Fill command, you can modify
the whole word at the same time.

4. Soften Fill Edges
The Soften Fill Edges command
was the closest thing to a static blur available before Flash 8.
Fortunately, Flash 8 and newer versions support a much more
sophisticated Blur filter that renders smoother softened edges and
enables you to change the color of the item even after the blur is
applied. The only advantages that the Soften Fill Edges command has over
the Blur filter are that you can use it to modify raw shapes or drawing
objects and choose whether to render it inside or outside the item's
original fill boundary. This command, as with the Expand Fill command,
can be applied only to fills and gives you the option to expand or inset
the shape by a specific number of pixels.
|
Flash enables you to select a line and choose the Soften Edges command from the Modify =>
Shape menu. After you apply the command, however, the line just
disappears from the Stage — surprise! If you make this mistake, you can
recover your line by immediately choosing Edit => Undo (Ctrl+Z/+Z).
|
|
The blurry effect of Soften
Fill Edges is created by a series of banded fills around the original
fill that decrease in opacity toward the outermost band. You can control
the number and width of these bands by entering values in the Soften
Fill Edges dialog box (shown in Figure 4)
to create a variety of effects, from a very subtle blurred effect to a
dramatic stepped appearance around the edges of the fill.
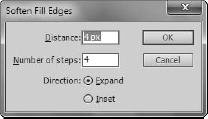
The Soften Fill Edges dialog box controls the following features of the fill modification:
Distance: Defines the number of pixels the original shape expands or shrinks
Number of steps: Sets the number of bands that appear around the outside edge of the fill
Expand or Inset:
Controls whether the bands are added to the outside edge of the fill
(expand) or stacked on the inside edge of the shape (inset)
Figure 5
shows how the original fill (left) appears after Soften Fill Edges is
applied with the Expand option (center), or with the Inset option
(right).
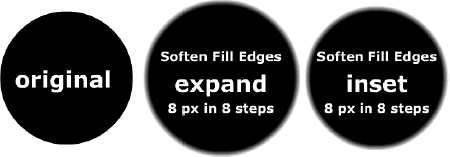
The width of the
individual bands equals the total number of pixels set in Distance
divided by the Number of steps. When the edge of the shape is magnified,
the individual bands can clearly be seen. Figure 6
compares a series of eight bands, each 1 pixel wide, created by using a
Distance setting of 8 and a Number of steps setting of 8, compared with
the smooth softened edge that results from applying a Blur filter with
an X and Y setting of 8.

As with the Expand Fill
command, Soften Fill Edges can create interesting text effects when
applied to broken-apart letter shapes. Figure 7
shows an effect created by combining the original white text with a
"shadow" made by applying the Soften Fill Edges command to a
broken-apart copy of the text that was filled with dark gray.
|
You can achieve an effect similar to the shadow shown in Figure 7 by applying the Glow filter to an editable text field and selecting the knockout option.
|
|
