Data-driven pages handle repeating regions elegantly.
A single row of a table is bound to data, and the application server
returns as many requested rows as are available. However, not all pages
are data-driven — and not all areas of a page that repeat can be bound
to a data source. Dreamweaver provides solutions for both the
server-side — the Repeat Region server behavior — and the client-side —
the template-based repeating region feature.
A repeating region, like an editable region, is applied to a template and may surround any tag-complete
area (an area containing both a beginning tag and an ending tag) on a
page. Typically, repeating regions wrap around the same type of areas as
their server behavior cousins, such as table rows. However, unlike the
Repeat Region server behavior, template repeating regions are expanded
and manipulated manually in a template-based document. Keep in mind one
other important aspect of repeating regions: They aren't automatically
editable — you have to include an editable region within a repeating
region to make it so. The capability to lock specific portions of
repeating regions makes this an extremely powerful feature.
To insert a repeating region, follow these steps:
Select
the portion of the page that you want to repeat. As noted earlier, a
repeating region cannot overlap a tag pair. If you attempt to do this,
Dreamweaver automatically extends the selection so that the entire tag
is included.
Choose Insert => Template Objects => Repeating Region or, from the Templates group of the Insert panel, click the Repeating Region.
Enter
a unique name in the New Repeating Region dialog box and click OK.
Dreamweaver automatically provides a name, but as always, it's best if
you supply a meaningful name. Dreamweaver surrounds the repeating region
with a blue border and tab with the keyword "Repeat" and the name of
the region, as shown in Figure 1.
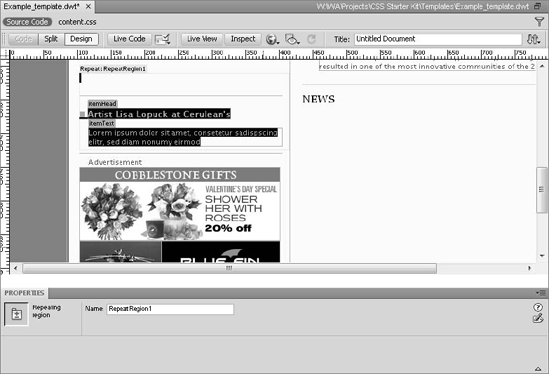
As mentioned earlier, repeating
regions are not, by default, editable. To make a repeating region
editable, select the content within the repeating region — not the
repeating region itself — and then create an editable region by either
clicking the Editable Region icon in the Templates menu of the Insert
panel or choosing Insert 
 Editable Region. You must give the editable region a unique name as usual. Template Objects
|
You may notice that the
repeating and editable regions tabs overlap, making it difficult to see
the repeating region name. I've found it handy to use fairly long names
for the repeating region, such as dataRowRepeating, and relatively short
names for the editable region, such as dataRow, to enable me to see
portions of both tabs. Also, although all template regions use the same
color established in Preferences, the highlight for a repeating region
is significantly lighter than that for editable regions. This color
variation makes it much easier to identify the different types of
regions.
|
|
1. Modifying a repeating region
The power of
repeating regions isn't apparent until you open a template-based
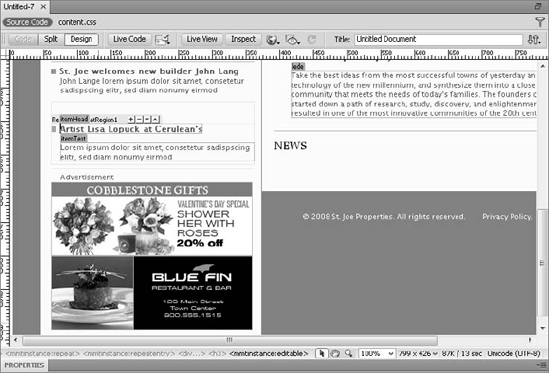
document containing one. With Invisible Elements enabled, you notice a
series of buttons above each repeating region, as shown in Figure 2.
With these controls, new entries — identical to the content contained
within the repeating region — are added, deleted, or moved from one
position to another. You can even copy and paste content within a
repeating region.
To modify a repeating region in a template-based document, follow these steps:
Make sure View => Visual Aids => Invisible Elements is enabled.
Locate the four buttons above the repeating region:
To
add a new entry, click the Add (+) button. New entries are inserted
below the current cursor selection. New entries are selected after they
are created.
To delete an existing entry, position your cursor in the entry and click the Remove (−) button.
To move an entry down, place your cursor in the entry and click the Down button.
To move an entry up, place your cursor in the entry and click the Up button.
To copy and paste an entry, follow these steps:
Position your cursor in the entry.
Choose Edit => Repeating Entries => Copy Repeated Entry.
Choose Edit => Paste or Edit => Repeating Entries => Paste Repeated Entry.
If you prefer to work with
Invisible Elements off, Dreamweaver provides corresponding menu options
under both the main and context menus. In fact, the menu options are,
in some ways, more powerful and can be immediate timesavers. Look in the
main menu under Modify => Templates => Repeating Entries or, in the context menu under Templates, for these commands:
2. Constructing a repeating table
Repeating regions are used so
commonly in tables that Dreamweaver provides a tool to create both a
table and a repeating region at the same time. The Repeating Table
object opens the standard table dialog box with the added capability to
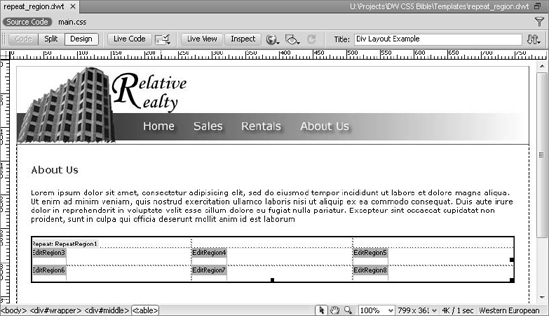
define which rows are within a repeating region. When inserted, the
repeating region is all set up — and even includes a separate editable
region in each cell, as shown in Figure 3.
To insert a Repeating Table, follow these steps:
In your template open for editing, position your cursor where you'd like the table to appear and choose Insert => Template Objects =>
Repeating Table. Alternatively, you can drag the Repeating Table icon
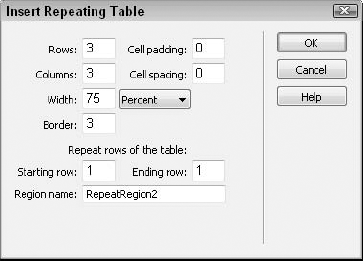
from the Templates menu of the Insert panel. The Insert Repeating Table
dialog box, shown in Figure 4, is displayed.
Enter the values desired for the table attributes: Rows, Columns, Cell Padding, Cell Spacing, Width, and Border.
Determine
which rows of the table are to be repeated by entering the number of
the first row in the Starting Row field and the number of the last row
in the Ending Row field. For example, if you want only the second row of
the table to repeat, your values are Starting Row: 2 and Ending Row: 2.
However, if you want three rows to repeat starting with row 2, the
values are Starting Row: 2 and Ending Row: 5.
Enter a unique name for the repeating region in the Region Name field or leave the Dreamweaver-supplied default name.
Click OK when you're finished.
After the table is created,
notice that every cell in the designated repeating region is editable.
Dreamweaver automatically inserts separate editable regions and names
them incrementally EditRegion1, EditRegion2, and so on. By defining each
cell as editable, rather than the entire row, Dreamweaver gives you the
option to retain the editability on a cell-by-cell basis. If the cell
should not be editable, position your cursor anywhere in the cell and
choose Modify => Templates => Remove Template Markup.
In the previous Dreamweaver
Technique, you began the process of converting an existing page into a
template. This Technique takes the next step and includes editable
regions within a table.
Open the file created in the previous Dreamweaver Technique from the Templates folder, template_start.dwt.
You
can apply editable regions to more than just text. Images are also good
candidates, but first, it's a good idea to create a generic image
placeholder. Select the image of the house in the page and delete it.
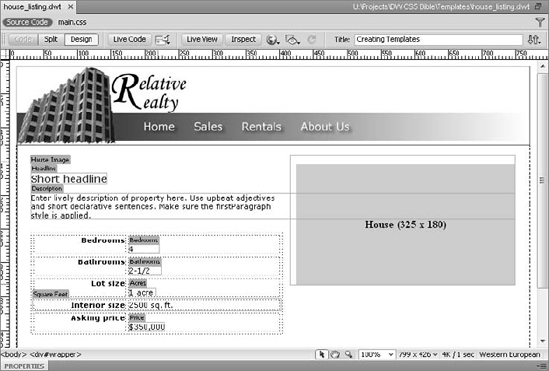
From the Insert panel's Common category, choose Images: Image Placeholder.
When the Image Placeholder dialog box opens, enter House in the Name field, 325 in Width, and 180 in Height; click OK when you're done.
Select the image placeholder and, from the Property inspector's Class list, choose imageRight.
With the image selected, choose Template: Editable Region.
In the New Editable Region dialog box, enter House Image in the Name field.
Tables
are another page element that is easily made template-friendly. Select
the value in the table cell next to the Bedrooms label and choose
Templates: Editable Region.
In the New Editable Region dialog box, enter Bedrooms in the Name field and click OK.
Repeat
Steps 6 and 7 to create editable regions for each of the values in the
second column of the table; make your selections and name your editable
regions like this:
| Selection | Editable Region Name |
|---|
| 2~HF | Bathrooms |
| 1 acre | Acres |
| 2500 sq. ft. | Square Feet |
| 350,000 | Price |
Save
your page; click OK to acknowledge that some block content is within an
editable region — if desired, you can select the Don't Show Me This
Message Again option to avoid this alert in the future.
Editable regions are a cornerstone of the template structure and, as you can see, have a great number of uses.