When resizing an image (often called resampling),
pixels are added or removed from the file. When you resize an image to
larger than its original size, you are adding pixels and increasing the
file size. Generally this upsampling
is not recommended in Fireworks unless it is only by a small percentage
or for special effect, because the image quality can degrade
noticeably. When you make an image smaller (downsampling),
you are removing pixel data from the image and reducing the file size.
This tends to make the image softer, but we can gain back some of the
original crispness of the photo by applying a filter called Unsharp
Mask. Unsharp Mask can be applied as either a permanent filter or as a
Live Filter. For the greatest flexibility, Live Filters are a better
option.
1. | Choose File > Open, and select the policeman.jpg file .
|
2. | Select the Open As Untitled option at the bottom of the dialog box. (This will open an untitled copy of the image.)
|
3. | Click Open.
When the file opens, it is quite large—4368 × 2912 pixels in size. This
is one of the high-resolution images from the movie photo shoot and is
much too large for use on the Web. You will resize it to a more suitable
dimension and resolution.
|
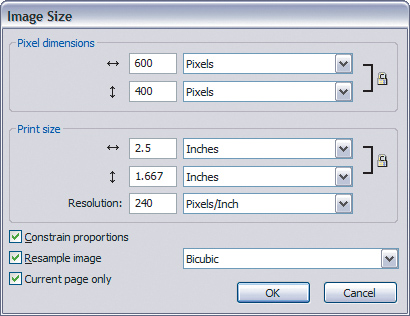
4. | Choose Modify > Canvas > Image Size to launch the Image Size dialog box.
|
5. | Make sure the Constrain Proportions option is checked.
|
6. | Set the width to 600 pixels and press Tab. The height will automatically change based on the width you have entered.
|
7. | Click
OK. After you resize the image, double-click the Zoom tool or press
Ctrl+1 (Windows) or Command+1 (Mac) to bring it to 100%.
|
8. | Click the Add Live Filters icon (+ sign) in the Properties panel.
|
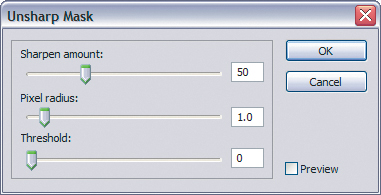
9. | Choose
Sharpen > Unsharp Mask to open the Unsharp Mask dialog box. The
default properties are a bit extreme for a low-resolution file, so we’ll
alter one slightly.
|
10. | Change the Pixel Radius to a value of 1.
|
11. | Deselect the Preview option to see the image without sharpening.
|
12. | Activate
Preview again. Notice that there is slightly more contrast and even a
bit better separation between the officer and the background. This is
because Unsharp Mask increases the contrast only of edge pixels (the place where a dark and light pixel meet).
|
13. | Click OK to apply the filter.
|
Generally,
higher-resolution images can handle (and sometimes need) higher amounts
of unsharp-masking than low-resolution images. The three controls for
the Unsharp Masking filter are the following:
Sharpen Amount:
This property controls how much darker and lighter the edge borders
become. Sharpen Amount can also be thought of as how much contrast is
added at the edges.
Pixel
Radius: This property affects the size of the edges to be sharpened. A
smaller radius enhances smaller-scale detail. Higher radius values can
cause halos at the edges (a highlight around objects), making images
look unnatural. Fine detail needs a smaller radius value. Pixel Radius
and Sharpen Amount are reciprocal; reducing one allows more of the
other.
Threshold:
This property controls how far apart adjacent tonal values have to be
before the filter does anything. The threshold setting can be used to
sharpen more pronounced edges while ignoring more subtle edges. Low
values have a greater effect because fewer areas are excluded. Higher
threshold values exclude areas of lower contrast.