3. Adjusting scale with the Gradient Transform tool
To resize a bitmap fill
symmetrically (to maintain the aspect ratio), find the round corner
handle with an arrow icon, which is usually located at the lower-left
corner of the fill. On rollover, the diagonal arrow icon appears,
indicating the direction(s) in which the handle resizes the fill. Click
and drag to scale the fill symmetrically. On radial gradients, you use
the round-corner handle with the longer arrow icon to scale with the
gradient aspect ratio constrained. Linear gradients have only one handle
for scaling, and this handle always scales in the direction of the
gradient banding.
To resize a fill asymmetrically,
find a small square handle on either a vertical or a horizontal edge,
depending on whether you want to affect the width or height of the fill.
On rollover, arrows appear perpendicular to the edge of the shape,
indicating the direction in which this handle resizes the fill. Click
and drag a handle to reshape the fill.
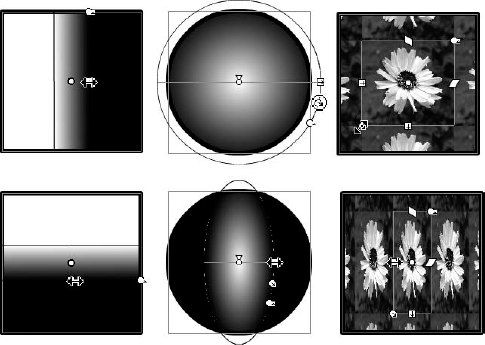
Figure 5
shows the three fill types with their respective scale options. Linear
gradient fills (left) can be scaled only in the direction of the
gradient banding, but they can be rotated to scale vertically (lower)
rather than horizontally (upper). Radial gradient fills (center) can be
expanded symmetrically (upper) with the circular handle, or
asymmetrically (lower) with the square handle. As with linear gradients,
they can be rotated to scale vertically rather than horizontally.
Bitmap fills (right) can be scaled by the corner handle to maintain the
aspect ratio (upper), or dragged from any side handle to scale
asymmetrically (lower).
|
Adjusting bitmap fills
with the Gradient Transform tool can be tricky business. On tiled
fills, the transform handles are often so small and bunched together
that they are difficult to see. On full-size bitmaps, the handles are
sometimes outside the Stage, and it can be hard to find the handle that
you need. It can also be unpredictable where the handles appear when you
select a bitmap fill with the Gradient Transform tool — often they are
outside the shape where the fill is visible. Our advice is to use this
workflow only when you have no other choice. In general, it is a much
better idea to decide on the size for a bitmap and create a Web-ready
image that you can use without scaling before you import it to Flash.
|
|
NOTE
The right column of Figure 5 is a good example of how changes applied to one tile in a bitmap fill are passed to all the other tiles within the shape.
4. Setting gradient fill overflow styles
As you work with scaled
gradient fills, you will quickly notice that your shape is always
filled from edge to edge but that the fill area may not appear quite how
you'd like it to. In early versions of Flash, you were stuck with the
solid color fill around the edges when a gradient was scaled smaller
inside of a shape. This default behavior is now part of the Overflow
menu in the Color panel that gives you some other options for how a
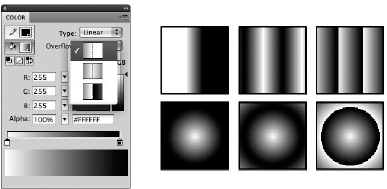
gradient renders when it is scaled down. As shown in Figure 6, there are three different overflow styles:
Extend: Extends the colors on the outside edge of the gradient to create a solid fill beyond the edge of the rendered gradient
Reflect: Alternates flipped (reflected) versions of the original gradient until the shape is filled from edge to edge
Repeat: Renders the color pattern of the original gradient repeatedly until the shape is filled from edge to edge
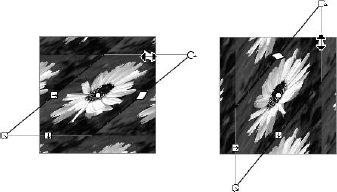
5. Skewing a bitmap fill with the Gradient Transform tool
To skew a bitmap fill
horizontally, click the diamond-shaped handle at the top of the image;
arrows appear, parallel to the edge of the fill, indicating the
directions in which this handle skews the fill. Drag to skew the image
in either direction. Figure 7
shows a bitmap skewed horizontally (left) and vertically (right). Note
that the skew procedure is still active after it has been applied,
meaning that the skew may be further modified — this behavior is common
to all functions of the Gradient Transform tool.
NOTE
Gradient fills cannot be skewed; they can be scaled only on the horizontal or vertical axis.
|
If you get carried away with
the Gradient Transform tool and you want to get back to the original
fill position and size, double-click the center icon of the shape to
reset all transformations. |