Illustrator contains several features that use
transparency, including the ability to specify blending modes and
opacity masks with the Transparency panel and via effects such as
Feather and Drop Shadow. Transparency as a feature in Illustrator (and
InDesign as well) requires closer attention when it comes to printing
documents. In fact, Illustrator, InDesign, and Adobe Acrobat all use the
same methods to print with transparency, so the concepts you learn here
apply to all those applications as well.
You may have heard that
printing with transparency is problematic, but a lot has changed since
transparency was first introduced in Illustrator 9. Once you understand
what happens to a file with transparency and you learn about a few
simple settings, you won’t have to worry about printing issues when
you’re using transparency features.
In truth, transparency has
always been around—in raster form—in Photoshop. The only difference now
is that you can apply these effects in vector form and still edit them
late in your workflow. At the end of the day, these transparency effects
will become rasterized, leaving you with the same result as if you had
done everything in Photoshop. In any case, let’s take a closer look at
what transparency is and how it works.
Understanding Transparency Flattening
Let’s start with a
simple fact: PostScript doesn’t understand transparency. As you probably
know, PostScript is the language that printers and RIPs speak. Native
transparency is understood only by PDF language version 1.4 or newer
(first present in Acrobat 5 and Illustrator 9).
Note
If you’ve used Photoshop before, you may be familiar with the term flattening, which combines all layers in a document. Although similar in concept, transparency flattening is different. |
To print objects with
transparency, Illustrator must “translate” any transparent artwork into a
language that PostScript understands. This translation process is
called transparency flattening.
The process of flattening is simple, and Illustrator follows two cardinal rules when performing flattening on a file:
1. | All transparency in the file must be removed.
|
2. | While performing rule #1, the appearance of the file cannot change.
|
Both of these rules are
followed during the flattening process, with no exception. Obviously,
all transparency has to be removed because PostScript doesn’t know what
transparency is. Additionally, if removing the transparency would result
in your file changing in appearance, that would mean you could design
something in Illustrator that couldn’t be printed, which doesn’t make
sense either. If you think about it, if you’re removing transparency
from the file and you’re also keeping the visual appearance of the
object, something has to give, and that something is the editability of
your file. Let’s take a look at an example of this.
Flattening Artwork
Let’s try an example of flattening:
1. | Draw two different-colored circles, one overlapping the other.
|
2. | Set the top circle to Multiply (Figure 1).

The nice feature of transparency is that you can move the top circle
around or change its color, and any overlapping areas will simply
multiply. The problem is that PostScript doesn’t know what transparency
is and doesn’t know how to print that overlapping area, so transparency
flattening is required.
|
3. | Select
both circles, choose Object > Flatten Transparency, and click OK
(don’t worry about the dialog box, which we’ll get to later).
The file is now flattened. Does it look any different? It can’t, because
of rule #2, but the file now no longer contains any transparency and
can be printed on a PostScript device. The difference is that the file
is no longer editable as it was before it was flattened. Upon selecting
the circles, you’ll find that the two transparent circles have now been
broken up into three individual opaque shapes (Figure 2).

|
This flattening process
happens every time you print something with transparency. However, the
flattening happens in the print stream, not to your actual Illustrator
file. When you choose to print a file, Illustrator flattens a copy of
your file and sends the flattened file to the printer, while leaving
your document intact. It wouldn’t be good if simply printing a file
rendered it uneditable. In our example, we specifically flattened the
file using the flatten transparency function to see the results, but
under normal circumstances, you would not flatten the transparency
manually—Illustrator would do that for you automatically at print time.
Note
Flattening
also happens whenever you save or export your file to a format that
doesn’t understand transparency. For example, EPS (which is PostScript)
and PDF 1.3 do not support transparency. |
So, when you print a file
with transparency, this flattening process occurs so that a PostScript
printer can print the file correctly, and this process happens on the
way to the printer, so your Illustrator file is not affected in any way.
The example of the two
overlapping circles is a simple case of flattening. But other examples
can display certain side effects. Let’s explore such a case.
Flattening with Rasterization
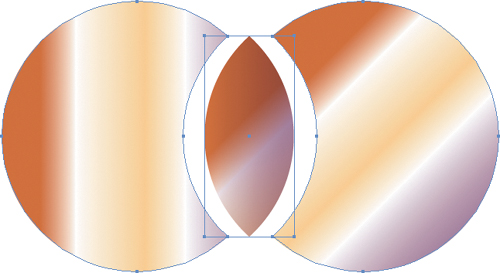
Let’s create another example:
1. | As in the previous example, create two overlapping circles.
|
2. | Set the top circle to Multiply.
|
3. | Fill each circle with a linear gradient, but in one of the circles, apply the gradient on a 45-degree angle.
The result is two circles with gradients, but the area in which these
two shapes overlap appears as two gradients traveling in different
directions (Figure 3).

When this file is flattened, you know that the result will be three
separate shapes as in the previous example; however, this example is a
bit different. Although gradients can be preserved in vector form,
there’s no way to describe a crisscross gradient, like you see in the
overlapping area, as a vector. Because of rule #2, Illustrator is not
allowed to change the appearance of your file during flattening, so the
only course of action Illustrator can take is to turn that overlapping
area into a raster image.
|
4. | Select both circles, choose Object > Flatten Transparency, and click OK.
You’ll find that although the file looks the same, it now consists of
two vector shapes and a raster image in the middle. Illustrator creates a
vector mask for the middle shape so that the file will print correctly
(raster images are always rectangular in shape). It’s important to point
out that Illustrator didn’t raster the entire file; it merely
rasterized the portion of the file that could not be preserved in vector
form (Figure 4).
|
At
this point, a question should be forming in your mind: If part of the
file is now a raster image, what is the resolution of that raster?
Patience, young Padawan; we’ll get to that soon. Here’s a review of what
you’ve learned to this point:
Transparency flattening is required to correctly print a file with transparency to a PostScript device.
Transparency
flattening happens automatically, in the print stream, when you print a
file with transparency from Illustrator, InDesign, Acrobat, or Adobe
Reader.
Transparency
flattening may cause certain parts of a vector file to become
rasterized to prevent a file from changing in appearance.
Using the Two Levels of Rasterization
In the previous example,
where two vector shapes resulted in a portion of that file becoming
rasterized, Illustrator had no choice but to rasterize the middle region
because there was simply no other way to preserve the appearance in
vector form. This is one level of rasterization.
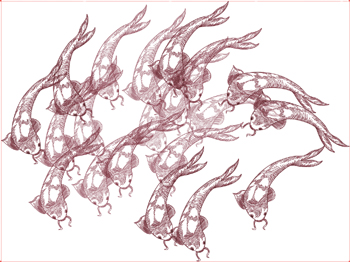
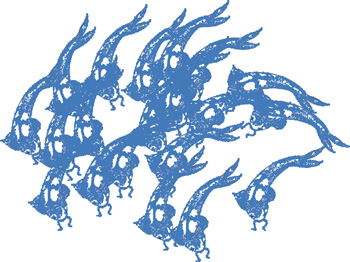
However, in some cases a
second level of rasterization may occur, even if the appearance of a
file could be preserved in vector form. Before printing a file,
Illustrator analyzes the entire document and looks for complex regions
containing many overlapping objects (which would result in a large
number of atomic regions). Illustrator may then choose to rasterize
those complex regions for performance reasons. Although we’ve been
trained to think vector objects are simpler than their bitmapped
counterparts, try to imagine an Illustrator graphic filled with many
overlapping objects with transparency applied (Figure 5,
on the next page). Although it may seem like only several objects at
first glance, once those objects are broken up into atomic regions, you
may be looking at thousands of vector shapes, which can take a long time
to process and print (Figure 6, on the next page). In those cases, Illustrator can save precious RIP and processing time by rasterizing these complex regions.
As
far as the first level of rasterization goes, you really have no choice
but to allow Illustrator to rasterize objects where it needs to do so.
What you can do, however, is learn how to build files that work around this issue . With regard to the second level of
rasterization, you can control how liberal Illustrator is when looking
for complex regions. In fact, you can even disable this second level of
rasterization altogether. Finally, with either level of rasterization,
Illustrator always gives you total control over how these areas are rasterized.
Understanding the Transparency Flattener Settings
Illustrator has three transparency
flattener presets that you can choose from in the Advanced panel of the
Print dialog box. These settings control how files with transparency are
flattened at print time. To access these settings, choose Edit >
Transparency Flattener Presets, and click the New button to define a new
preset. Let’s explore the settings in the Transparency Flattener Preset
Options dialog box (Figure 7).
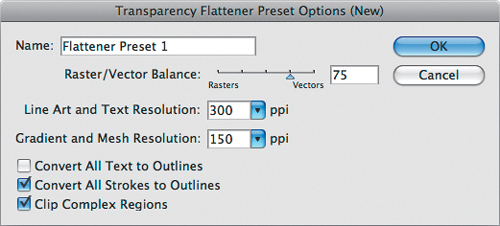
Raster/Vector Balance.
This slider is what controls how liberal Illustrator is when looking
for complex regions to rasterize (what we defined previously as the
second level of rasterization). A number closer to zero (0) gives
Illustrator more freedom to rasterize at will, resulting in faster print
times. Moving the slider closer to 100 results in fewer rasterized
areas but longer print times. At the 100 setting, Illustrator does not
rasterize any
parts of the file for performance reasons, effectively disabling the
second level of rasterization. The High Resolution flattener preset uses
this setting. In cases where files are taking extremely long to print
(or crashing the RIP altogether), adjusting this slider to a slightly
lower setting helps.
Line Art and Text Resolution.
In cases where Illustrator is going to rasterize line art or text, you
can specify a resolution that results in good-looking, sharp output.
You’ll notice that the High Resolution flattener setting specifies a
resolution of 1200 ppi, ensuring that text elements and vector objects
still have nice, clean, sharp edges in final output.
Note
The
two resolution settings in the flattener controls are used whenever
vector objects are forced to become rasters during the flattening
process. However, live effects, such as Feather and Drop Shadow, use the
Document Raster Effects Resolution setting to determine their
resolutions. |
Gradient and Mesh Resolution.
Because gradients and meshes are continuous tones in nature, they don’t
require a resolution as high as line art or text. In fact, anything
twice your line screen is probably getting thrown out anyway. Therefore,
Illustrator uses this setting to rasterize elements that can afford to
be set at a lower resolution. You’ll notice that the High Resolution
flattener preset uses a value of 300 ppi.
Convert All Text to Outlines. In
cases where text is going to be rasterized, chances are that the
rasterized text looks a bit chunkier than regular vector text. To
compensate for this, you can turn on this option to convert all text to
outlines, giving a consistent chunkier look to all of your text.
Convert All Strokes to Outlines.
Similar to the previous setting, this compensates for disparities
between vector and rasterized strokes by converting all strokes to
outlines.
Clip Complex Regions.
We mentioned that Illustrator can look for complex areas of a file and
rasterize them for performance reasons. However, we know that raster
images are always rectangular in shape, which means it’s possible for
“innocent” parts of your file to become rasterized simply because they
fall into the rectangular bounding box of the area that is complex. More
often than not, this results in stitching,
or noticeable boxes and color shifts. The Clip Complex Regions option
avoids this issue by creating a clipping mask around any rasterized
complex region (so the rectangular-shaped raster is masked by the vector
outline of the object). As you can probably understand, this makes for
even more complex files and can result in longer print times as well.
This option is turned on by default but isn’t applicable in the High
Resolution preset because no complex regions are rasterized at all with
that setting (because it has a Raster/Vector Balance setting of 100).
Understanding Object Stacking Order and Transparency Flattening
When
rasterization occurs during transparency flattening, the last thing you
want to see turning into a raster is text. That’s because you always
want text to be clean and sharp in your printouts. Even at the High
Resolution setting, where text is rasterized at 1200 ppi, that
resolution is still less than half of what most imagesetters set text
with—usually upward of 2400 ppi.
Although it’s
true that under certain circumstances rasterization must occur in order
to print a file and maintain its appearance, the way you build your
files can affect how often this happens. Let’s look at a simple example
that clarifies this:
1. | Draw a circle, and add a drop shadow to it by choosing Effect > Stylize > Drop Shadow.
|
2. | Switch to the Type tool, create some text, and position the text near the drop shadow (Figure 8).

|
3. | With the text still selected, choose Object > Arrange > Send to Back.
|
4. | Now select both the circle and the text, choose Object > Flatten Transparency, and click OK.
Upon close inspection, you’ll see that a portion of the text was
rasterized. This happened because the text was below the drop shadow in
the stacking order, and to maintain the file’s appearance when the drop
shadow was rasterized, Illustrator had to include part of the text in
the drop shadow’s bounding area (Figure 9).

|
5. | Choose
Edit > Undo to go back to the version before you applied the Flatten
Transparency function, and select the text object.
|
6. | Choose Object > Arrange > Bring to Front.
|
7. | Select the circle and the text, choose Object > Flatten Transparency, and click OK.
In this case, the text, which was above the drop shadow in the stacking order, was not affected at all and was not rasterized (Figure 10).

|
When using transparency
features in Illustrator (or InDesign, for that matter), it’s important
to make sure that text always appears above
objects with transparency to avoid unwanted rasterized text issues. Of
course, some designs call for text to appear beneath transparent
objects, and in those cases, you don’t have much of a choice.