Adjusting tonal range
The background image
you’ve imported adds a certain air of mystery to the design, but it’s a
bit low in contrast, lacking visual impact. You will use a Live Filter
to adjust the contrast.
1. | Ensure
the alleyway photo is selected (look for that blue bounding box), and
then click the plus sign (+) in the Filters area of the Properties
panel.
|
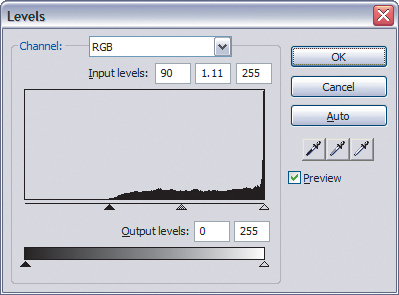
2. | Choose Adjust Color > Levels. The Levels dialog box appears.
The histogram (graph) in the Levels dialog box shows you the
distribution of tones in the selected image; you use it to alter
shadows, midtones, and highlights. Directly below the histogram are the
input level sliders: shadows on the left, highlights on the right, and
midtones in the middle.
In this image, you’ll notice that there is nothing displaying in the histogram for the darker tones.
|
3. | Drag
the left slider to the right so that it almost lines up with the
beginning of the histogram chart. The Input value should read about 90,
as seen here.

|
Live
Filters are nondestructive effects you can apply to most objects
(vector, bitmap, or symbol) within Fireworks. The great power and
advantage of Live Filters is that you can always edit the effect at a
later time. If you feel the filter is too harsh, or too subtle, just
click the “i”
icon to edit the filter properties. Note that this icon becomes
available once the Live Filter has been added to the Properties panel.
|
|
4. | Lighten the midtones slightly by dragging the middle slider to the left, for an input value of 1.11. Click OK.
The Levels Live Filter now appears in the Filters list in the Properties panel.
The result is definitely an improvement, but now things are a little too
dark in the shadows and a bit too bright in the midtones. You will
reopen the Levels filter and make further adjustments.
|
5. | Click the “i” icon next to the Levels filter in the Live Filters category of the Properties panel. The Levels dialog box reopens.
|
6. | Change the shadow input value to 80 by typing the numbers into the leftmost input box above the histogram.
|
7. | Change the midtone value back to 1 by changing the value in the middle input box. Click OK.
|
8. | Press Ctrl+S (Windows) or Command+S (Mac) to save your work. |
Using the Align panel
Guides and Smart Guides are
helpful for positioning items, but they’re “one object at a time”
features. If you have multiple items you need to reposition, the Align
panel is the tool to use.
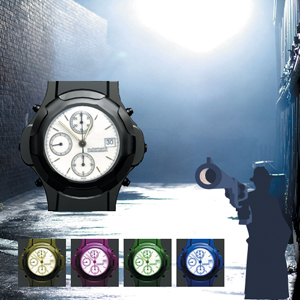
In this exercise, you will add
four more watches to show the available color range of the product. You
can import each file one at a time if you like (tan_, green_, blue_,
and magenta_watch.jpg), but to make things a little easier for you, we
have provided a single Fireworks PNG file that contains all four
watches, and that is the one you will use in this exercise.
1. | Choose File > Import.
|
2. | Browse to the Lesson03 folder, and select the watch_colors.fw.png file.
|
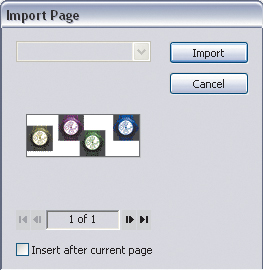
3. | Click Open. The Import Page dialog box appears.

|
4. | Make sure Insert after current page is not selected and then click Import (Windows) or Open (Mac).
|
5. | Click
anywhere on the canvas to import the collection of images at their
original sizes. You can see things are a bit messy, much like how it
would look if you quickly dragged and dropped the images from another
document window.
In the Layers panel, notice that each image is truly a separate object.
This is one of the beauties of a Fireworks PNG; because each image was a
unique object in the original PNG file, each is imported as a separate,
unique object.
All four objects should still be selected. If not, use the Shift key and click on each watch in turn to select them all.
|
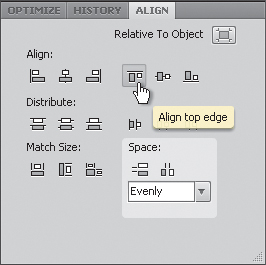
6. | Open the Align panel (choose Window > Align if you don’t see the Align panel tab in your Panel groups).
|
7. | Click the Align Top Edge button to align the top edges of all the objects.

|
8. | Change the Space menu option to a value of 10, instead of the default option of Evenly.
|
9. | Click
the Space Evenly Horizontally icon right above the Space menu. You now
have a nice, neat, evenly spaced row of watches. Don’t worry if the
watches aren’t all fully on your canvas; we’ll deal with that in the
next exercise.
|
10. | Press Ctrl+S (Windows) or Command+S (Mac) to save your work.
|
Grouping objects together
The
canvas is starting to fill up with several graphics. You’re going to
make your life a little easier by grouping that row of watches together.
Grouping temporarily turns a series of selected objects into a single
object, making it easier to manipulate them.
1. | Make sure the four watches are still selected.
|
2. | Choose Modify > Group.
In the Layers panel, you will see that the four watches are now part of the same object, with a new name of Group: 4 Objects.
|
3. | Select
the Pointer tool, and, if necessary, drag the group to the left edge of
the main watch. Smart Guides—the purple dashed lines that appear and
disappear as you move one object around the edges of other objects on
your canvas—will help you get this adjustment just right.
The row of watches takes up a fair amount of space and may overlap the
investigator image. You will scale the group using a new feature in the
Properties panel to make it fit the layout better.
|
4. | Click
the hollow square to the left of the width and height. The square
becomes solid and you have now constrained the proportions of the group.
|
5. | Type 344 into the Width field and then press the Tab key. The height is automatically scaled to proportionately match the width.
|
6. | In the Properties panel, set the x value to 28 and the y value to 398, so the group of watches is below the main watch.
|
7. | Press Ctrl+S (Windows) or Command+S (Mac) to save your work.

Tip
You can also choose Modify >
Transform > Numeric Transform, to scale by percentage, resize by
exact pixels, or rotate an object to a specific angle.
|