3. The Paint Bucket tool
You use the Paint Bucket
tool to fill enclosed areas with color, gradients, or bitmap fills.
Although the Paint Bucket tool is a more robust tool than the Ink Bottle
tool, and it can be used independently, it's most often used in
conjunction with the Eyedropper tool. When the Eyedropper tool picks up a fill, it first acquires the
attributes of that fill and then automatically changes itself to the
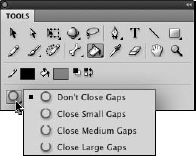
Paint Bucket tool. When the Paint Bucket tool is active, shown in Figure 3,
two options are available from the Tools panel: Lock Fill and Gap size.
The Gap size drop-down menu offers four settings to control how Flash
handles gaps or open spaces in lines when filling with the Paint Bucket
tool.
When you use the
Eyedropper tool to acquire a bitmap fill, the Eyedropper tool is
automatically swapped for the Paint Bucket tool and a thumbnail of the
bitmap image appears in place of the fill color chip. This procedure
also automatically engages the Paint Bucket Lock Fill option.
|
Using the Paint Bucket to
fill with white (or the background color) is not the same as erasing.
Painting with white (or the background color) may appear to accomplish
something similar to erasing. However, you are, in fact, creating a
filled item that can be selected, moved, deleted, or reshaped. Only
erasing erases!
|
|
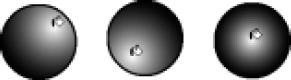
Another helpful behavior of the
Paint Bucket tool is that the exact location where you click to apply
the Paint Bucket tool defines the highlight point for the fill. This has
no visible effect when filling with solid colors or bitmap fills, but
when filling with gradients it affects how the fill is rendered within
the boundaries of the shape. Figure 4 illustrates how the highlight of a gradient fill varies based on where it was "dumped" with the Paint Bucket.
|
You can also adjust the
highlight and the center point of the rendered gradient with the
Gradient Transform tool after a shape is filled.
|
|
As with the Ink Bottle tool,
the Paint Bucket tool can be especially useful for applying custom fill
styles to multiple items. You can build a collection of custom fill
styles either off-screen (on the Pasteboard) or in a special, saved,
custom-fills-palette, single-frame Flash movie. You can then acquire
these fills whenever necessary.
|
If you click with the Paint
Bucket tool on one of several selected fills, all the selected fills
simultaneously change to the new fill.
|
|
4. Using the Paint Bucket Gap size option
As shown in Figure 3,
the Gap size option drop-down offers four settings that control how the
Paint Bucket treats gaps when filling. These settings are Don't Close
Gaps, Close Small Gaps, Close Medium Gaps, and Close Large Gaps. These
tolerance settings enable Flash to fill an outline if the endpoints of
the outline aren't completely joined, leaving an open shape. If the gaps
are too large, you may have to close them manually with another drawing
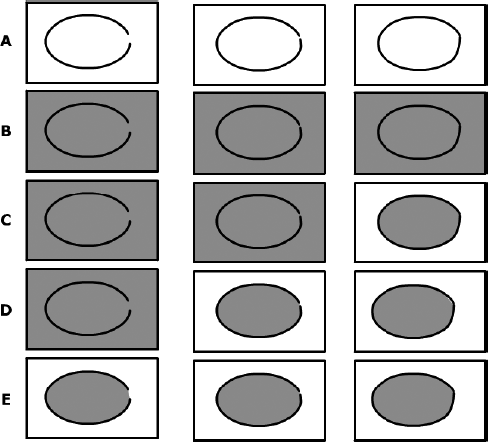
tool. Figure 5 illustrates how the Gap size option settings affect the Paint Bucket fill behavior.
|
The level of zoom changes the
apparent size of gaps. Although the actual size of gaps is unaffected by
zoom, the Paint Bucket's interpretation of the gap is dependent upon
the current Zoom setting. When zoomed in very close, the Paint Bucket
tool finds it harder to close gaps; when zoomed out, the Paint Bucket
tool finds it easier to close gaps.
|
|
5. Using the Paint Bucket Lock Fill option
The Paint Bucket's Lock
Fill option is the same as the Brush Lock Fill option — it controls how
Flash handles areas filled with gradient color or bitmaps. When this
button is turned on, all areas (or shapes) painted with the same
gradient or bitmap appear to be part of a single, continuous, filled
shape. The Lock Fill option locks the angle, size, and point of origin
of the current fill to remain constant throughout any number of selected
shapes. Modifications made to the fill in one of the shapes are applied
to the other shapes filled by using the same Lock Fill option.
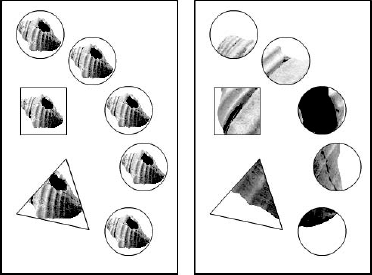
To demonstrate the
distinction between fills applied with or without the Lock Fill option, I
created five shapes and filled them with a bitmap with Lock Fill off.
As shown in Figure 6,
on the left, the image was rendered individually from one shape to the
next. On the right, those same shapes were filled with the same bitmap,
but with Lock Fill on. Note how the image is now continuous from one
shape to the next. Bitmap fills are automatically tiled to fill a shape,
so the bitmap fill on the right was also scaled with the Gradient
Transform tool to make it easier to see the continuation of the image
between the various shapes.
NOTE
When you use the Eyedropper tool to pick up a fill or gradient from the scene, the Lock Fill button is automatically toggled on.
|
If the shapes you are filling
with the Paint Bucket tool were created with the Object Drawing option
turned on or drawn with one of the Shape Primitive tools, you can use
the Lock Fill option to get a fill that continues from one shape to the
next, but when you try to adjust the fill with the Gradient Transform
tool, you will find that the fills are transformed individually instead
of as a group. The workaround for this glitch is to use raw shapes when
you apply a locked fill that you plan to transform. If you started with
drawing objects or shape primitives, use the Break Apart command before
you try to use the Gradient Transform tool to adjust a continuous fill
on multiple shapes. |