Printing a file should be a straightforward
experience, but it wasn’t always that way in Illustrator. Prior to
Illustrator CS, getting a file to print correctly often meant opening
the Page Setup dialog box, the Document Setup dialog box, and the Print
dialog box. When Adobe released Illustrator CS, however, it updated the
Illustrator printing engine and interface and modeled them after the
Print dialog box in InDesign. Ever since that version, you can go
directly to the Print dialog box and control all your print
specifications in one place.
Exploring the General Print Panel
While you’re designing a
job, printing quick and accurate proofs to your laser or ink-jet
printer is just as important as printing final output to an imagesetter.
For this reason, you’ll find that Adobe put many often-used settings in
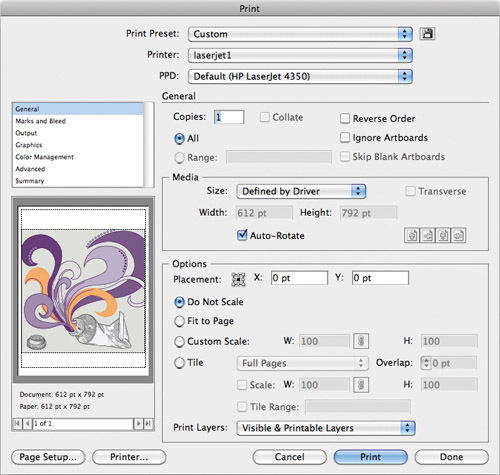
the General panel of the Print dialog box (Figure 1).
This way, you can quickly print consistent and accurate files from
Illustrator without having to dance between multiple dialog boxes or
panels. At the top of the Print dialog box you’ll find a pop-up to
choose from predefined print presets , a pop-up to choose which printer you
want to print to (extremely useful for those who have several different
printers at their disposal), and a pop-up to choose a PostScript Printer
Definition (PPD) file.
Tip
One of
the options available in the Printer pop-up is Adobe PostScript File,
which allows you to print your document as a PostScript file that can
then be downloaded directly to a printer or converted to PDF using
Acrobat Distiller. |
A PPD file contains specific
information about a printer, including media dimensions, color
information, and printer-specific settings such as resolution.
Illustrator makes an educated guess about the right PPD file for your
selected printer, although you can override it and choose your own if
you want (however, if you’re not familiar with PPD files, it’s best to
leave this setting alone). You can choose a PPD only when an Adobe
PostScript device is selected as your printer.
Along
the left side of the Print dialog box is a list of all the panels you
can choose from to specify a range of print options. Beneath the list of
panels is a print preview that gives you a better idea of what will
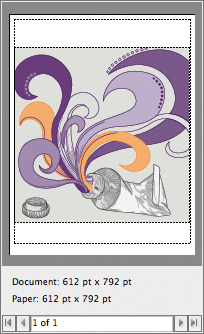
print. But this is no ordinary print preview—it’s interactive. You can
drag the artwork around in the preview to determine which part of the
paper the art will print on. By holding the Shift key while dragging,
you can constrain movement to the X or Y axis; by double-clicking the
preview, you can reset the positioning to the default. As you specify
changes in the Print dialog box, such as adding trim marks, you’ll see
those changes appear in the preview as well.
Setting Basic Print Options
Note
The
items we’ve discussed to this point appear across the top and along the
left side of the Print dialog box and are always visible no matter which
panel of the dialog box is active. |
As in just about any other
program, in the Print dialog box you can specify the number of copies as
well as the range of pages (or artboards) you want to print. This is
especially handy now that Illustrator bestows multiple artboards to its
faithful users. When you specify a range of artboards, use a comma as a
separation device and a hyphen to indicate a continuous string of artboards. For example, you can specify a range of 1-3, 6, which will print artboards 1, 2, 3, and 6 (Figure 2).
In addition to page range, you can specify the following options when printing your artboards:
Reverse Order. This option prints your last artboard first and your first artboard last.
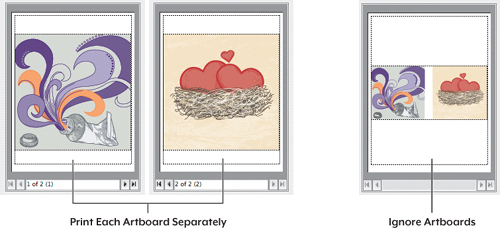
Ignore Artboards.
If you do not select this option, Illustrator will print each of the
artboards in your document. If you select this option, Illustrator will
not print separate pages for each artboard. Instead, Illustrator will
treat all artwork as one single large artboard (determined by the total
bounding area of all the art), as shown in Figure 3.
Skip Blank Artboards. If you have artboards that haven’t been filled with artwork yet, save paper by selecting this option.
In the Media section of the
dialog box, you can specify the size of the paper on which you want to
print. The items that appear in this pop-up menu are defined by the PPD
file that is chosen for your printer. If your printer supports it,
you’ll also have the ability to define custom media sizes; being able to
do so is extremely useful with large-format ink-jet printers or for
printing to imagesetters or platesetters. Checking the Auto-Rotate
option will automatically print pages at their correct orientation,
which is perfect for documents that contain artboards with both
landscape and portrait settings. Additionally, you can choose an
orientation to flip a page on its side. Changing the orientation can be
extremely important when printers want to choose which side of a sheet
the press will grip. It can also be useful when printing to a
large-format printer that uses rolls of paper, enabling you to save
paper by positioning your document to use the longer side of the roll.
You can use the Print
Layers pop-up menu to specify which kinds of layers will or won’t print:
Visible & Printable Layers, Visible Layers, or All Layers.
Additionally, you can set a custom scale size at which to print your
file. The Do Not Scale option prints your file at actual size, the Fit
to Page option reduces or enlarges your artwork so that it fills the
entire size of the output media, and the Custom Scale setting lets you
specify any scale size for the height or the width. The Placement option
lets you reposition your artwork on the artboard either by entering
values in the X and Y fields or by manually dragging your artwork in the
preview window.
Using Page Tiling
Page tiling was initially added
to Illustrator to let users print a single large file across several
smaller pages. This allowed a designer to assemble a large document at
the actual size using a printer with smaller media sizes. However, over
the years, designers learned to use this feature to create a single
large artboard, using the tiled areas as a substitute for multiple
pages. For example, setting up a document at 11 by 17 inches with page
tiling would result in two 8.5-by-11-inch pages. Now, of course, with
multiple artboards, this workaround is unnecessary.
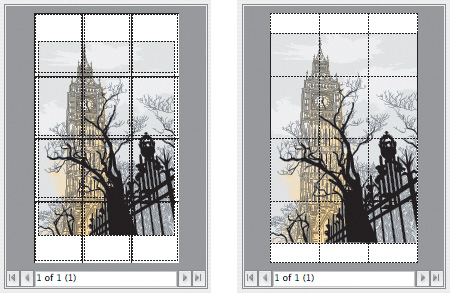
You can now choose from two page tiling settings (Figure 4):
Tip
When
you’re using Tile Full Pages or Tile Imageable Areas, each tile is
assigned a number, and you can specify which tiles you want to print by
entering a tile number in the Page Range field in the General panel of
the Print dialog box. |
Tile Full Pages. The Tile Full Pages option divides a single artboard into multiple sections, or tiles.
Each tile matches the media size you choose in the General panel of the
Print dialog box, and Illustrator creates as many of those tiles as
necessary to cover the entire document. Tile Full Pages also allows you
to specify an Overlap value in case your printer doesn’t print to the
edge of each sheet.
Tile Imageable Areas.
The Tile Imageable Areas option divides one artboard into multiple
tiles. Tiles match the media size you choose in the General panel of the
Print dialog box where possible, and Illustrator creates custom-sized
tiles as necessary to tile the entire document.
To tile a document with multiple artboards, you must select the Ignore Artboards option.
Because tiling is
something you might want to set in your document before you even start
working, be aware of the Done button at the bottom of the Print dialog
box. Clicking Done keeps the settings you’ve made in the Print dialog
box and returns you to the document for further editing and designing
without actually printing the file. Although it may seem odd to open the
Print dialog box to specify tiling settings, remember that the main
reason for tiling in Illustrator is specific to printing.