We all wind up shooting subjects that are backlit
(where the light is behind your subject). That’s because our eyes
automatically adjust to the situation and we see the subject just fine
in our viewfinder. The problem is our cameras aren’t nearly as
sophisticated as our eyes are, so you’re almost guaranteed to get some
shots where the subject is way too dark. Although I feel you get better
results using Camera Raw’s Fill Light and Recovery sliders,
Shadows/Highlights does a fairly decent job, and there’s a trick you can
use to make the adjustment re-editable.
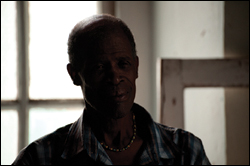
Step One. | Open
a photo where your subject is in the shadows (it can be a person, or a
building, or anything backlit). In this example, the light is coming
from the windows behind our subject, so he appears almost like a
silhouette. Ideally, we’d like to brighten him up, and darken the light
from the windows and the wall to the right by pulling back the
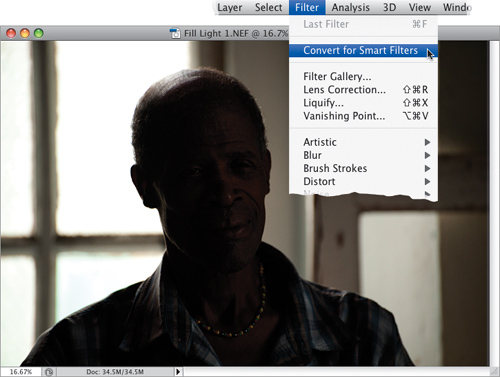
highlights. To do this, first go under Filter menu and choose Convert for Smart Filters.
This lets you apply the adjustment as if it was an adjustment layer
(meaning you can re-edit it later if you need to, or even delete the
adjustment altogether). Even though the adjustment we’re going to apply
isn’t found under the Filter menu, for some reason Adobe lets it act
like it is a regular filter, so why not take advantage of it, eh? Now go
under the Image menu, under Adjustments, and choose Shadows/Highlights.
SCOTT KELBY
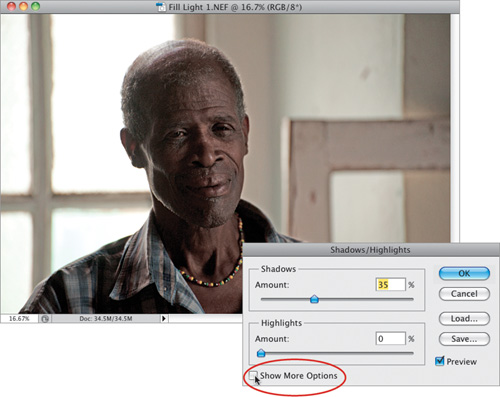
 | Step Two. | If
you’re choosing Shadows/Highlights, you probably have a problem in the
shadow areas, which is why, by default, it’s set to open up (lighten)
the shadow areas in your photo by 35% (as seen here). In previous
versions of Photoshop, the default setting was 50%, but most users felt
it was too high a setting, so in CS5, Adobe set it down to something
more reasonable. However, in this case, our subject is so buried in the
shadows that we’ll have to open the shadows quite a bit, but the problem
with opening the shadows 50% or more is your photos tend to look
“milky.” To get around that, turn on the Show More Options checkbox, as
shown here.
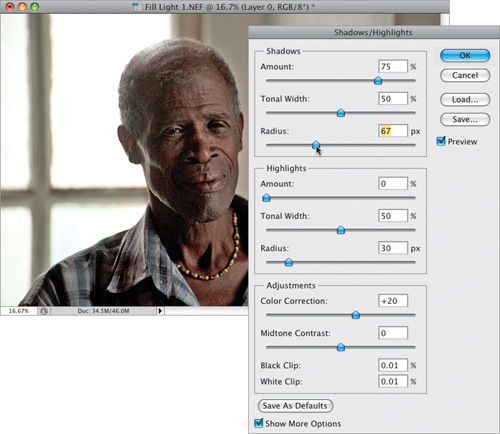
 | Step Three. | This
brings up an expanded version of the dialog (as shown here). I have a
little formula that I use that usually gives me the opened up shadow
areas I need, without looking totally fake. First, I usually leave the
Amount some where around 35% (the final amount depends on the individual
photo, and here I had to increase it to 75). Then, I drag the Shadows
Radius slider to the right to between 65 and 80 (as shown here), which
smoothes out the effect even more. (The Radius amount determines how
many pixels each adjustment affects, so to affect a wider range of
pixels, increase the amount.)
Tip: Save a New Default
If you come up with some
settings you like, click the Save As Defaults button in the bottom-left
corner of the dialog, and now it will open with your settings.
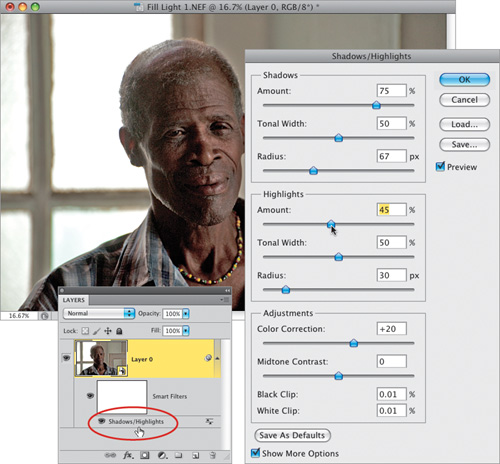
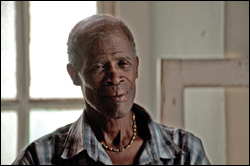
| Step Four. | Now
that the shadows are opened up (and look reasonably realistic), you can
work on the highlights. In most cases, you’ll only have to fix one or
the other—the shadows or the highlights, but not both. It takes someone
special to actually take a photo that is so wrong on every level that it
needs both areas adjusted (like I did here). So, to pull back (darken)
the highlights in the window and on the wall on the right, go to the
Highlights section and drag the Amount slider to the right (as shown
here). Now, if later you need to tweak these changes, because in Step
One you applied this as a Smart Filter, you can go to the Layers panel,
double-click directly on the words “Shadows/Highlights” (as shown here),
and the Shadows/Highlights dialog will appear again, with the settings
you used previously. Just make any changes you want, then click OK.
 |
Before
After (opening up the shadows and pulling back the highlights)
|