You can always use the Selection tool to select a
stroke or fill so that you can modify it by using any of the Swatches
popups or the Stroke Style menu on the Properties panel. But, what do
you do if you want to add a stroke or fill to a shape that was drawn
without one or the other? The answer to this dilemma is found in a trio
of tools that work nimbly together to provide one of the most unique
graphics-editing solutions found in Flash. You use the Eyedropper tool
to acquire fill and stroke styles or colors, and use the Paint Bucket
and Ink Bottle tools to transfer these characteristics to other shapes.
NOTE
These tools only
apply changes directly to shapes, shape primitives, or drawing objects,
so to modify an element that has been grouped or converted into a
symbol, you must first access the element in Edit mode.
1. The Eyedropper tool
The dropper icon that appears when you use the
Selection tool to select colors from any of the popup Swatches menus is
similar to the Eyedropper tool available in the Tools panel. However,
when pulled out of the Tools panel directly, the Eyedropper tool (I) has
slightly different behavior. Although you cannot use the Eyedropper
tool to sample colors from elements outside the Document window, you can
use it to sample line and fill styles or to simultaneously change the
stroke and the fill color chips to the same sampled color.
NOTE
When used to acquire
colors, the Swatches panel Eyedropper tool is limited to picking colors
from swatches within the panel. However, the droppers that you access
from the Swatches popup menus in the Color panel or Tools panel can
acquire colors from other visible areas, such as the system background,
items on the desktop, or items open in other applications. The
functionality of this feature is not totally consistent, so here are
some tips to making it work:
When picking colors by
using the dropper from the Color panel swatches popup, press and hold
the mouse as you roll over color chips in the popup or colors anywhere
on your desktop and release the mouse only when you are hovering over
the color that you want to sample. The preview in the swatches popup
changes as you roll over different colors, and the color chip changes
when you release the mouse to load the color that you have selected.
If you are using the dropper
from the Tools panel color chip swatches popup, the behavior is a bit
different: Click once on the color chip to open the swatches popup, and
then move the dropper to roll over any color in the popup or on your
desktop and click again to pick the color and load it into the current
color chip. The droppers available from the swatches popups for any of
the color chips in the Properties panel work the same way as the
droppers in the Tools panel swatches popup, but they are limited to
picking colors from within the Flash application (or the currently
loaded swatches).
The Eyedropper tool doesn't
have any options in the Tools panel because they are all built in. As
you hover over an item, the Eyedropper tool displays a small icon to
indicate whether it is over a line or a fill that can be sampled by
clicking. When a line is sampled, the Eyedropper tool automatically
converts to the Ink Bottle tool, and when a fill is sampled, the
Eyedropper tool converts to the Paint Bucket tool.
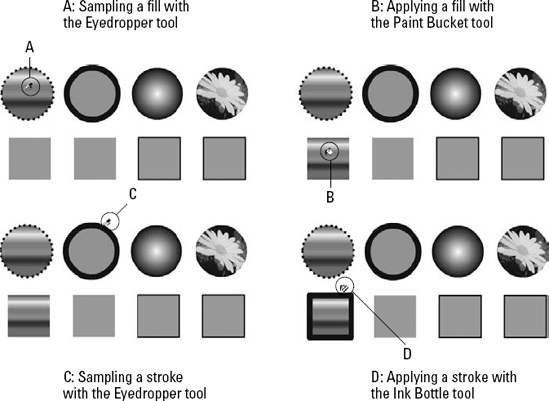
The composite image shown in Figure 1
shows the icons that appear when you use the Eyedropper tool to sample a
fill (A) and apply it to another shape with the Paint Bucket tool (B),
and sample a stroke (C) and apply it to another shape with the Ink
Bottle tool (D).
Any items already
selected when the Eyedropper tool samples a stroke or fill immediately
acquire the applicable stroke or fill style. This is the quickest way to
transfer the fill or line styles of one element to a whole group of
elements. Figure 2 shows the Eyedropper tool used to sample a fill with one (A) or more (B) elements already selected.

|
When you press and hold the
Shift key while clicking a line or stroke color with the Eyedropper
tool, the Fill and the Stroke color chips both convert simultaneously to
the newly selected color so that it can be applied with any of the
other drawing tools.
|
|
2. The Ink Bottle tool
You use the Ink Bottle tool (S) — refer to Figure 9.1
(D) — to change the color, style, and thickness of existing outlines.
It is most often used in conjunction with the Eyedropper tool. When the
Ink Bottle tool is in use, pay attention to the following three options:
The current Stroke Color option on the Tools panel or the Properties panel
The Stroke weight (or thickness) setting in the Properties panel
The Stroke Style setting in the Properties panel
The Ink Bottle applies the
current stroke color and line style, either sampled with the Eyedropper
tool or chosen from the popup in the Tools panel or the controls in the
Properties panel.
|
When you click to sample a line with the Ink Bottle tool, all other currently selected lines are changed simultaneously.
|
|
The Ink Bottle tool is
especially useful for applying custom line styles to multiple lines. You
can build a collection of custom line styles either off Stage or in a
special custom line palette saved as a single-frame Flash movie. You can
then acquire these line styles whenever you want to reuse them.
|
You can add Flash files with graphics libraries that you plan to reuse to the application's Libraries folder so that they can be easily accessed from the Window => Common Libraries menu.
|
|
NOTE
Depending on the level of
zoom, some lines may not appear accurately on the screen — though they
print correctly on a high-resolution printer. You may adjust Stroke
weight in the Fill and Stroke section of the Properties panel.