Constructing a template is only half the job — using
it to create new pages is the other half. Because the basic layout is
complete and you're only dropping in new images and entering new text,
creating pages based on templates takes just a fraction of the time
needed to create regular Web pages. Dreamweaver makes it easy to enter
new content as well — you can even move from one template region to the
next, much like filling out a form (which, of course, is exactly what
you're doing).
To create a new document based on a template, follow these steps:
In
the Template category of the Assets panel, select the desired template
and choose the New From Template option from the panel's context menu.
Alternatively, choose File =>
New. Then, from the New Document dialog box, select the Page From
Template category and choose the site and desired template, as shown in Figure 1.

If
you want to maintain a connection between the template-derived document
and the template, leave the Update Page When Template Changes option
selected. To detach the template from the newly created document and
make the entire page editable, deselect the option.
Click OK when you're finished.
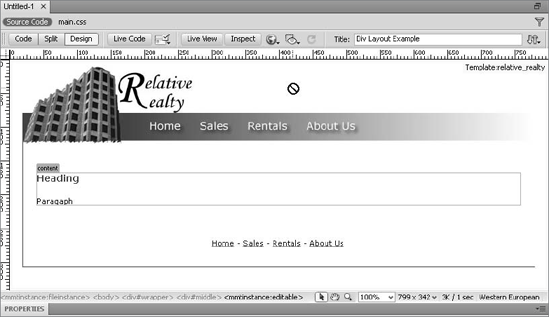
When your new page opens, the editable regions are again highlighted, as shown in Figure 2;
furthermore, the cursor is only active when it is over an unlocked
region. If you have the Code view open, you also see that the locked
region is highlighted in a different color — by default, gray. Document
highlighting makes it easy to differentiate the two types of regions.
NOTE
A document created from a template is known as an instance of that template.
Generally, it is easiest to
select the editable region name or placeholder first and then enter the
new content. Selecting the editable regions can be handled in several
ways:
Highlight the region name or placeholder with the mouse.
Position your cursor inside any editable region and select the <mmtinstance:editable> tag in the Tag Selector.
Choose Modify => Templates and select the name of your editable region from the dynamic list.
NOTE
If all your editable
regions are separate cells in a table, you can tab forward and Shift+Tab
backward through the cells. With each press of the Tab key, all the
content in the cell is selected, whether it is an editable region name
or a placeholder.
Naturally, you should save your document to retain all the new content that's been added.
|
Behaviors can be
added without any additional coding or workarounds to links within
editable regions. You cannot, however, add a behavior to text or an
image in a locked region.
|
|
In this Dreamweaver Technique, you convert an existing page to a template and apply editable regions to several page elements.
From the Techniques site, expand the 28_Template folder and open the template_start file.
Choose File => Save as Template.
In the Save As Template dialog box, enter house_listing in the Save As field and click Save.
When the Update Links dialog box appears, click Yes.
Dreamweaver stores the new file in the Templates folder as house_listing.dwt.
Notice that the term <<Template>> is now visible in the
Dreamweaver title bar. The next task is to begin adding editable regions
to the template. Select the text A Real Steal by dragging across it
with your mouse.
Because you want to make just the text inside the <h1>
tag an editable region and not the entire tag, it's best not to use the
Tag Selector. From the Insert panel's Common category, choose
Templates: Editable Region.
In the New Editable Region dialog box, enter Headline in the Name field.
If you have Visual Aids =>
Invisible Elements enabled, you'll see a border appear around the
editable region as well as a tab naming the area. Delete the selected
original text and enter the placeholder text Short Headline.
Place your cursor in the first paragraph of text and choose the <p.firstParagraph> tag from the Tag Selector.
Repeat Steps 6 and 7 to create a new editable region; name the region Description.
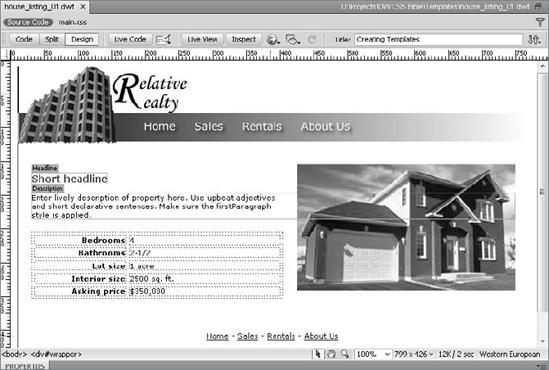
Press
Delete to remove the selected original text. Press Enter (Return) to
create a new paragraph and enter this placeholder text: Enter
lively description of property here. Use upbeat adjectives and short
declarative sentences. Make sure the firstParagraph style is applied.
In the Property inspector, choose firstParagraph from the Style list.
Select the second paragraph in the Tag Selector and click Delete to remove it.
Save
your page; Dreamweaver notes that the Headline editable region is
within a block tag. Click OK to acknowledge that this is by design.