Does My File Contain Transparency?
Not every document needs
flattening—only those with transparency in them. The tricky part is that
transparency can be introduced into an Illustrator document in several
ways:
You apply a blending mode or an Opacity value other than 100% in the Transparency panel.
You apply the Effect > Stylize > Drop Shadow feature.
You apply the Effect > Stylize > Feather feature.
You apply the Effect > Stylize > Outer Glow feature.
You apply the Effect > Stylize > Inner Glow feature.
You apply any “below-the-line” Photoshop effect from the Effect menu.
You place a PDF file that contains transparency.
You place a native Photoshop file or layered TIFF that contains transparency.
You apply a Bristle brush stroke that contains a paint opacity value of less than 100 percent.
It would be helpful to know
whether your document uses transparency or even will require either of
the two levels of rasterization discussed earlier. You can use the
Flattener Preview panel (Window > Flattener Preview) to tell whether a
document has transparency effects in it, as well as to preview areas
that will become rasterized in the flattening process.
By clicking the Refresh
button in the panel, Illustrator highlights specific areas in your file
in red, indicating where rasterization will occur. You can enlarge the
panel to see a larger image, and you can also click inside the preview
area of the panel to zoom in closer to see more detail. From the
Highlight pop-up menu, you can choose from a variety of items that
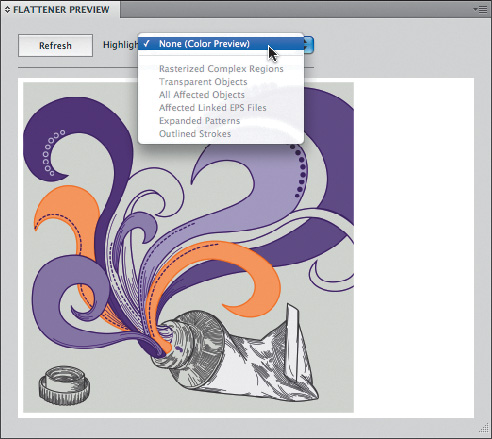
Illustrator will preview. If all the items listed in your Highlight
pop-up are dim, that indicates your file doesn’t have transparency
present, and no flattening is necessary to print your file (Figure 11,
on the next page). For example, when you choose Transparent Objects,
Illustrator shows you where all objects that use transparency are on
your page—although those regions may not necessarily become rasterized.
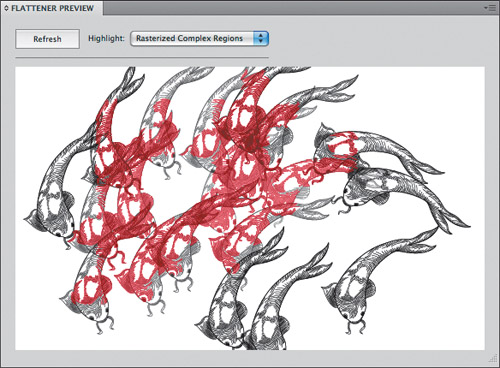
We also mentioned earlier that Illustrator looks for complex areas of a
document; you can see where those areas are by choosing Rasterized
Complex Regions in the pop-up menu (Figure 12,
on the next page). Additionally, the All Affected Objects option shows
you all the objects that may not be transparent themselves but that
interact with transparency in some way. (Like with the example we
mentioned earlier with the drop shadow and the text, the text itself
doesn’t have transparency applied to it, but if the text appears below
the drop shadow, the text must become rasterized to preserve the
appearance.)
To take advantage of all that
the Flattener Preview panel can offer, adjust the different flattener
settings, and preview the results—making changes or adjustments where
necessary—before you actually print the file. As an aside, InDesign and
Acrobat Pro also contain a similar Flattener Preview panel and identical
flattener settings (in fact, it’s the same underlying code).
|
To
throw yet another variable into the mix, the kind of printer or RIP you
use also affects your results. Any Adobe PostScript LanguageLevel 3
device should be able to handle transparency without issue.
Specifically, PostScript version 3015 (which appears in the latest
versions of RIPs) can process files that have been flattened. It’s
important to remember that flattening has to occur for any RIP to
understand how to print transparency. If your RIP can process PDF files,
that doesn’t necessarily mean it can process PDF files with
transparency in them. If you’re in doubt, check with your RIP
manufacturer to find out whether transparency flattening can occur
inside the RIP or whether you need to print files from an Adobe
application to flatten them.
Some older print devices are
confused by the effects of flattening. For example, a Scitex Brisque RIP
(since acquired by Creo and now Kodak) looks at jobs that are printing
and splits up the vector and raster elements onto two “layers.” The
rasterized content prints on a continuous tone (CT) layer at a lower
resolution (such as 300 dpi), and line art prints on a separate vector
layer at a much higher resolution (such as 2400 dpi). Because flattening
could cause a vector object to be rasterized, the RIP sees that raster
only as a CT image and prints it at the lower resolution. This might
cause text that is rasterized to print with noticeably jagged edges.
There’s an update available for Brisque RIPs to address this issue, but
that doesn’t automatically mean everyone who owns a Brisque has
installed the update (or knows it exists).
Rampage RIPs experience similar issues, although turning off the dual-mode setting addresses them.
The best advice in any case is
to talk with your printer. For any big job, most printers will be happy
to run a test file for you to make sure everything will print
correctly. Taking advantage of these opportunities will surely save you
headaches when press deadlines loom. Adobe also has free specialized
training materials for print service providers if your printer needs
more information (online at http://www.adobe.com/print).
|
Printing with Confidence
You can avoid
accidents by learning to anticipate possible problems. Now that you’re
aware of how transparency works, here are a few ways to ensure that you
get the results you expect when you’re printing from Illustrator:
Use the right flattener
presets—Low Resolution, Medium Resolution, and High Resolution. For
quick proofs to your laser printer, you can use the Low Resolution or
Medium Resolution setting, but when you’re printing to a high-end
proofer or imagesetter, use the High Resolution setting. You’ll find the
Transparency Flattener settings in the Advanced panel of the Print
dialog box.
To
avoid text becoming rasterized, create a new layer in your Illustrator
file, and place all your text on that layer. As long as you keep that
text layer as the top layer in your document, you won’t have to worry
about chunky or pixelated text because of rasterization.
A
potential problem is that even if you, as a designer, are aware of
transparency, plenty of printers aren’t. If you are sending a file and
aren’t sure who will be printing it or what they will be using to print
it, you might consider sending the file as a PDF/X-1a file
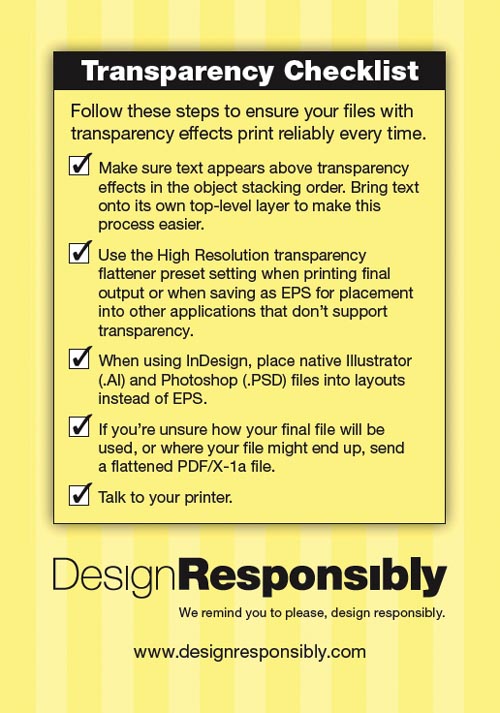
If you’d like an easy way to remember the important steps to get great results when printing, a small transparency checklist (Figure 13, courtesy of Design Responsibly), is available when you register at www.peachpit.com/rwillcs5.
Designing with transparency
allows you to design creations that were previously prohibitive and
difficult to implement, thus allowing you to save valuable time while
being even more creative. Now that you know how transparency works and
what’s necessary to use it in your workflow, give it a test drive.
You’ll be happy you did.