You can find the Gradient Transform tool (F) in a
drop-down within the same tile on the toolbar as the Free Transform tool
(Q). Gradient Transform is used only to modify bitmap or gradient fills
and does not apply to simple color fills. The Gradient Transform tool
does many of the same things the Free Transform tool does, but it
modifies only the fill
of a shape without changing the stroke or outline appearance at all.
This type of adjustment is a lot like shifting, rotating, or scaling a
larger piece of material behind a frame so that a different portion is
visible.
The Gradient Transform tool
has only one option in the Tools panel, but, as with the Eyedropper
tool, it does apply differently depending on the type of fill selected.
To use the Gradient Transform tool, select it in the Tools panel, and
then simply click an existing gradient or bitmap fill. A set of three or
four adjustment handles appears, depending on the type of fill. The
following three transformations can be performed on a gradient or bitmap
fill: adjusting the fill's center point, rotating the fill, and scaling
the fill. The extra set of adjustment handles appearing on bitmap fills
enables them to be skewed. The Magnet option in the Tools panel toggles
on Snapping behavior, making it easier to constrain transformations to
even adjustment increments. Figure 1 illustrates the various adjustment handles on three types of fills.
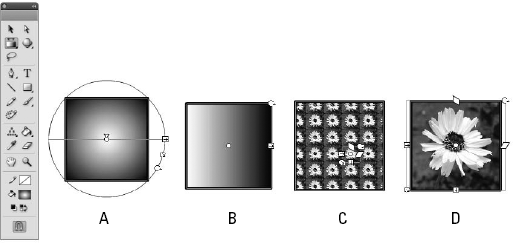
The position of these handles
may shift if a fill (or bitmap fill) has been variously copied, rotated,
or pasted in any number of ways. The fundamental rules are as follows:
The round center handle moves the center point.
The extra center pointer on radial gradients moves the highlight.
The round corner handle with the short arrow rotates.
The square edge handles scale either vertically or horizontally.
The round corner handle with a long arrow scales symmetrically.
The diamond-shaped edge handles on bitmap fills skew either vertically or horizontally.
1. Adjusting the center point with the Gradient Transform tool
If the fill is not aligned
in the shape as you would like it to be, you can easily move the center
point to adjust how the shape outline frames the fill. To adjust the
center point, follow these steps:
Deselect the fill if it has been previously selected.
Choose the Gradient Transform tool from the Tools panel.
Bring
the cursor to the small circular handle at the center of the fill until
it changes to a four-arrow cursor, pointing left, right, up, and down,
like a compass, indicating that this handle can now be used to move the
center point in any direction.
Drag the center circular handle in any direction you want to move the center of the fill.
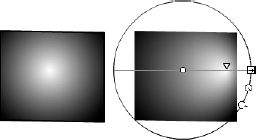
Figure 2 shows a radial gradient (left) repositioned with the Gradient Transform tool (right).
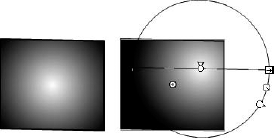
The Gradient Transform
option enables you to adjust the highlight of a radial gradient without
moving the center point of the fill. As shown in Figure 3,
you can drag the extra pointer above the center point circle to move
the highlight of the gradient along the horizontal axis. If you want to
move the highlight along a vertical axis, use the rotate handle to
change the orientation of the fill.
|
The Paint Bucket tool is also a
handy way to set the highlight point of a gradient fill. Select the
gradient that you want to apply, and then click inside the shape where
you want the highlight to be. You can keep clicking in different areas
of the shape with the Paint Bucket to move the highlight around until
you like it.
|
|
2. Rotating a fill with the Gradient Transform tool
To rotate a gradient or
bitmap fill, find the small circular handle that's at the corner of the
fill. (In a radial gradient, choose the lower circular handle.) This
circular handle is used for rotating a fill around the center point.
Simply click the circular handle with the Rotate cursor and drag
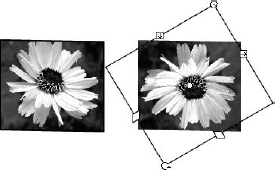
clockwise or counterclockwise to rotate the fill. Figure 4 shows a bitmap fill (left) as it appears when rotated clockwise (right).
|
Activate the Snap to
Objects toggle in the Tools panel if you want to use snapping behaviors
to help guide rotating or scaling of a fill. (Turn behaviors on or off
in the application menu under View => Snapping.)
|
|