IT tutorials
 
Graphics
 

CorelDraw 10 : Adding Graphics to a Page (part 3) - Optimizing images for the Web

11/21/2011 10:33:18 AM
- Free product key for windows 10
- Free Product Key for Microsoft office 365
- Malwarebytes Premium 3.7.1 Serial Keys (LifeTime) 2019

Optimizing images for the Web

The more images you place on a Web page and the larger their file sizes, the longer it will take the page to load in a person's browser. And although 56K and faster modems are the standard, some people still access the Internet with older, slower modems. As a result, it's important to balance image quality and size when preparing graphics for the Web. To handle this, CorelDraw 10 provides the Web Image Optimizer.

To optimize an image for the Web:
1.
Open the image file in CorelDraw.

2.
Choose File > Publish To The Web > Web Image Optimizer.

The Web Image Optimizer dialog box appears (Figure 7).
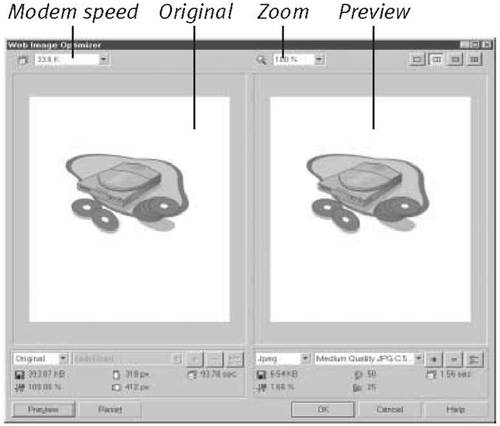
Figure 7. Use the Web Image Optimizer to reduce an image's size before adding it to your Web page.


3.
Click a button in the upper-right corner to display two windows: one for the original and one for a preview of the revised image.

4.
In the first window, select the image's current file type from the pull-down list. (If the file is still in native CorelDraw format, choose Original.)

5.
In the second window, select the image's destination file type from the pull-down list.

6.
To set compression and other options for the chosen destination file type, click the right-most button beneath the second window.

A dialog box specific to that file type appears (Figure 8).
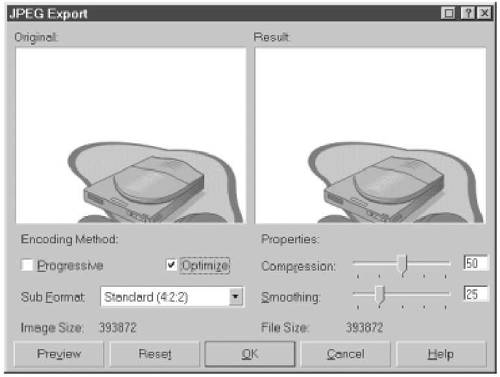
Figure 8. A dialog box specific to the selected output file format appears. Choose settings, preview the image (if you like), and click OK.


7.
Set options as desired and click OK.

8.
Select a compression setting from the second drop-down list beneath the second window.

9.
Select the modem speed for which you want to optimize from the drop-down list in the upper-left corner of the dialog box.

10.
Click the Preview button to calculate the file's new size and its approximate transmission time, as well as to preview it in the second window.

11.
To view results for other file types, repeat Steps 5–10. Otherwise, click OK.

A standard Save dialog box appears (Figure 9).
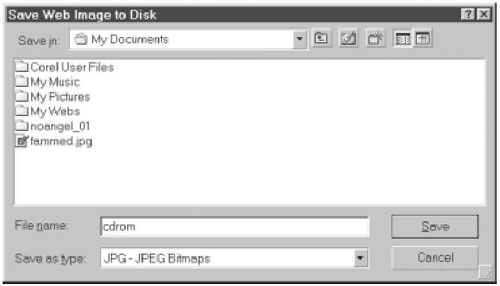
Figure 9. Name the output file, specify a destination, and click Save.


12.
Name the file, choose a location on disk in which to save it, and click Save.

The file is saved in the specified format.

  • If you select a progressive JPEG (Figure 8), the image downloads in a series of passes that get progressively clearer. Otherwise, the image downloads from its top to its bottom.

 
Others
 
- CorelDraw 10 : Adding Graphics to a Page (part 2) - Exporting the rollover graphic
- CorelDraw 10 : Adding Graphics to a Page (part 1) - Creating Rollover Graphics
- CorelDraw 10 : Adding Text to a Web Page
- Adobe Flash Professional CS5 : Transforming Gradients and Bitmap Fills (part 2) - Adjusting scale with the Gradient Transform tool, Setting gradient fill overflow styles
- Adobe Flash Professional CS5 : Transforming Gradients and Bitmap Fills (part 1) - Adjusting the center point with the Gradient Transform tool, Rotating a fill with the Gradient Transform tool
- Adobe InDesign CS5 : Joining Anchor Points & Using the Smooth Tool
- Adobe InDesign CS5 : Splitting Paths
- Adobe Flash Catalyst CS5 : Using design-time data (part 2) - Add and remove elements in the repeated item
- Adobe Flash Catalyst CS5 : Using design-time data (part 1) - Replace design-time images & Edit design-time text
- Adobe Flash Catalyst CS5 : Setting data list properties
 
 
Top 10
 
- Microsoft Visio 2013 : Adding Structure to Your Diagrams - Finding containers and lists in Visio (part 2) - Wireframes,Legends
- Microsoft Visio 2013 : Adding Structure to Your Diagrams - Finding containers and lists in Visio (part 1) - Swimlanes
- Microsoft Visio 2013 : Adding Structure to Your Diagrams - Formatting and sizing lists
- Microsoft Visio 2013 : Adding Structure to Your Diagrams - Adding shapes to lists
- Microsoft Visio 2013 : Adding Structure to Your Diagrams - Sizing containers
- Microsoft Access 2010 : Control Properties and Why to Use Them (part 3) - The Other Properties of a Control
- Microsoft Access 2010 : Control Properties and Why to Use Them (part 2) - The Data Properties of a Control
- Microsoft Access 2010 : Control Properties and Why to Use Them (part 1) - The Format Properties of a Control
- Microsoft Access 2010 : Form Properties and Why Should You Use Them - Working with the Properties Window
- Microsoft Visio 2013 : Using the Organization Chart Wizard with new data
Technology FAQ
- Is possible to just to use a wireless router to extend wireless access to wireless access points?
- Ruby - Insert Struct to MySql
- how to find my Symantec pcAnywhere serial number
- About direct X / Open GL issue
- How to determine eclipse version?
- What SAN cert Exchange 2010 for UM, OA?
- How do I populate a SQL Express table from Excel file?
- code for express check out with Paypal.
- Problem with Templated User Control
- ShellExecute SW_HIDE
programming4us programming4us