I get more requests for how to fix this problem than
probably all the rest combined. The reason is it’s so darn hard to fix.
If you’re lucky, you get to spend an hour or more desperately cloning.
In many cases, you’re just stuck with it. However, if you’re smart,
you’ll invest an extra 30 seconds while shooting to take one shot with
the glasses off (or ideally, one “glasses off” shot for each new pose).
Do that, and Photoshop will make this fix absolutely simple. If this
sounds like a pain, then you’ve never spent an hour desperately cloning
away a reflection.
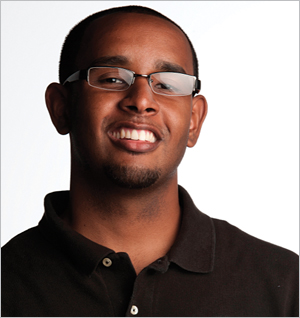
Step One. | Before
we get into this, make sure you read the short intro up top here first,
or you’re going to wonder what’s going on in Step Two. Okay, here’s a
photo of a co-worker with his glasses on.
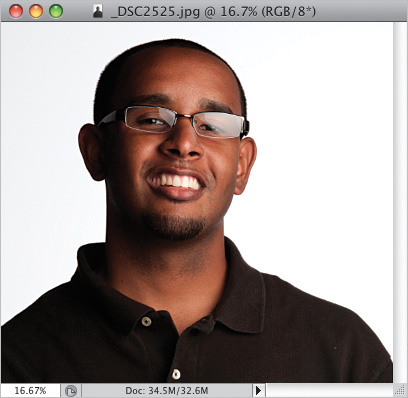
| Step Two. | I
could see right away that we were going to have a reflection in his
glasses, so I told him after the shot not to move his head, but just to
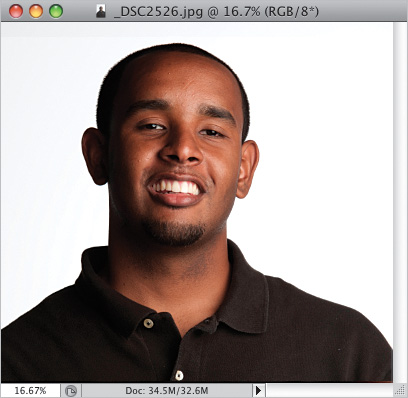
reach up and remove his glasses, and then we took another shot. Now,
with both images open, get the Move tool (V), press-and-hold the Shift key, and click-and-drag the “no glasses” shot on top of the “glasses” photo.
BRAD MOORE
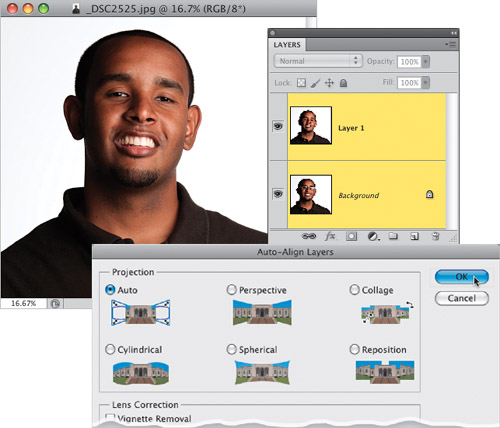
| Step Three. | Holding
the Shift key will help get the alignment of the two layers somewhat
close, but in this case, it’s still off by a bit because the shot was
hand-held. Anyway, for this to work, the two photos have to be lined up
with each other right on the money, and in CS5, Photoshop will do it for
you. You start by going to the Layers panel, clicking on the Background
layer, then pressing-and-holding the Command (PC: Ctrl) key and
clicking on Layer 1 to select them both (you can see they’re both
highlighted here). Then go under the Edit menu and choose Auto-Align Layers
(if that function is grayed out, it’s because you don’t have both
layers selected). When the dialog appears, leave it set to Auto and just
click OK.
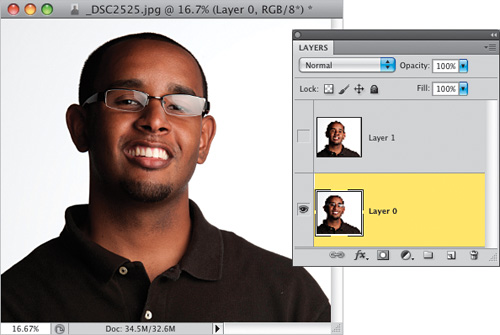
 | Step Four. | A
little progress bar will appear telling you that it’s aligning the
selected layers based on their content, and within a few seconds the two
layers will be precisely lined up . Once your images
are aligned, use the Crop tool (C)
to crop away any transparent areas. Okay, now you’ll need to hide the
top layer by clicking on the little Eye icon to the left of the layer,
then click once on the Background layer (as shown here). Now you’re
seeing the original shot, with the reflection in the glasses.
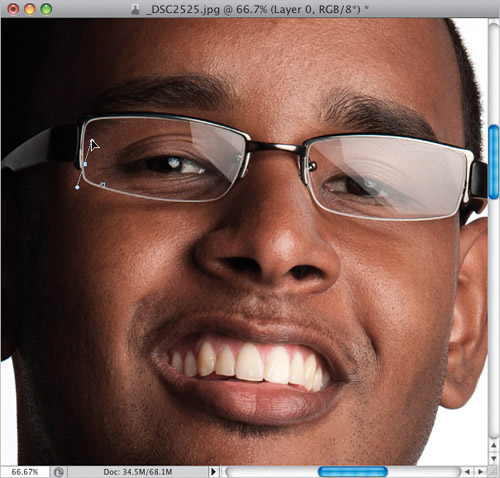
 | Step Five. | You’re
going to need to select the inside area of both lenses, and you can use
whichever selection tool you’re most comfortable with (like the
Magnetic Lasso tool perhaps), but for a job like this, I think the Pen
tool is perfect. If you choose to go the Pen tool route, get the Pen
tool (P), then go up to the Options
Bar and click on the second icon from the left (so it just draws a
path). Then click the Pen tool once on a lower part of one of the glass
lenses, move your cursor over to the left, and click, hold, and drag
slightly to the left (as shown here). This draws a slightly curved path
between the two points (the farther you drag after clicking, the more
the curve bends).
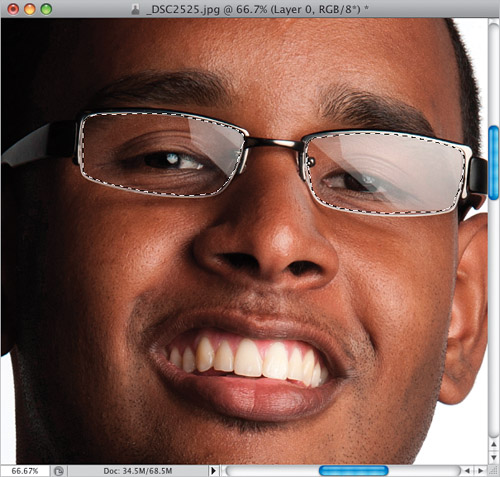
 | Step Six. | So
basically, that’s how it works—you move a little further along the
lens, click, hold, and drag. Move again—click, hold, and drag, and
continue this as you’re basically going to trace around the lens with a
path. When you get back to the point where you started, a little circle
appears in the bottom-right corner of your Pen tool’s icon letting you
know you’ve come “full circle.” Click on that point to close your path.
Now do the same thing to the other lens. Once you’ve gotten paths drawn
around both lenses, press Command-Return (PC: Ctrl-Enter)
to turn your paths into a selection (as shown here). Remember, you
don’t have to do this using the Pen tool—use any selection tool(s)
you’re comfortable with.
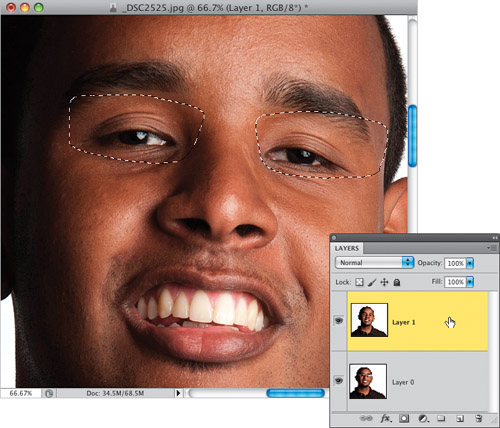
 | Step Seven. | After
your selection is in place, make the top layer visible again (seen
here) by clicking in the first column on the Layers panel where the Eye
icon used to be. Then, click on the top layer to select it.
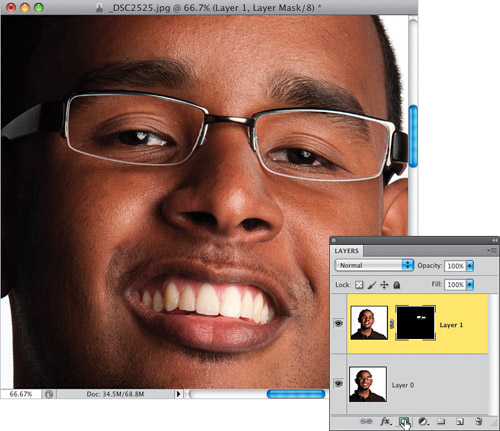
 | Step Eight. | To
complete the effect, just click the Add Layer Mask icon at the bottom
of the Layers panel (as shown here) and the eyes from the top layer
replace the eyes from the original glasses layer, and your reflection
problems are gone.
 |
Before(notice the reflection—most visible in the right eye)
After (the reflection is gone)

|