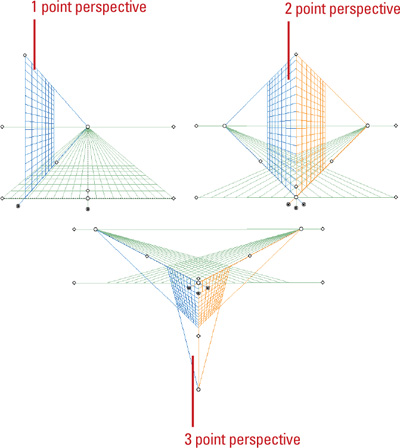
The Perspective Grid tool allows you to display a perspective grid that you can use to draw
shapes and create scenes with 1, 2, or 3-point perspective. For example,
you can create a row of trees down a street to create perspective. The
perspective grid provides presets with a 1, 2, or 3-point perspective to
help you get started. You can change the viewing angle and distance
along with widgets to control vanishing points, horizon height, ground
level, and the origin. You can draw objects directly on the perspective
grid or attach existing ones to it. If you want to match the depth or
height of an existing perspective object, you can use the Move Plane To
Match Object command to adjust the grid, so you can draw or adjust
another object to it.
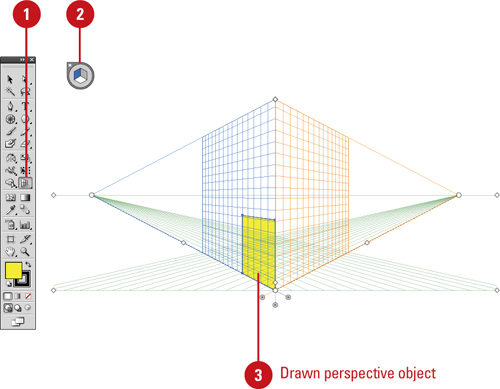
Draw Perspective Objects
- 1. Click the Perspective Grid tool on the Tools panel.
- If the grid doesn’t appear, click the View menu, point to Perspective Grid, and then click Show Grid.
- 2. To select a perspective grid preset, click the View menu, point to Perspective Grid, point to a Point Perspective (One, Two, or Three), and then select a preset.
- 3. To draw objects on the grid, do any of the following:
- Draw Perspective Objects. Select a Line tool (other than the Flare tool) or Rectangle tool, and then drag to draw it.
- Attach Normal Objects. Select the plane to which you want to use, select the normal object, click the Object menu, point to Perspective, and then click Attach to Active Plane.
- Release Perspective Objects. Select the attached object, click the Object menu, point to Perspective, and then click Release with Perspective.
- Move Plane to Match Objects. Select the existing object, click the Object menu, point to Perspective, and then click Move Plane To Match Object.
Adjust the Perspective Grid
- 1. Click the Perspective Grid tool on the Tools panel.
- If the grid doesn’t appear, click the View menu, point to Perspective Grid, and then click Show Grid.
- 2. To select the active grid plane, click a plane in the cube (Right,
Left, or Horizontal) in the Plane Switching Widget. Click the area
outside the cube to select no plane.
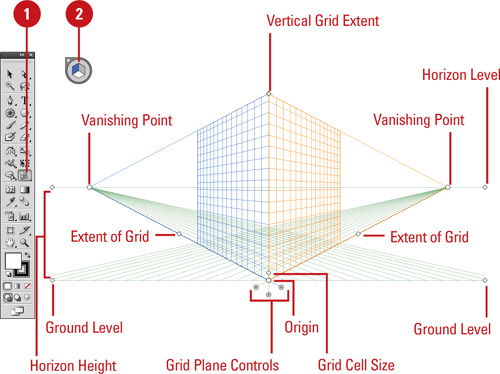 - 3. To adjust the perspective grid, drag the left or right controls on the grid for any of the following:
- Ground Level. Moves the perspective grid.
- Vanishing Points. Adjusts the perspective in or out.
- Horizon Height. Adjusts the horizon line up or down.
- Extend the Grid. Extends or shortens the perspective grid.
- Grid Plane Controls. Adjust the Right, Horizontal, or Left.
- Grid Cell Size. Increases or decreases the grid cell size.
- Origin. Adjusts the X and Y coordinates of the grid plane.
- 4. To set perspective grid related options, click the View menu, point to Perspective Grid, and then click any of the following:
- Show/Hide Rulers. Shows or hides the ruler on the height line.
- Snap to Grid. Snaps an object to a perspective gridlines.
- Unlock/Lock Grid. Unlocks or locks the perspective grid.
- Lock Station Point. Locks the station point in place. When you move one vanishing point, the other one moves in sync.
|