In Flash Catalyst, graphic optimization
options include converting vector graphics to bitmaps, compressing
images, and converting embedded images to linked files. When you import a
design document, you can choose fidelity options that do some of the
graphic optimization for you. But even after importing graphics into
your Flash Catalyst project, you can use the optimization options in the
Heads-Up Display (HUD) or the Modify menu to apply settings to
individual images.
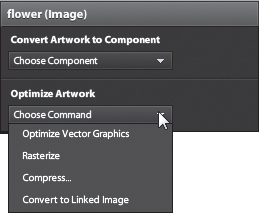
When you select artwork, the optimization options appear in the HUD. The options include:
Tip
When you select an optimized vector graphic, the
Optimize Vector Graphics option changes to Break Apart Graphic. To edit
the parts of a complex vector graphic that has been optimized, you must
first break it apart.
Optimize Vector Graphics
compiles a selected graphic into a low-level Flash object that displays
more quickly in Flash Catalyst and at runtime. Once you optimize a
vector drawing in Flash Catalyst, you can no longer edit its stroke and
fill. In an optimized vector graphic file, all MXML information (vector,
stroke, path, fill, and so on) is kept separately in an FXG file. When
you optimize a vector graphic, a new optimized graphic is added to the
Library panel in the Optimized Graphics category. The new optimized
graphic replaces your original graphic in the artboard.
Rasterize converts
a static vector graphic or text into a bitmap image. It replaces the
image in the artboard with a PNG file and places a copy of the PNG in
the Library panel. Use this option to optimize static vector graphics or
text.
Compress adds
compression to a bitmap image. It places a smaller (lower-quality) copy
of the bitmap image in the Library panel. When you compress an image
with transparency, the transparency is lost.
Convert To Linked Image
converts an embedded image to a linked image. By default the images you
add to your application are embedded and will be published as part of
the SWF file. To reduce the size of your application, you can link
images. Linking an image stores it outside the SWF file and loads the
image when you run the application.
Optimize artwork
When you imported the Illustrator file, Flash
Catalyst suggested you optimize graphics to improve the performance of
your application. The gray border at the top of the artboard is made up
of a rectangle shape and several small paths used to create the
horizontal stripes. You don’t need to work with these items separately,
so you can optimize the Top Graphic.
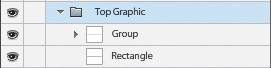
1. | In the Layers panel, click the small triangle to expand the Top Graphic layer.
The Top Graphic layer includes two objects: Group and Rectangle.
|
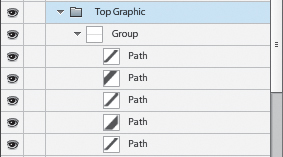
2. | Click the small triangle to expand the Group row.
Every stripe in the graphic is a separate path.
|
3. | Click the small triangle again to collapse the Group row.
|
4. | In the Layers panel, click the Top Graphic layer to select all its contents.
|
5. | In the Optimize Artwork section of the HUD, choose Optimize Vector Graphics.
The parts of the Top Graphic are combined into a single optimized graphic named Graphic1.

|
6. | Save your changes, and then choose File > Close Project.
The project closes and you return to the Flash Catalyst Welcome screen.
|
Flash Catalyst supports both vector and bitmap
graphics, making it a very powerful design tool. For example, the
artwork you import may include both vector and bitmap graphics.
Vector graphics
are mathematical equations describing the distance and angle between two
points. Additional information, such as the color and thickness of a
line (stroke) and the contents of a path (fill) can also be set. Vectors
can be sized up or down without losing image quality.
Bitmap (raster) images
are made of a specific number of pixels mapped to a grid. Each pixel
has a specific location and color value. An image with more pixels has a
higher resolution and a larger file size.
Another example of the difference between vector and
bitmap is that a photograph can accurately depict a physical scene in a
single image layer. To produce similar realism in a vector illustration
could require hundreds of vector shapes stacked upon each other.
This is not to suggest that bitmaps are better than
vectors, or vice versa; both of these main graphic types are integral to
visual communication and designing in Flash Catalyst.

The illustrations at right are examples of
vector and bitmap graphics. On the left is an image created with many
paths. The image on the right is a bitmap photograph.