Scaling vector objects
We talked about how scaling—whether for bitmap or vector shapes—can
cause unwanted distortion, and how the 9-slice Scaling tool eliminates
that problem. Because this is such a useful tool, and because it’s a bit
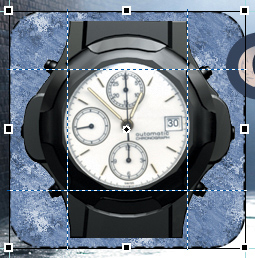
different for vectors, we’ll practice with it again, this time scaling
the rounded rectangle in the watch_promo.fw.png file to make it large
enough to hold the text that you will be adding to the design.
Scaling the “old” way
Remember, traditional scaling will distort the corner
radii of this rectangle, giving you an undesirable result. Let’s try
this first to see what happens.
1. | Make
sure the rectangle is still active; look for the blue control handles
at the four corners of the shape. If you don’t see them, use the Pointer
tool to select the shape on the canvas or in the Layers panel.
|
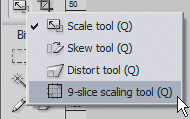
2. | Select the Scale tool (
 ) from the Select section in the Tools panel. Control handles appear around the rectangle.
|
3. | Drag the top-middle control handle straight up by 60 pixels. Refer to the tooltips as you drag the handle.
|
4. | Release
the mouse, and note how the corners of the rectangle have been
distorted. (If the guides or the rectangle’s bounding box are obscuring
your view of the corners, click Preview on the Document window, but be
sure to click back to Original to continue working.)
|
5. | Press
the Esc key to cancel the transformation, or press Ctrl+Z (Windows) or
Command+Z (Mac) to undo the scaling if the rectangle is no longer active
or if another tool was selected.
|
Distortion-free vector scaling with the 9-slice Scaling tool
Now let’s see how big of an improvement we get with this method.
1. | Drag
in a guide from the top ruler, and position it at 64 pixels. (Tooltips
do not display when using the 9-slice Scaling tool, so this step is
necessary in order to set an accurate height.)
Note
The 9-slice guides can be repositioned prior to the
scaling operation; any elements in the four corners created by the
guides do not scale.
|
2. | Select
the 9-Slice Scaling tool from the Tools panel. As in the previous
exercise, the scaling handles appear again, but the image is now divided
with special 9-slice guides. The default settings are fine in this
case.
|
3. | Drag the top-middle control handle straight up to the guide. Note that the corners do not distort this time.
|
4. | Double-click inside the object or press Enter or Return to accept the new dimensions.
|
Adding text to your design
Images and text go together in many designs. In this exercise, you will add a call-to-action tagline to the design.
1. | Select the Text tool.
|
2. | In the Properties panel, choose a showy, bold font family (we chose Cooper Std).
|
3. | Set
a large font size. For Cooper Std we chose 24 points; if you are using
another font, start at 24 and see if that size works for you.
|
4. | Set Fill Color to Black.
|
Since CS4, Fireworks uses the same text engine as
Illustrator and Photoshop, so copying and pasting text from these
applications, or opening a Photoshop file containing text, has become
much more predictable. Prior to CS4, Fireworks used its own proprietary
type engine to render fonts. If you open a Fireworks CS3 or earlier
source PNG file, Fireworks CS4 prompts you to update the fonts in the
file. In most cases, updating the fonts is recommended, but you may have
to reposition your text areas once the update has been completed.
|
|
5. | |
6. | Press Enter or Return, and then type Get the Watch.
If you find the spacing between your letters is too narrow, you can set
the tracking to a higher value. Tracking adjusts the space between two
adjacent characters, and is the method Fireworks uses for manual kerning
(spacing) of letters.
|
7. | Use the Pointer tool to select the text box.
|
8. | Change
the tracking value to alter the distance between letters. Using the
Cooper Std font, we adjusted the tracking to a value of 40.

|
9. | Set
the font’s weight to bold. If the font has multiple families, you can
do this in the Font Style menu in the Properties panel. If the font
doesn’t have any derivatives, you can apply faux bold by clicking the B
icon.
Tip
If you find the guides getting in the way, you can
hide them temporarily by pressing Ctrl+; (Windows) or Command+; (Mac),
or by choosing View > Guides > Show Guides. You can clear the
guides completely by choosing View > Guides > Clear Guides.
|
10. | Use
the Pointer tool to position the text area so it is centered left to
right within the rectangle. A Smart Guide appears when you’re in the
correct location.
To dress up the text a bit more, you can add a Live Filter.
|
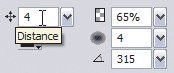
11. | In
the Filters area of the Properties panel, click the Add Live Filter
button, and then choose Shadow And Glow > Drop Shadow. Set the
Distance to 4, and click away from the Live Filter settings to close
them.
|