If you’ve completed all the drawing
exercises in this lesson, you’ve earned a treat. I don’t mean eating the
pear—but it was delicious (tossed with lettuce, celery, walnuts, and
bleu cheese dressing). No, I’m referring to Painter’s incredible feature
for turning photos into drawings and paintings, not by clicking on
filter effects, but created one brush stroke at a time! And, yes, you’re
the one applying the brush strokes.
|
Actually, you can get Painter to do all
the work while you take a coffee break. Check out Painter X’s new Smart
Stroke Brush category, used in conjunction with the new Auto-Painting
Palette. But that’s not art, just a parlor trick. I use Painter to help
me prepare an image and provide some shortcuts, but I reserve the right
to make each stroke myself. Yes, that’s where I really draw the line!
|
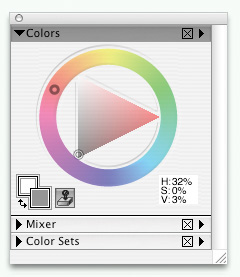
We’ve been using only the Tracing Paper feature
of cloning so far. You can turn any variant into a Cloner Brush by
enabling the Clone Color check box on the color picker. Its icon is a
rubber stamp. Figure 1
shows Clone Color on, with the usual color selection area faded to
indicate it’s not available. For the current brush variant, then, all
color information will be coming from the Clone Source: hue, saturation,
and value (brightness). You’ll see how this works in a minute.
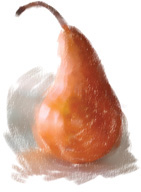
Let’s
make a clone drawing. Open the pear image again, and use the Quick
Clone command. Choose Pastels > Square Hard Pastels 10 and the
Charcoal Paper texture used earlier. Enable Clone Color and apply
strokes following the contour of the pear (that’s generally a good
practice whatever medium you use). Make Tracing Paper more opaque as you
go so you can see your work. Include a few strokes under the pear and
in the background. Does your drawing look something like Figure 2? How cool is that?
|
Cloner brushes have always been the most
exciting feature of Painter, in my not so humble opinion. There are 38
brush styles to choose from. Version X provides a handy way to jump to
the Cloner category instantly. Choose the Cloner tool in the Toolbox.
(Look for the brush icon with a little cross-hair indicating a clone
source.) Its roommate is the Rubber Stamp tool, used for point-to-point
cloning: with your Option/Alt key engaged, click on the pixel area you
want as the source. Release the modifier key, and you can paint from
that source to anywhere else on the image.
|
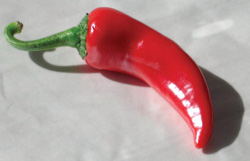
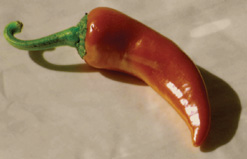
Pick a Pepper
This pepper has such a fascinating shape that I took several
shots of different “poses,” some in bright sunlight and some indoors on
a semi-gloss gray background—my Wacom tablet. Let’s work with
ChiliSunlit1.jpg, shown in Figure 3.
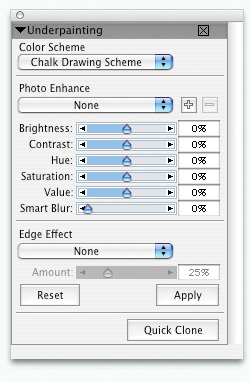
Painter
X introduces a way to prepare an image to enhance the effectiveness of
cloning, based on the type of clone you plan to make. These choices are
found in the new Underpainting Palette (found under Window > Show
Underpainting), shown in Figure 4. I chose a new color scheme optimized for chalk drawing. The result, in Figure 5,
is a less saturated, warmer tonality. Make a Quick Clone of this
version, and then select File > Save As to choose the RIFF file
format. Now you can preserve the stages of your drawing with Iterative
Save.
This time you’ll use an approach I call
“scribble, smear, and pick.” It includes my
choice of texture, Sandy Pastel Paper. Import it now, or you can select
the same variants I’m using:
Begin with the Tapered Pastel, using Clone
Color. Make rough scribbles over most of the pepper, guided by the
contours of the shape. Include the cast shadow and some of the
background. The top image in Figure 6
shows this stage. Switch to the Blender and smooth out some (not all)
of your scribbled strokes. Look closely at this stage with Tracing Paper
turned off, comparing it to the source image. Decide which details you
want to bring out. Pick out those details with Sharp Chalk, using Clone
Color.
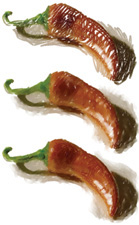
The final stage shows more detail on the stem
and the small highlight on the upper part of the pepper near the stem.
One very subtle but important element is the thin rim of reflection
between the core shadow on the lower right of the pepper and the cast
shadow. This could not be made with Clone Color, so I disabled that
option, selected a light color, and drew it in with Sharp Chalk.
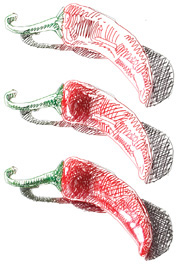
Repetitive Pepper
Prepare
to make a pencil clone of the pepper. Go back to the original bright
color scheme and use a Grainy Cover Pencil variant with Clone Color
enabled. Change brush size as needed. Try a technique similar to the
crosshatch contours you used on the pear , allowing quite a bit of white paper to show through. Start with a quick outline of all the shapes, including the shadows.
|
To change only the size of your brush, it’s not
necessary to choose another variant. Just use the bracket keys: the
left bracket ([) makes the brush smaller, the right bracket (]) makes it
larger. This is especially handy when cloning because you must enable
Clone Color every time you switch to a different variant.
|
Figure 7
shows the development of my pencil clone sketch. Notice the outlines
around highlight shapes in the early stage. Playful scribbles are mixed
with crosshatching, building up tone in the shadows and darker parts of
the pepper. Your sketch will have its own style and character—and spicy
flavor.
I’ll return to cloning techniques in
future lessons, but I just couldn’t wait to introduce you to this
powerful feature. No offense to the fabulous folks at Adobe, but
Painter’s Cloner brushes leave Photoshop in the dust!