Dreamweaver uses four primary tools to
implement Cascading Style Sheets: the CSS tab of the Property inspector,
the CSS Styles panel, the Edit Style Sheet dialog box, and the Style
Definition dialog box. The CSS tab of the Property inspector is
available when text is selected and is a great vehicle for applying
styles as well as reviewing and modifying related properties, such as
font-family, size, and color — you can also create new CSS rules for
selected text. You use the CSS Styles panel to view all the styles
available or those that are being applied to the currently selected HTML
tag; the CSS Styles panel also provides a direct link to modifying any
property or for adding properties to any rule. The Edit Style Sheet
dialog is useful for managing groups of styles and style sheets, whereas
the Style Definition dialog defines the CSS rules themselves. With
these interfaces, you can accomplish the following:
Link or import all your styles from an external style sheet
Create new selectors and specify their rules
Apply styles to selected text or to a particular tag surrounding that text
Modify any styles you create
1. Generating new styles
The world of CSS can be overwhelming to the novice
designer: How do you even begin to master this complex set of rules and
concepts? Dreamweaver offers many routes to explore CSS, but perhaps the
easiest entry is through the Property inspector. Set a font face, font
size, or color on any bit of text and Dreamweaver applies your
formatting either as a modification of an existing rule or as a new
style that is added to the list of available styles, right in the
Property inspector.
|
Dreamweaver CS5 is much smarter about the creation of
new styles through the Property inspector than in previous versions.
Dreamweaver no longer automatically inserts generically named classes —
such as Style1, Style2, and so on — into the head of your document.
Instead, Dreamweaver intelligently guides you to proper CSS rule
creation with appropriate selectors or class names of your choosing,
stored where you specify: embedded in the document or within an external
style sheet.
|
|
Walk through the following steps to see how Dreamweaver helps you build styles correctly:
Switch to the CSS tab in the Property inspector.
Select the text you want to style, either by highlighting it or choosing the tag from the Tag Selector.
Dreamweaver
selects any CSS rule previously defined that specifically targets the
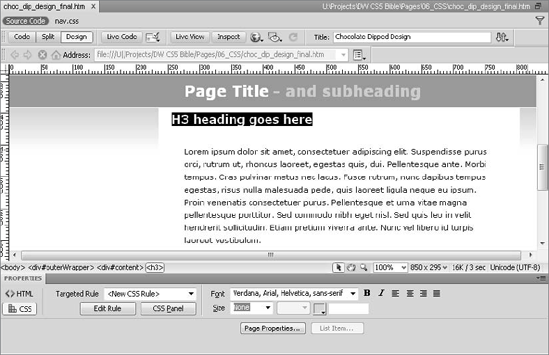
selection in the Targeted Rule list. If no such rule exists, <New CSS Rule> is selected in the Targeted Rule list, as shown in Figure 1.

|
If you select a portion of text rather than the entire tag, the style is applied to a <span> tag surrounding your selection; otherwise, the style is applied to the containing element, like a <p> or heading tag such as <h3>.
|
|
Change
any property in the Property inspector, including font name, size,
color, or alignment, or select the Bold or Italic options.
Dreamweaver displays the New CSS Rule dialog box.
The
type of selector and the selector name displayed depends on — you
guessed it — your selection. If you have chosen a range of text,
Dreamweaver sets the Selector Type to Class and gives you the
opportunity to enter a new class name. If you've chosen a tag from the
Tag Selector, the Selector Type becomes Compound and the Selector Name
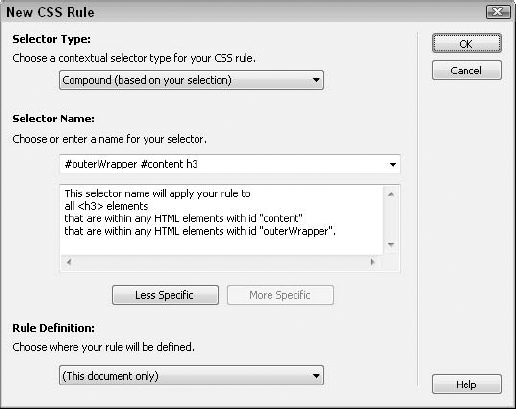
is a descendant selector , such as #outerWrapper #content h3, as shown in Figure 2. The descendant selector represents where the selected tag is in the CSS cascade.
Dreamweaver even provides a plain-language translation of how the rule is applied, as in the following:
This selector name will apply your rule to
all <h3> elements
that are within any HTML elements with id "content"
that are within any HTML elements with id "outerWrapper".

If
the current selector is too specific and you want the rule to be more
generally applicable, click Less Specific. Each time you click Less
Specific, the leftmost selector (#outerWrapper in this example) is removed.
Once
you choose Less Specific, the More Specific button is enabled. You can
restore the leftmost selector by clicking More Specific. The
plain-language translation is adjusted accordingly.
Choose where you want your new rule stored from the Rule Definition list and click OK.
Dreamweaver's mechanism for creating new CSS rules
through the Property inspector is extremely powerful, from both workflow
and learning perspectives. Not only does Dreamweaver help you create
appropriate CSS rules, it provides insight into a key CSS concept, the
cascade, when working with Compound selectors.
The following sections explain the four selector types — Class, ID, Tag, and Compound — in depth.
1.1. Class
Making a custom style is the most flexible way to
define a style on a page. The first step in creating a custom style is
to give it a name; this name is used in the class attribute.
The name for your class must start with a period and must be
alphanumeric without punctuation or special characters. If you do not
begin the name of your custom style with a period, Dreamweaver inserts
one for you. Here are some typical names you can use:
.master
.pagetitle
.bodytext
|
Although you can give your classes names such as body, title,
or any other HTML tag, this approach is not a good idea. Dreamweaver
warns you of the conflict if you try this method. Also be aware that
class names are case-sensitive.
|
|
1.2. ID
An ID selector is applied through the id
attribute, available for almost all HTML tags. Each ID selector is
intended to be unique for each page. In other words, you apply an ID
rule once per page. An ID selector is identified by an initial pound
sign, as in #footer.
1.3. Tag
The third option in the Selector Type list is Tag.
This type of style provides an excellent tool for making quick, global
changes to existing Web pages. Essentially, the Tag style enables you to
modify the features of your existing HTML tags. When you select this
option, the drop-down list displays more than 90 HTML tags in
alphabetical order. Select a tag from the drop-down list and click OK.
As you become more familiar with HTML, you're free to simply enter the
tag into the Tag field.
1.4. Compound
Because of its flexibility, you may find that you use
the Compound option frequently. Enter the selector directly in the
Compound field; Dreamweaver allows almost any type of input, whether or
not it recognizes the selector type. In addition to ID and descendant
selectors, you can also group selectors when applying a single style to
multiple tags and/or classes. If, for example, you want to create a
style for the <body>, <td>, and <th> tags, you enter the tag names in the Compound field (without their delimiters) in a comma-separated list like this:
body,td,th
The Compound option is also useful for defining pseudo-classes
and pseudo-elements. A pseudo-class represents dynamic states of a tag
that may change under user action or over time. Several standard
pseudo-classes associated with the <a> tag are used to
style hypertext links. When you choose Compound, the drop-down list box
contains four customization options, which can all be categorized as
pseudo-classes:
a:link — Customizes the style of a link that has not been visited recently
a:visited — Customizes the style of a link to a page that has been recently visited
a:hover — Customizes the style of a link while the user's mouse is over it
NOTE
The a:hover pseudo-class is a CSS Level 2 specification and is not supported by Netscape 4.x. Furthermore, a:active links are always colored red, regardless of the CSS specifications.
a:active — Customizes the style of a link when it is selected by the user
|
Dreamweaver does not preview pseudo-class styles (except for a:link), although they can be previewed through a supported browser.
|
|
A pseudo-element, on the other hand, gives you control over contextually defined page elements: For example, p:first-letter
styles the first letter in every paragraph tag, enabling a drop-cap
design. Because of their specific nature, Dreamweaver does not display
any pseudo-elements in the Compound list. You can, however, enter your
own — Dreamweaver does a fine job of rendering both the :first-letter and :first-line pseudo-elements.
NOTE
Dreamweaver does not render the lesser-used pseudo-elements :before and :after in the Design view; however, they are displayed properly in Live View.
1.5. Descendants and other advanced selectors
Dreamweaver also enables you to enter some of the
more advanced additions to the CSS selector palette through the Compound
selector type.
One such selector is the descendant
selector. Descendant selectors are contextual selectors because they
specify one tag within another. A descendant selector, for example,
permits you to give paragraphs within a table a different style than
paragraphs outside a table. Similarly, text nested within two
blockquotes (giving the appearance of being indented two levels) can be
given a different color, font, and so on than text in a single
blockquote.
For example, to style text within nested blockquotes, enter the following in the Compound field of the New CSS Rule dialog box:
blockquote blockquote
In essence, you are creating a custom style for a set
of HTML tags used in your document. This type of CSS selector acts like
an HTML tag that has a CSS style applied to it; that is, all page
elements fitting the criteria are automatically styled. You can also
combine custom styles with redefined HTML styles in a descendant
selector.
Other advanced selectors that you can enter in the Compound field include:
Child: Selects an element that is a direct child of another element. For example, in a div tag with nested div elements, div > p selects the paragraphs in the outermost div tag only.
Adjacent-sibling: Selects an element that immediately follows another. For example, in an unordered list with two list items, li + li selects the second list item, but not the first.
Universal: Selects any element. This selector may be used to skip one or more generations of tags. Use body * p to select paragraphs contained within div elements that are children of the body tag, for example.
Attribute: Selects tags with specified attributes. You can select tags if they either contain the attribute (p[align]) or if they contain an attribute set to a specific value (p[align="left"]).
Best of all, these selectors are rendered correctly
in both Dreamweaver's Design and Live views. Most modern browsers (such
as Firefox, Internet Explorer 7 and higher, or Safari) properly render
these selectors as well.
NOTE
Dreamweaver warns you if you enter what
it considers an invalid selector type; however, you are given the option
to use the selector if you choose.