Photoshop’s Tools panel contains three
categories of tools that you can use to create a basic selection:
Marquee tools, Lasso tools, and Wand tools. While these three are very
useful, many users forget that they are only starting points. Learning
to use them is important, but again, it’s just the beginning.
1. Marquee Tools
The Marquee tools allow you to click and drag to
define a selection. The keyboard shortcut for selecting the Marquee tool
is the letter M. To toggle between the Rectangular and Elliptical
Marquee tool, press Shift+M. Descriptions of the Marquee tools follow:
Rectangular Marquee tool. Use this tool to make a rectangular selection. Press the Shift key to draw a square.
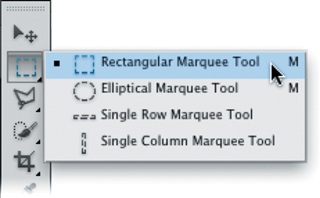
Elliptical Marquee tool. Use this tool to make an elliptical selection. Press the Shift key to draw a circle.
Single Row or Single Column Marquee tool.
Creates a selection that is 1 pixel wide in the shape of a row or
column. These two tools are not used often, which is why Adobe didn’t
assign the keyboard shortcut M to trigger them.
Putting the Marquees into action
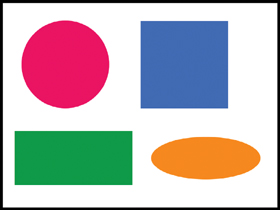
Let’s give the Rectangular and Elliptical Marquee tools a try and make some selections:
1. | Open the file Ch05_Marquee_Practice.tif .
|
2. | Practice
selecting each of the four objects using both the Elliptical and
Rectangular Marquee tools. Remember to use the Shift key to constrain
proportions for the square and circle shapes. Don’t worry about
perfection; you’ll learn lots of ways to tweak selections in the coming
pages.
|
|
There are a few ways to access tools from the Tools panel:
You can click the tool icon. To access nested tools (those that share the same well), click and hold the mouse button on the tool icon. You can also hold down the Option (Alt) key and click an individual tool in the Tools panel to cycle tools. You can press the letter shortcut key. Hovering over a tool’s icon will teach you the shortcut keys when the tool tip pops up. To switch to a nested tool, hold down the Shift key and press the tool’s shortcut key. If
the Shift key is an extra step you’d rather not use, modify your user
preferences. Press Command+K (Ctrl+K) to call up your Preferences
screen. Deselect the check box next to Use Shift Key for Tool Switch.
|
Selection options for Marquee tools
When using the Marquee tools, several options are
available to you in the Options bar. These modifiers can improve or
alter your selection.
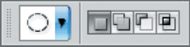
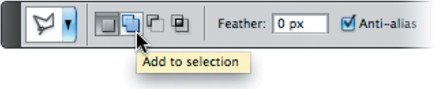
The first four icons specify the kind of selection:
New selection. Creates a new selection.
Add to selection.
After you create one selection, you can click this button so subsequent
selections are combined with the existing selection. You can also hold
down the Shift key to add to a selection.
Subtract from selection.
After you create one selection, you can click this button so subsequent
selections are subtracted from the existing selection. You can also
hold down the Option (Alt) key to subtract from a selection.
Intersect with selection.
Requires you to make a first selection. When you draw a second
selection, Photoshop creates a new selection where the two selections
overlap.
The following options modify the selection tool and must be chosen before making a selection:
Feather. A
normal selection has a crisp edge. Feathering a selection creates a
gradual blend at the selection’s edges. Think of it as the difference
between a line drawn with a pencil and one drawn with a felt-tip marker.
Feathered selections are useful when you want to extract objects.
Anti-alias.
When working with the Elliptical Marquee tool, you can select
Anti-alias to create a smoother edge for curved lines (especially if
your image is at a low resolution).
Style. For the Rectangular Marquee tool and Elliptical Marquee tool, you can choose from three styles in the Options bar:
Normal. This is the default option. Click to draw your marquee freehand.
Fixed Ratio. You can set a width-to-height ratio. For example, to draw a marquee three times as wide as it is high, enter 3 for the width and 1 for the height.
Fixed Size.
You can specify an exact size for the marquee’s height and width. You
can enter the value in pixels (px), inches (in), or centimeters (cm).
Moving a selection
There are a few ways to reposition a selection:
While drawing a selection (with the mouse button still depressed) you can hold down the spacebar and move the selection.
With
an active selection, move the tool’s cursor inside the selection border
(marching ants). The icon changes to a triangle with a marquee border.
You can then click inside and drag the selection to move it.
To modify a selection using
controls similar to the Free Transform command, choose Select >
Transform Selection. All the options available to the Free Transform
command can be applied to the selection border.
2. Selection Lassos
The
Lasso tools allow you to draw freeform segments with your mouse to
create a selection border. The Lasso tools are most often used to create
a rough selection . The keyboard shortcut for selecting the Lasso
tool is the letter L. To select the next Lasso tool, press Shift+L.
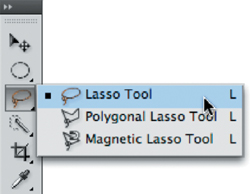
Lasso tool. Use this tool to make a freehand selection. You must return to your starting point to close the selection loop.
Polygonal Lasso tool.
Use this tool to draw straight-edged segments for a selection border.
With every click, a part of the segment is drawn. Continue clicking to
set endpoints for additional segments. Click your starting point to
close the loop and create an active selection. To constrain the tool to
45-degree angles, hold down the Shift key while drawing.
Magnetic Lasso tool.
When you use the Magnetic Lasso tool, Photoshop attempts to snap the
border to the edges of the image. If the anchor point doesn’t snap
accurately, click once to manually add a point.
Putting the Lasso tools into action
Let’s give these tools a try:
1. | Open the file Ch05_Boat.tif.
|
2. | Try using both the Polygonal and Magnetic Lasso tools to select the boat. Make multiple attempts at practicing the selection.

In the middle of making a selection with the Polygonal or Magnetic
Lassos, you can press the Delete key to remove segments. Press and hold
once, and then release and press subsequent times to remove segments
(one per click). If you need to stop a selection, press the Esc key. If
you need to deselect and start over, just press Command+D (Ctrl+D).
|
Selection options for Lasso tools
When
using the Lasso tools, several options are available to you in the
Options bar to improve or alter your selection. These modifiers are very
similar to those for the Marquee tools, so I’ll just briefly mention
them.
The first four icons specify the kind of selection:
New selection
Add to selection
Subtract from selection
Intersect with selection
The next two options create a smoother selection:
Magnetic Lasso options
The Magnetic Lasso has a few additional options that
mainly deal with its snapping behavior. You can change the following
properties in the Options bar:
Width. The
width specifies how wide an area the Magnetic Lasso looks at when
trying to detect edges. If you’d like to see the width area visually,
activate the Caps Lock key before making a selection.
Edge Contrast.
This value (measured in percent) determines the lasso’s sensitivity to
edges in the image. Higher values detect high-contrast edges, whereas
lower values detect lower-contrast edges.
On an
image with well-defined edges, you should use a higher width and edge
contrast setting. For an image with soft edges, use a lower setting for
both width and edge contrast.
Frequency.
The rate at which Photoshop adds anchor points is based on the
Frequency setting. An anchor point is the point at which the lasso
attaches, so you can move the selection border in another direction. You
can enter a value between 0 and 100. Higher values add more anchor
points to your selection border.
Stylus Pressure. Click
the Stylus Pressure icon if you have a tablet connected. This option
allows you to use the pressure of the pen to affect edge width.
3. Wand Tools
The Quick Selection and Magic Wand tools (W is the
keyboard shortcut) allow you to click an area of color to have Photoshop
create a selection based on adjacent pixels and your Tolerance setting.
The Magic Wand is a much older tool that works reasonably well on
photos with large areas of similar color. The Quick Selection tool is a
significant improvement over the Magic Wand tool, however, and has
quickly become a favorite tool of Photoshop pros.
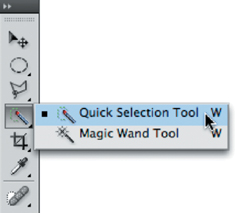
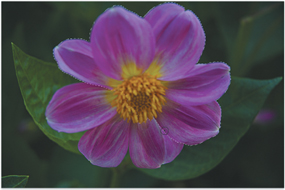
Quick Selection tool
The Quick Selection tool allows you to create a selection that quickly forms based on color and contrast.
1. | Open the file Ch05_Quick_Selection.tif .
|
2. | Select the Quick Selection tool by pressing W.
|
3. | Press the right bracket key ] to make the selection brush larger; press the left bracket key [ to make it smaller.
|
4. | Click and drag in the flower to make an initial selection.
|
5. | To
add to the selection, click and drag again. If too much of a selection
is made, hold down the Option (Alt) key to subtract from the selection.
|
Selection options for the Magic Wand tool
When using the Magic Wand tool, several options are
available to you in the Options bar that can improve or alter your
selection. These modifiers are very similar to those for the Marquee and
Lasso tools, so I’ll cover them briefly.
Tip: A Better Wand
The Magic Wand tool works best if you turn on the
pixel-averaging option. But where is it? It doesn’t appear in the
Options bar when the Magic Wand tool is selected. Instead, you must
select the Eyedropper tool. Then in the Options bar you can change the
Sample Size to a 5 by 5 Average (or 11 by 11 Average). The Magic Wand
tool (as well as a few other tools) will then become less sensitive to
erroneous clicks.
The first four icons specify the kind of selection:
New selection
Add to selection
Subtract from selection
Intersect with selection
The remaining settings allow you to refine your selection parameters:
Tolerance.
This setting determines how similar the pixels must be to your initial
click in order to be selected. You can enter a value in pixels, ranging
from 0 to 255. A higher value selects a broader range of colors.
Anti-alias. This creates a smoother edge when you click.
Contiguous.
When Contiguous is selected, only adjacent areas with the same colors
are selected. If deselected, all pixels in the entire image that use the
same colors will be selected.
Sample All Layers. If you have a multilayered document and want to select colors on all layers, select this check box.
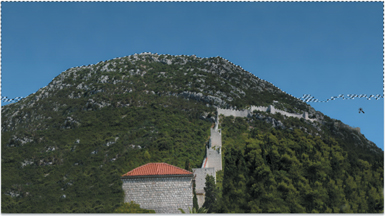
Putting the Magic Wand into action
Let’s try out the Magic Wand tool:
1. | Open the file Ch05_Magic_Wand.tif .
 |
2. | Select the Magic Wand tool by pressing Shift+W for wand. You can press the keys multiple times to toggle between the Quick Selection and Magic Wand tools.
|
3. | Set the Tolerance to 20 and select the Anti-alias check box.
|
4. | Click the sky in the upper-left corner to make an initial selection.
|
5. | Part
of the sky will be selected. Hold down the Shift key and click another
area of the sky to add to the selection. Repeat as needed until the
entire sky is selected. |