6. Debugging your applied CSS
Anyone working with CSS for any amount of time has
experienced the frustration of seeing their Dreamweaver-perfect page
break in one or more browsers. Real-world browser testing is a
tried-and-true technique, but a tedious and time-consuming one with no
clear solutions. Dreamweaver offers a real alternative: Check Browser
Compatibility.
With the Check Browser Compatibility feature, your
page is quickly reviewed for 16 different, common browser rendering
issues. Better yet, the command offers full relief for the identified
problems, both in an immediate form through the Results panel and also
in a more full-featured fashion via the Web. Debugging your CSS styled
pages just got a whole lot easier.
To begin the CSS debugging process, choose File => Check Page =>
Browser Compatibility or select Check Browser Compatibility from the
Document toolbar. The current page is immediately reviewed and if any
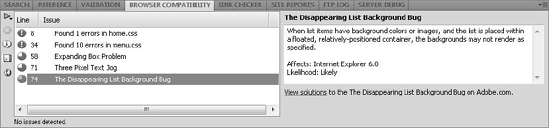
issues are found, they are listed in the Results panel, as shown in Figure 12.
Each listing displays the line number, name, and a brief description of
the problem as well as browsers affected. The Learn More link opens
your primary browser to the relevant page on Adobe's CSS Advisor
mini-site (www.adobe.com/go/cssi)
where a community-recognized solution is available. Users can
contribute to the site to help build the knowledge base as new problems
and answers arise.
In this Technique, you attach a print style sheet to a page and change the styles so that the document is more printer-friendly.
In the Technique site, expand the 06_css folder and open print_start.htm.
From the CSS Styles panel, click Attach Style Sheet.
When the Attach External Style Sheet dialog box opens, click the Browse button.
In the Select Style Sheet dialog, browse to the styles folder in the root of the site and select print.css.
From the Media list of the Attach External Style Sheet dialog box, choose Print; click OK when you're ready.
To see the changes you'll make take effect, you'll need to switch to print style rendering.
Choose View => Toolbars => Style Rendering.
From the Style Rendering toolbar, click Render Print Media Type, or choose View => Style Rendering => Screen Media Type.
In the CSS Styles panel, make sure you're in All mode; if not, click All.
For your first change to the print style sheet, hide those page elements that are not relevant in print: the header and footer.
In the CSS Styles panel, expand the print.css entry and select the #header style.
Click Edit Style at the bottom of the CSS Styles panel.
When the CSS Rule Definition dialog box opens, switch to the Block category and, from the Display list, choose None.
Repeat Steps 1–3, selecting the #footer style from the CSS Styles panel instead.
Now, you need to adjust certain styles so they are more suitable for print.
In the CSS Styles panel, select the #wrapper style.
From the Properties pane, click in the value column next to the width property and enter auto; press Enter (Return) when you're done.
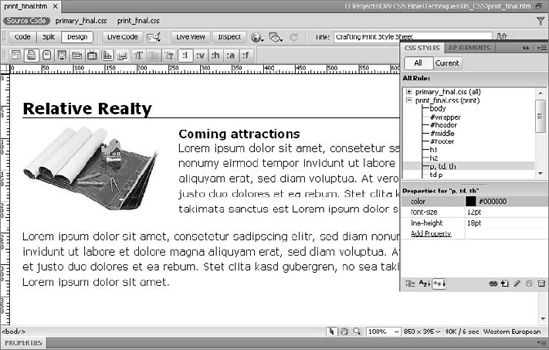
In the CSS Styles panel, select the h1 style.
From
the Properties pane, click in the color swatch next to the color
property and select black (#000000) from the pop-up color picker.
Select the value next to the font-size property and enter 14pt; press Enter (Return) to confirm your choice.
Repeat Steps 3–5, selecting the p, td, h style and changing the font-size property to 12pt.
With the p, td, th style still selected, click Add Property and enter line-height; press Enter (Return) and then enter 18pt.
The final step is to add a heading that appears only
in the print version of the page. To accomplish this, you'll need to
hide the content in the screen-oriented style sheet.
Place your cursor on the first image on the page and switch to Code view.
Press the left-arrow button to move the cursor in front of the <img> tag and enter the following code: <h1>Relative Realty</h1>. Return to Design view when you're done.
Place your cursor in the new <h1> tag and, from the Property inspector's Class list, choose printOnly.
In the Style Rendering toolbar, choose Switch To Render Screen Media Type, or choose View => Style Rendering => Screen Media Type.
You'll notice that the heading — redundant in screen mode — is also visible here. You can change that by adding a style.
In the CSS Styles panel, select the primary.css entry and click New CSS Rule.
In the New CSS Rule dialog box, switch the Selector Type set to Class and change the Name field to .printOnly; click OK when you're ready.
Switch to the Block category and, from the Display list, choose None; click OK to confirm the change and close the dialog box.
Select File => Save All to store all the changes.
You can easily see the differences by switching between the Screen and Print icons on the Style Rendering toolbar.