5. Editing and managing style sheets
Style sheets, like most elements of a Web page, are
almost never set in stone. Designers need to be able to modify style
rules — whether they're embedded or from an external style sheet — at a
moment's notice. Through the CSS Styles panel's Edit Styles mode,
Dreamweaver provides near-immediate access.
5.1. CSS Styles panel
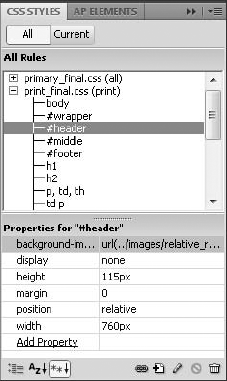
As discussed earlier, the CSS Styles panel in All
mode displays all the styles attached to the current page, whether
embedded or external. Presented in a collapsible outline (see Figure 7),
Dreamweaver shows the styles in the order in which they are defined in
the code. The Class list is more than just a pretty display — it's a
direct pipeline to editing each style. You can select any style and
click the Edit Style button, and Dreamweaver displays the CSS Rule
Definition dialog box with the current style's settings.
|
As any designer beginning to work with CSS knows, not
all browsers are created equal. In fact, browsers vary wildly in their
CSS support. To achieve cross-browser compatibility with CSS, designers
have resorted to using what are referred to as CSS hacks.
A CSS hack is the use of CSS code in an unintended fashion to make CSS
elements unavailable to certain browsers. In other words, a CSS hack
acts as a filter. Dreamweaver includes two of the most common hacks that
allow you to hide CSS from two of the most problematic browsers:
Netscape 4.x and Internet Explorer 5
for Mac. Both hacks are available only from within Code view through the
context menu; commands for applying and removing each hack are
included.
To hide a CSS rule from Netscape 4.x, use the Caio
hack. In Code view, select the CSS code you want to make sure that
Netscape 4.x does not attempt to render and right-click (Control+click). From the context menu that appears, choose Selection => Apply Caio Hack. Dreamweaver wraps your selection with the following code:
/*/*/
/* */
The first line starts hiding code from Netscape 4.x and the second line stops the hiding.
You can hide CSS rules from Internet Explorer 5 for
Mac in a similar fashion with the Backslash-Comment hack. To hide
particular rules, select them and then right-click (Control+click) to
bring up the context menu. Choose Selection => Apply Backslash-Comment Hack; Dreamweaver wraps your selection with the following code:
/*Start hiding from IE Mac \*/
/*Stop hiding from IE Mac */
To remove either of these hacks, select the entire
code block, including the opening and closing hack lines, and choose
Selection => Remove Backslash-Comment Hack or Selection => Remove Caio.
|
If you'd prefer to work directly with the CSS code,
double-click the style. Dreamweaver goes to the style selected in the
editing option of your choice, as defined in the CSS Styles category of
the Preferences. You can choose between using the Edit CSS dialog box,
the Properties pane, or Code view.
|
Modifying or deleting a style in an external style
sheet causes that style sheet to open. Dreamweaver does this so that the
modification or deletion can be undone. You can force the style sheet
not to open by unchecking the Open CSS Files When Modified option in the
CSS Styles category of the Preferences; but, if you do, changes to the
style sheet cannot be undone.
|
|
If you have an external CSS editor such as TopStyle
or Style Master defined — and the Use External Editor option selected —
double-clicking a style opens the style sheet in that editor. Access the
Use External Editor option by right-clicking (Control+clicking) in the
CSS Styles panel or by selecting the CSS Styles panel menu.
To delete a style, select the style and click the Delete CSS Rule button.
NOTE
If you're looking for a single reference on CSS hacks, check out CSS Hacks and Filters written by me and published by Wiley. For more details, visit www.idest.com/csshacks/.
5.2. CSS Styles panel Properties pane
Although the CSS Rule Definition dialog is helpful
when establishing CSS rules, it's not the most direct route for
modifying them. Dreamweaver supplies a much quicker facility for viewing
and changing existing styles: the Properties pane of the CSS Styles
panel (see Figure 8).
To change the value of a property, click into the
corresponding field on the right of the CSS Properties tab. Color-based
properties, such as background-color, include a standard
Dreamweaver color picker to simplify your selection; properties
requiring a URL offer both Point-to-File and Browse-for-File icons.
Those properties that use specific keywords, such as display,
provide a list of acceptable values. In all cases, the value can also be
entered by hand. This is especially useful when working with properties
that accept compound values, such as border, for which
entering the values in proper order (style, color, width) is valid.
Hover over a property value to see a code hint. After you've inserted
your new value, press Enter (Return) or click anywhere to confirm the
change; Dreamweaver immediately renders the results.
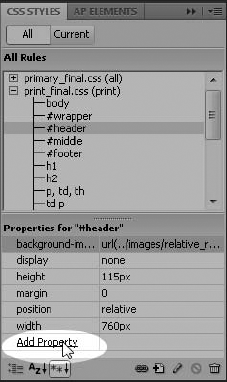
To add a new property to an existing rule in the Properties pane, follow these steps:
In the Properties pane, click Add New Property.
Enter the property in the blank field that appears. Alternatively, you can choose a property from the drop-down list.
Press Tab or Enter (Return) to move to the second column.
Enter the value for the new property.
To remove a property from the Properties pane, select it and press Delete.
|
Rather than type out the whole property, you can
enter just the first few letters and press Alt+down arrow (Option+down
arrow). Dreamweaver goes right to the first matching property. Press
Enter (Return) after you've found your match to move to the second
column to enter the desired value(s).
|
|
You can add new properties through the CSS Styles
panel in either All or Current modes. All mode works best when you're
editing CSS from a top-down perspective. If you'd prefer a bottom-up
approach, switch to Current mode and select the tag containing the
existing style rather than the style itself.
5.3. Toggling CSS properties
Have you ever had to pinpoint which circuit breaker
controlled which part of your home? Typically, you end up turning them
off and on, one at a time, to see which lights went out when. Similarly,
it's easy to lose sight of what properties in the various rules are
having what effect and temporarily removing them is a good testing
technique. Dreamweaver provides a point-and-click method for easily
disabling and enabling any CSS property.
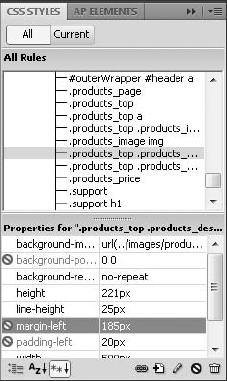
|
Move your cursor over the far-left column of the
properties in the CSS Styles panel and you'll see the universal "no"
symbol (a circle with the line through it) appear in gray. Click once to
turn the symbol red and disable the associated property (see Figure 9);
click again to enable the property again. The ability to enable/disable
CSS properties is available in the Properties pane for both All and
Current mode, as well as the Current mode's Summary pane.
|
|
When you disable a property, Dreamweaver comments it
out of the code using a special syntax. For example, let's say there is a
background-color property that is coded like this:
background-color: #fff;
If you disable the property in the CSS styles panel, the code changes to this:
/* [disabled]background-color: #FFF; */
In CSS, surrounding your code with /* and */ converts it to a comment. Within that comment, Dreamweaver inserts the [disabled]
keyword to distinguish any toggled-off property from any comments
entered manually in the code. But what if you already have a comment
following a property? CSS doesn't permit nested comments, so Dreamweaver
will take code like this:
background-color: #fff; /* Make sure the bg is white */
and comment out just the property and value, thereby leaving your comment intact:
/* [disabled]background-color: #FFF; */ /* Make sure the bg is white */
Should you enable the property again, Dreamweaver removes its comment indicators and restores your code as before.
|
Any property that has been disabled is also identified with the universal "no" symbol in the Code Navigator.
|
|
If you have disabled a number of properties in a CSS
rule, you can re-enable them all at once with a single command. Simply
right-click (Control+click) any properties in the rule or the rule
itself and choose Enable All Disabled in Selected Rule from the context
menu. This option is also available from the panel menu button in the
upper-right of the CSS Styles panel.
Conversely, let's say you've completed your testing
and you've discovered a number of properties that have no impact and are
currently disabled. You can clean up your CSS rules by removing these
unneeded properties, in one operation. Bring up the context menu for any
selected rule via the panel menu button or right-clicking
(Control+clicking) the rule or property and choosing Delete All Disabled
in Selected Rule.
5.4. Managing CSS rules
The development of the CSS rules for a site is an
evolutionary process. The designer may start by embedding CSS layout
rules in the basic page and, when the design is locked down, elect to
move the rules to an external sheet. Or, before publishing the final
style sheets, the designer may prefer to clean them up, grouping similar
styles together for added clarity. Dreamweaver offers a number of key
tools to help designers manipulate their CSS rules however they choose.
Managing your CSS rules in Dreamweaver is both
intuitive and fast. You can, for example, simply drag and drop a CSS
rule from one location in your style sheet to another — right in the CSS
Styles panel. Highlight any rule while in All mode and drag it to its
new location. Rules can easily be moved to any embedded or attached
style sheet; any unopened style sheet affected is opened and marked as
modified. You can move a single rule at a time or select any number of
them to drag to a new location.
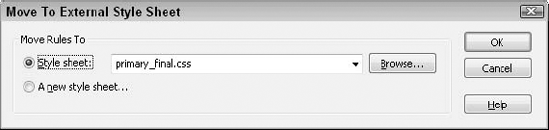
CSS rules can also be moved to an unattached or new
style sheet. Right-click any selected rules and choose Move CSS Rules to
begin the process. When the Move To External Style Sheet dialog box
opens, as shown in Figure 10,
you have the option to choose an existing style sheet or store the
selected rules in a new one. If you decide to use a new style sheet, a
Save Style Sheet As dialog box appears when you click OK.
The Move CSS Rules feature is also available in the
Coding toolbar along with another powerful, albeit more specialized, CSS
management command: Convert Inline CSS To Rule. As the name implies,
the Convert Inline CSS To Rule feature moves style attributes within a
tag like this:
<div id="legalDisclaimer" style="font-size: smaller;">
to a separate rule, like this:
#legalDisclaimer { font-size: smaller; }
|
The Convert Inline CSS To Rule command is terrific
for cleaning up legacy pages where the use of inline styles in
absolutely positioned <div> tags was the rule rather than the exception.
|
|
The contextual menu in the CSS Styles panel offers a
number of other management tools in addition to the Move CSS Rules
command. Beyond the traditional cut/copy/paste options is the Go To Code
feature. As you might suspect, Go To Code goes directly to the CSS code
defining the selected rule, whether the rule is in the current page or
an external style sheet. Go To Code lets you dive right into the heart
of your CSS, quickly and easily.
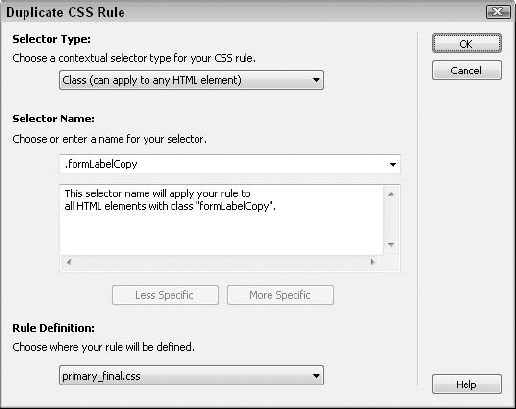
The Duplicate command is another CSS rule management
power tool and one that I personally use all the time. Often I find that
a rule I need to create has similar properties to an existing rule —
and it's much faster to duplicate the rule than re-create it. When you
choose to duplicate a selected rule, a dialog box with all the options
of the New CSS Rule dialog appears (see Figure 11).
This featureset allows you to copy the properties of any rule and, if
you choose, change the selector to anything you desire. You could, for
example, duplicate a rule with an ID selector and save your new rule as a
class. You can even save the duplicated rule in a different style sheet
or the current page. Once you select the name of your duplicated rule
as well as the selector, the style is added to the specified location;
however, unlike when creating a new style, the CSS Rule Definition
dialog box does not appear.