2. Applying styles through the Property inspector
In addition to automatically creating CSS styles,
Dreamweaver also enables you to apply any defined style directly through
the Property inspector. The immediate availability of CSS styles is a
major boon to productivity and is extremely helpful for designers
working in a site fully committed to using Cascading Style Sheets.
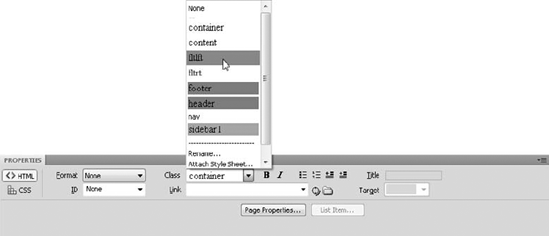
To apply a class style from the Property inspector,
switch to the HTML tab, select a page element, and then make your choice
from the Class list, as shown in Figure 3;
to make it simpler for you, a style is previewed in the Class list. If
the tag allows an ID to be assigned, all available ID selectors are
listed in a similar list. However, unlike class selectors, after an ID
selector has been assigned to a tag, Dreamweaver no longer displays it
in the ID list.
3. Attaching an external style sheet
Now that CSS-enabled browsers dominate, more Web
designers are encountering clients with existing external style sheets.
To apply the site's design specifications to a new page, all the
designer need do is connect the current page to the CSS document.
Dreamweaver provides a streamlined method for doing just that.
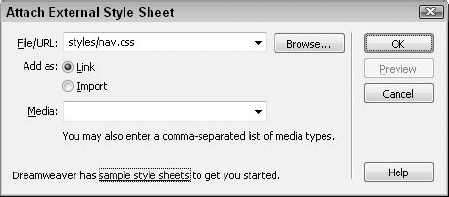
The Attach Style Sheet button, found on the CSS
Styles panel, is a straightforward solution for linking external style
sheets to the current document. When Attach Style Sheet is selected, the
Attach External Style Sheet dialog box, shown in Figure 4,
appears. Here, you can choose between the two previously discussed
methods for attaching an external style sheet: Link or Import. You'll
also have the option to target your style sheet for a specific media
type.
If you're not sure which style sheet is the
appropriate one, you can check it out before applying it. Just select
the existing style sheet and click Preview. Dreamweaver applies the
selected style sheet to the current page. If you choose another style
sheet or click Cancel, the sheet is removed.
After you've made your choice, click Browse to locate
a previously existing style sheet. When selected, a standard Select
File dialog box appears with the *.css filter set. Simply locate the style sheet and select it: Dreamweaver inserts the necessary code into the <head> of your document. If any HTML tags — such as <p> or any of the heading tags — on your page are defined in the style sheet, you see an immediate change in your document.
|
If you don't have an external style sheet and want to
create one, just enter the path and filename in the text field, making
sure to use the .css extension. Dreamweaver notes that the file
cannot be found and asks if you want to proceed. Click OK, and, when
you create your first style, Dreamweaver also creates the CSS file with
the requested filename.
|
|
The final option on the Attach External Style Sheet dialog box, the Media list, is discussed in the next section.
3.1. Choosing a media type
One of the most important facets of the Cascading Style Sheet specification is the ability to style a page for a specific media type.
A media type is a means of communication, such as a computer screen,
printer, or TTY device. The W3C identifies eight different media types: aural, braille, handheld, print, projection, screen, TTY, and TV. If no media type is declared, the style sheet is applied to all devices that render the page. If one is declared, a media attribute is added to the code, like this (addition bolded for emphasis):
<link href="Techniques/styles/main.css" rel="style sheet"
type="text/css" media="screen" />
The bulk of today's designers do not apply a media
type at all. However, an increasing number have started to create
different style sheets: one to be viewed on the computer screen and
another to be printed. Dreamweaver makes this easy by including a media
list on the Attach External Style Sheet dialog box. The list includes
the eight media types recognized by the W3C as well as another one from
the specification, all. It's considered a best practice to add a media attribute to your page and recommended to use all to cover every media type, screen for computer screen, and print for printer.
|
If you'd like to declare your style sheet for
multiple media types, enter the desired types in a comma-separated list
through the Media field of the Attach External Style Sheet dialog box.
|
|
3.2. Rendering different styles
Dreamweaver's Style Rendering toolbar complements the
development of separate style sheets. After you've defined a style
sheet for a specific media type, such as print, you can use the Style
Rendering toolbar to select the desired media type and Dreamweaver will
render your page as if it were that medium. To display the Style
Rendering toolbar (see Figure 5), choose View => Toolbars =>
Style Rendering or right-click (Control+click) any other visible
toolbar and choose Style Rendering. Two media types — aural and Braille —
are not included in the Style Rendering toolbar because their rendition
is beyond Dreamweaver's scope.

Another option on the Style Rendering toolbar is to
disable all CSS rendering altogether. Select the Toggle Rendering Of CSS
Displays option on the far right of the toolbar to view the page
without CSS; select again to enable CSS rendering. This feature is
extremely helpful for both debugging CSS pages and viewing the order in
which screen readers will present the page.
You also have the possibility of designing
while displaying various pseudo-classes, typically used for styling the
various link states. There are five mutually exclusive buttons for
toggling pseudo-classes on the Style Rendering toolbar: :link, :visited,
:hover, :active, and :focus. These are very useful for checking the
look-and-feel of your design without having to enter into Live View or
preview in a browser.