1. Resolution Revisited
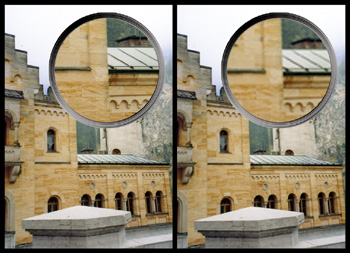
This photo was
scanned at two different resolutions. The image on the left was scanned
at 300 spi, and the image on the right was scanned at 72 spi. Examine
the detailed enlargements to see the impact of different scanner
settings.
The second part of the
image-sizing puzzle is a clear understanding of these output
requirements. What resolution does your printer need? Are you sending
the image to a service provider such as a commercial printer? You’ll
need to make lots of choices, but they should be based
on where the image needs to end up. Do not make assumptions when
starting a project. Know the destination of your image so you’ll know
which path to take.
Tip: Start Out Right: Digital Cameras
If you’re acquiring a digital
image, be sure to capture enough pixels. If you want a 5 × 7 inch print
and need 300 dpi, do the math before shooting. Take the inch size and
multiply it by the print resolution. In this example: 5 × 300 = 1500 and
7 × 300 = 2100. Therefore, 1500 × 2100 = 3,150,000, which is about 3.1
megapixels. To allow for cropping, you may want to shoot at an even
higher resolution.
2. Resampling
The process of resampling allows you to change the
pixel dimensions of your image. This will affect the display and print
size of your image. This part of the resizing process is important for
several reasons:
Images will print faster when they are sized properly for your output device.
Images will print clearer when you size them to a target size and then run a sharpening filter to enhance the edge detail.
Images
appear crisper when they are displayed at 100 percent on a computer
screen (such as for a PowerPoint presentation or Web site).
The process of resampling is often identified based
on whether you are scaling the image smaller (downsampling) or larger
(upsampling):
Downsampling.
If you decrease the number of pixels in an image, you are downsampling
the image, which permanently discards data. You can specify an
interpolation method (discussed in the next section) to determine how
pixels are deleted.
Upsampling.
When upsampling, you create new pixels to expand the image. Again, you
can specify an interpolation method to determine how pixels are added.
When upsampling, you add information that did not previously exist,
which generally just makes a larger image that is not any sharper than
the original.
Choose an Interpolation Method
When you resample an image, Photoshop creates new
pixels. Those new pixels are created based on the neighboring pixels.
How those new pixels are formed is determined by the interpolation
method you specify. Photoshop offers up to five methods to resample your
image.
Choose one of the following methods:
Nearest Neighbor. This method is fast but not very precise. It is useful for resizing illustrations. However, it can produce jagged edges.
Bilinear. This approach uses pixel averaging. It is a balance of speed and quality, and produces medium-quality results.
Bicubic.
This method is slower but more precise than the first two (and more
desirable). Photoshop spends more time examining surrounding pixels
before interpolating new ones. The math at work is very complex, so this
method will produce smoother results than Nearest Neighbor or Bilinear.
Bicubic Smoother. This method is a refinement of Bicubic. It is specifically designed for upsampling (enlarging images).
Bicubic Sharper.
This method is also a refinement of Bicubic. It is useful for
downsampling (shrinking images). It does a better job of maintaining
sharpness than the other methods.
Setting the Default Method

Photoshop allows you to choose a default
interpolation method. This will be used when you invoke a sizing
command, such as the Free Transform or Image Size command (more on both
in the pages ahead). Choose the method that best matches your workflow.
1. | Choose Edit > Preferences or press Command+K (Ctrl+K) to call up the Preferences dialog box.
|
2. | From the Image Interpolation menu, choose your default method (Bicubic is the most flexible method and is recommended).
|
3. | Click OK. |