1. Adapting to the Circumstances
In the abstract, adapters provide a common interface
to multiple disparate APIs. More specifically, in Android's case,
adapters provide a common interface to the data model behind a
selection-style widget, such as a list box. This use of Java interfaces
is fairly common (e.g., Java/Swing's model adapters for JTable),
and Java is far from the only environment offering this sort of
abstraction (e.g., Flex's XML data-binding framework accepts XML inlined
as static data or retrieved from the Internet).
Android's adapters are responsible not only for
providing the roster of data for a selection widget, but also for
converting individual elements of data into specific views to be
displayed inside the selection widget. The latter facet of the adapter
system may sound a little odd, but in reality, it is not that different
from other GUI toolkits' ways of overriding default display behavior.
For example, in Java/Swing, if you want a JList-backed list box
to actually be a checklist (where individual rows are a check box plus
label, and clicks adjust the state of the check box), you inevitably
wind up calling setCellRenderer() to supply your own ListCellRenderer, which in turn converts strings for the list into JCheckBox-plus-JLabel composite widgets.
1.1. Using ArrayAdapter
The easiest adapter to use is ArrayAdapter. You simply wrap one of these around a Java array or java.util.List instance, and you have a fully functioning adapter:
String[] items={"this", "is", "a",
                "really", "silly", "list"};
new ArrayAdapter<String>(this,
  android.R.layout.simple_list_item_1, items);
One flavor of the ArrayAdapter constructor takes three parameters:
The Context to use (typically this will be your activity instance)
The resource ID of a view to use (such as a built-in system resource ID, as shown in the preceding example)
The actual array or list of items to show
By default, the ArrayAdapter will invoke toString() on the objects in the list and wrap each of those strings in the view designated by the supplied resource. android.R.layout.simple_list_item_1 simply turns those strings into TextView objects. Those TextView widgets, in turn, will be shown in the list, spinner, or whatever widget uses this ArrayAdapter. If you want to see what android.R.layout.simple_list_item_1 looks like, you can find a copy of it in your SDK installation—just search for simple_list_item_1.xml.
2. Lists of Naughty and Nice
The classic list box widget in Android is known as ListView. Include one of these in your layout, invoke setAdapter() to supply your data and child views, and attach a listener via setOnItemSelectedListener() to find out when the selection has changed. With that, you have a fully functioning list box.
However, if your activity is dominated by a single list, you might consider creating your activity as a subclass of ListActivity, rather than the regular Activity base class. If your main view is just the list, you do not even need to supply a layout—ListActivity will construct a full-screen list for you. If you do want to customize the layout, you can, as long as you identify your ListView as @android:id/list, so ListActivity knows which widget is the main list for the activity.
For example, here is a layout pulled from the Selection/List sample project, a simple list with a label on top to show the current selection:
<?xml version="1.0" encoding="utf-8"?>
<LinearLayout
  xmlns:android="http://schemas.android.com/apk/res/android"
  android:orientation="vertical"
  android:layout_width="fill_parent"
  android:layout_height="fill_parent" >
  <TextView
    android:id="@+id/selection"
    android:layout_width="fill_parent"
    android:layout_height="wrap_content"/>
  <ListView
    android:id="@android:id/list"
    android:layout_width="fill_parent"
    android:layout_height="fill_parent"
    android:drawSelectorOnTop="false"
    />
</LinearLayout>
The Java code to configure the list and connect the list with the label is as follows:
public class ListViewDemo extends ListActivity {
  privateTextView selection;
  private static final String[] items={"lorem", "ipsum", "dolor",
          "sit", "amet",
          "consectetuer", "adipiscing", "elit", "morbi", "vel",
          "ligula", "vitae", "arcu", "aliquet", "mollis",
          "etiam", "vel", "erat", "placerat", "ante",
          "porttitor", "sodales", "pellentesque", "augue", "purus"};

  @Override
  public void onCreate(Bundle icicle) {
    super.onCreate(icicle);
    setContentView(R.layout.main);
    setListAdapter(new ArrayAdapter<String>(this,
                       android.R.layout.simple_list_item_1,
                       items));
    selection=(TextView)findViewById(R.id.selection);
  }

  public void onListItemClick(ListView parent, View v, int position,
                               long id) {
    selection.setText(items[position]);
  }
}
With ListActivity, you can set the list adapter via setListAdapter()—in this case, providing an ArrayAdapter wrapping an array of nonsense strings. To find out when the list selection changes, override onListItemClick()
and take appropriate steps based on the supplied child view and
position—in this case, updating the label with the text for that
position. The results are shown in Figure 1.

The second parameter to our ArrayAdapter, android.R.layout.simple_list_item_1,
controls the appearance of the rows. The value used in the preceding
example provides the standard Android list row: big font, a lot of
padding, and white text.
2.1. Selection Modes
By default, ListView is set up to simply
collect clicks on list entries. If you want a list that tracks a user's
selection, or possibly multiple selections, ListView can handle that as well, but it requires a few changes.
First, you need to call setChoiceMode() on the ListView in Java code to set the choice mode, supplying either CHOICE_MODE_SINGLE or CHOICE_MODE_MULTIPLE as the value. You can get your ListView from a ListActivity via getListView(). You can also declare this via the android:choiceMode attribute in your layout XML.
Then, instead of using android.R.layout.simple_list_item_1 as the layout for the list rows in your ArrayAdapter constructor, you need to use either android.R.layout.simple_list_item_single_choice or android.R.layout.simple_list_item_multiple_choice for single-choice or multiple-choice lists, respectively.
For example, here is an activity layout from the Selection/Checklist sample project:
<?xml version="1.0" encoding="utf-8"?>
<ListView
xmlns:android="http://schemas.android.com/apk/res/android"
  android:id="@android:id/list"
  android:layout_width="fill_parent"
  android:layout_height="fill_parent"
android:drawSelectorOnTop="false"
  android:choiceMode="multipleChoice"
/>
It is a full-screen ListView, with the android:choiceMode="multipleChoice" attribute to indicate that we want multiple-choice support.
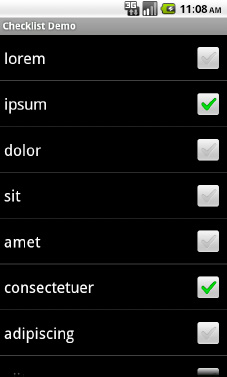
Our activity simply uses a standard ArrayAdapter on our list of nonsense words, but uses android.R.layout.simple_list_item_multiple_choice as the row layout:
packagecom.commonsware.android.checklist;

importandroid.os.Bundle;
importandroid.app.ListActivity;
importandroid.widget.ArrayAdapter;
importandroid.widget.ListView;

public class ChecklistDemo extends ListActivity {
  private static final String[] items={"lorem", "ipsum", "dolor",
          "sit", "amet",
          "consectetuer", "adipiscing", "elit", "morbi", "vel",
          "ligula", "vitae", "arcu", "aliquet", "mollis",
          "etiam", "vel", "erat", "placerat", "ante",
          "porttitor", "sodales", "pellentesque", "augue", "purus"};

  @Override
  public void onCreate(Bundle icicle) {
    super.onCreate(icicle);
    setContentView(R.layout.main);
    setListAdapter(new ArrayAdapter<String>(this,
                       android.R.layout.simple_list_item_multiple_choice,
                       items));
  }
}
The user sees the list of words on the left with check boxes down the right edge, as shown in Figure 2.
If we wanted to, we could call getCheckedItemPositions() on our ListView to find out which items the user checked, or setItemChecked() to check (or uncheck) a specific entry ourselves.