5. Examining the Solution in More Detail
Before we press on with making
further modifications to the code, let's take a quick step back and look
a little more closely at the solution and its contents. As you have
already seen, your solution contains two projects, rather than the one
you might have initially expected. Before we get to the reason for the
second project (the Content project), let's look in a little more detail
at the main game project.
5.1. The Game Project
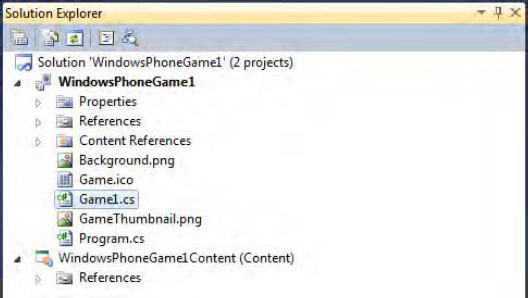
An example of the files present in a new game project can be seen in Figure 6.
The Properties and References
sections of the project will no doubt be familiar (and serve exactly
the same purpose as in any other project you may work on). The rest of
the items within the project deserve a little more explanation, however,
so let's take a look at each of them.
First is the Content References
item, which allows the project to read content (such as graphics, sound
effects, or music files) that it needs to use in order to run the game.
If you expand the Content References tree node, you'll see that it
references the Content project (named SpritesContent
in the example shown) that has also been created within your solution.
Next is Background.png.
This 173 × 173 pixel image provides a large graphic for your game,
which will be present if the user pins it to the start screen. You
should make sure that it provides an attractive and identifiable image
of your game.
This is followed by Game.ico,
a 32 × 32 pixel icon that will be used by your game executable when it
is compiled. It defaults to an image of an Xbox controller. You will
almost certainly want to change this for any finished game to help it
stand out from the crowd.
Following this is the Game1.cs
file that we have open in the code editor.
GameThumbnail.png is
next; it is a 64 × 64 pixel icon used when your game is displayed in
the full application list and in the Windows Phone Marketplace . The default image for this
looks like a dark-gray blob, but actually provides a shaded background
into which you can draw your own imagery to help make your game
identifiable. This image should be essentially the same as that from Background.png so the user can recognize the game in both the start screen and the application list.
Finally we arrive at Program.cs. If you open it in the code editor, you will see that it contains content similar to that shown in Listing 10.
Example 10. The default content of the Program.cs file
using System;

namespace Sprites
{
#if WINDOWS || XBOX
    static class Program
    {
        /// <summary>
        /// The main entry point for the application.
        /// </summary>
        static void Main(string[] args)
        {
            using (Game1 game = new Game1())
            {
                game.Run();
            }
        }
    }
#endif
}
|
The code is simple: creating an instance of the Game1 class that has been provided for us and calling its Run method. But before the Program class is defined within this source file, a compiler directive tells Visual Studio to build the class only if the WINDOWS or XBOX constants have been defined. For Windows Phone development, neither of these constants is defined (the constant WINDOWS_PHONE is defined instead). The end result is that this class won't be defined for Windows Phone XNA games.
Instead, XNA looks for the first class it can find that inherits from Microsoft.Xna.Framework.Game, which is the case for the Game1.cs that was created in our project. If you have multiple classes that inherit from Microsoft.Xna.Framework.Game,
Visual Studio will raise a compilation error. You can actually resolve
this by selecting a specific game class in the Project Properties
window, but in practical terms there is little reason to have multiple
game classes within the same project.
You will notice from the set
of files present in the project that there are no forms or files
representing any other user interface classes. XNA does not use anything
analogous to forms, instead relying purely on graphics being rendered
through program code.
5.2. The Content Project
Something else that may have
been unexpected when you created the XNA project is the presence of the
Content project. This project, which is initially empty, has the sole
purpose of containing all the external data files (graphics, sound
files, 3D models and so on) that you wish to use within your game.
So why is this created as a separate project? There are several reasons why it is useful:
The main reason is for
performance. Our test project has a single graphic file, but full games
can contain dozens of content files. Each time the project is compiled,
all these files need to be processed by XNA in order to put them into a
form that it can use. The content tends to be modified fairly
infrequently, but the program code is modified in virtually every build.
Putting the content into a separate project means that the processing
of this content need only be performed each time the content actually
changes, speeding up compile time for all the rest of the compilations.
Another
benefit of a Content project is that it allows you to separate the
content for different hardware targets. You may well want to use larger
graphics on an Xbox version of a game than on a Windows Phone version,
and maybe even larger still for high-end PC versions. Using separate
Content projects allows you to create a project for each and keep the
same code in your main game project.
If
you have content that you wish to share between multiple games (a
company logo, for example), it can be placed into a separate Content
project and referenced by each of the game projects. Changes made to
this Content project will then be reflected in all the games.
The way in which the game accesses the content is very simple. In the Game1 constructor of the game project we have been working on, you will find the line of code shown in Listing 11.
Example 11. Setting the RootDirectory property of the Content object
Content.RootDirectory = "Content";
|
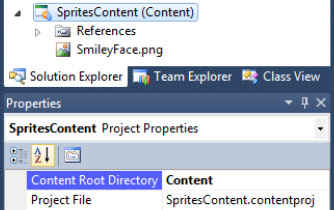
The value of "Content" that is set corresponds to the Content Root Directory
property of the Content project, which you will find in the Properties
window when the Content project's main node is selected in Solution
Explorer, as shown in Figure 7.
This is also shown in brackets after the project name. If you do decide
to add multiple Content projects to your solution, ensure that each has
a different Content Root Directory so that XNA knows where it can find each referenced asset.
Once the RootDirectory
property has been set, you can access assets within that directory just
by specifying their asset name, as we have seen already. If you wish to
divide your assets into groups (perhaps by type, graphics, sounds,
music, and so on), you can create subdirectories within your Content
project by right-clicking the main project node and selecting Add / New
Folder. When you place assets into these folders, you can access them
either by setting the RootDirectory to include the subdirectory name or by including the directory name when calling the Content.Load function, as shown in Listing 12.
Example 12. Loading Content from a subdirectory
_smileyTexture = Content.Load<Texture2D>("Graphics/SmileyFace");
|
|
If you use multiple Content projects, you can forego setting the RootDirectory property altogether and instead specify the Content project's root directory name as part of the path provided to Content.Load. |