In this section, we walk you
through the process of creating your first iPhone application. But
first, you need to obtain the iPhone SDK and install it on your Mac.
1. Obtaining and installing the SDK
Obtaining and installing the iPhone SDK is easy; just follow these steps:
Download the latest iPhone SDK for iPhone OS from the site mentioned above.
Install the iPhone SDK on your Intel-based Mac.
Now, you're ready to create your first project – read on!
2. Creating a project
Locate XCode and launch it. You can use Spotlight to find it or you can navigate to /Developer/Applications/XCode.
XCode is the central application for writing, designing, debugging, and
deploying your iPhone applications. You will use it a lot, so go ahead
and add it to the Dock.
From XCode, select File->New Project. You should see a window, similar to the one shown in Figure 1,
asking you for the type of project you want to create. Choose the
default and create a window-based application. This is the most generic
type of iPhone project and the one that can be customized for different
needs.
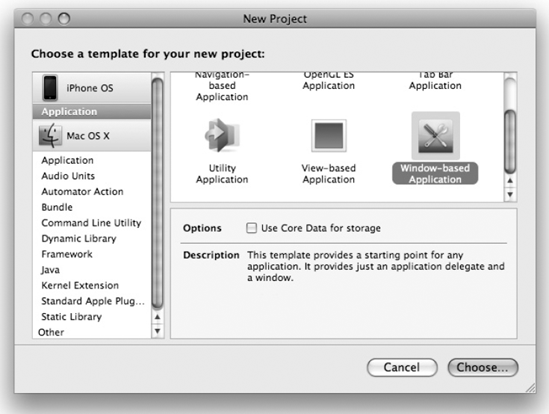
Click on Choose... and enter the name of your project (here, we're using My Project) and hit Save.
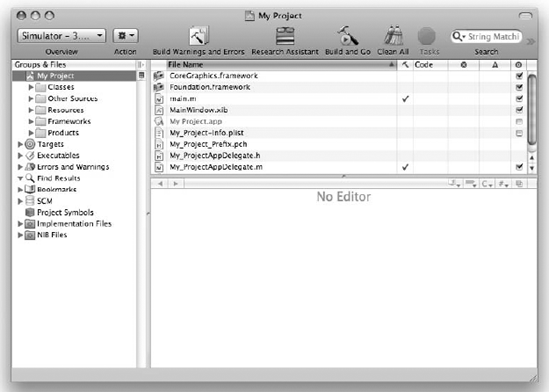
A new directory is created with the name you entered, and several files
are generated for you. You should now see the newly created iPhone
project as in Figure 2.
3. Familiarizing yourself with the IDE
As you can see from Figure 2, the main window is divided into several areas. On the top, you will find the Toolbar (Figure 3).
The Toolbar provides quick access to common tasks. It is fully
configurable; you can add and remove tasks as you want. To customize the
Toolbar, Control-click it and choose Customize Toolbar.... There, you can drag your favorite task on the Toolbar. Hit Done when you're finished. To remove an item, Control-click on it and choose Remove Item.

On the left-hand side, you'll see the Groups & Files list (Figure 4).
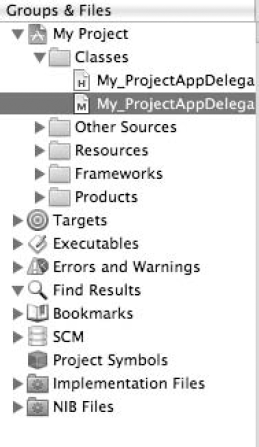
This list is used to organize the source code, frameworks, libraries, executables, and other types of files in your project.
The list shows several files and groups. Groups can
contain other groups and files. You can delete a group as well as create
a new one. The group indicated by the blue icon whose name is the same
as the name you've chosen as the project name is a static group.
Underneath it, you see all your headers, implementations, resources
(images, audio files, etc.), and other related files. The folder-like
yellow groups act conceptually as containers. You can have containers
inside other containers and all files inside these containers live in
the same directory on the disk. The hierarchy only helps you organize
things. You have full freedom to organize your project's layout as you
like. The compiler will pick up the resources, headers, and
implementation files when it builds your application.
The other kind of groups that are listed below the project group are called smart groups.
There are two types of smart groups: 1) built-in smart groups, and 2)
custom smart groups. The content of the built-in smart groups cannot be
customized. Examples of these groups include executables, bookmarks,
errors/warnings, and targets. Customized smart groups are shown in
purple, and two predefined groups are created for you when you create a
new project.
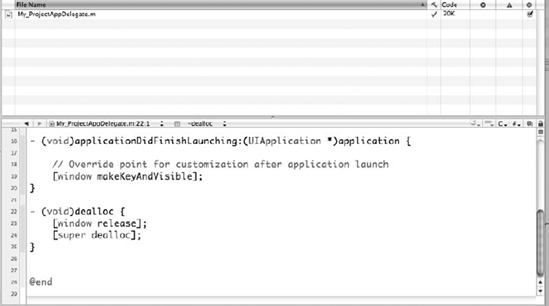
Figure 5 shows the Details view and the text editor beneath it.
Selecting an item in the Groups & Files list will result in its details being shown in the Details view. You can go to a full-editor window using Command-shift-E.
4. Looking closely at the generated code
Expand the Classes and Other Sources groups. You will notice several files that live underneath these two groups. Click on the main.m file and expand to a full-editor view.
The main.m file looks very similar to a C file with a main() function. All that main() does is prepare for memory management and launch the application.
Click on the My_ProjectAppDelegate.h file under the Classes
group. You will notice that the editor changes its content. This file
contains the declaration of the application delegate class. Every
application that runs on the iPhone OS has a delegate object that
handles critical phases of its lifecycle.
Click on My_ProjectAppDelegate.m. This file with the .m extension is the counterpart of the previous .h
file. In it, you see the actual implementation of the application
delegate class. Two methods of this class are already implemented for
you. The applicationDidFinishLaunching: method is one of those methods that handles a particular phase of the application lifecycle. The other method, dealloc,
is a method where memory used by this object is released. In iPhone OS,
you manage the allocation and freeing of memory as there is no garbage
collection. Memory management is crucial in iPhone development, and
mastering it is very important.
The generated files and resources are adequate for starting the application. To launch the application, click on Build and Go in the Toolbar or press the Command-Enter
key combination. You'll notice that the application starts in the
Simulator and it only shows a white screen with the status bar on top.
Not very useful, but it works!