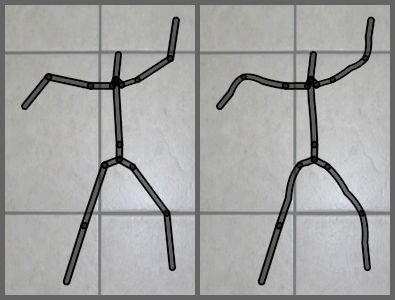
Figure 1 shows a comparison of the stick
figure with and without vertex skinning. (Usually skinning is applied to
3D models, so this is a rather contrived case.) Notice how the elbows and
knees have curves rather than sharp angles.
The main idea behind GPU-based skinning is that
you need not change your vertex buffer during animation; the only data
that gets sent to the GPU is a new list of model-view matrices.
Yes, you heard that right: a
list of model-view matrices! So far, we’ve been
dealing with only one model-view at a time; with vertex skinning, you give
the GPU a list of model-views for only one draw call. Because there are
several matrices, it follows that each vertex now has several
post-transformed positions. Those post-transformed positions get blended
together to form the final position. Don’t worry if this isn’t clear yet;
you’ll have a deeper understanding after we go over some example
code.
Skinning requires you to include additional
vertex attributes in your vertex buffer. Each vertex is now bundled with a
set of bone indices and bone
weights. Bone indices tell OpenGL which model-view matrices to
apply; bone weights are the interpolation constants. Just like the rest of
the vertex buffer, bone weights and indices are set up only once and
remain static during the animation.
The best part of vertex skinning is that you
can apply it with both OpenGL ES 2.0 (via the vertex shader) or OpenGL ES
1.1 (via an iPhone-supported extension). Much like I did with bump
mapping, I’ll cover the OpenGL ES 2.0 method first, since it’ll help you
understand what’s going on behind the scenes.
1. Skinning: Common Code
Much of the prep work required for vertex
skinning will be the same for both OpenGL ES 1.1 and OpenGL ES 2.0. To
achieve the curvy lines in our stick figure, we’ll need to tessellate
each limb shape into multiple slices. Figure 9-5 depicts an idealized elbow joint; note
that the vertices in each vertical slice have the same blend
weights.
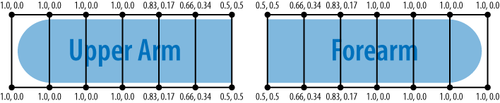
In Figure 2, the
upper arm will be rigid on the left and curvy as it approaches the
forearm. Conversely, the forearm will curve on the left and straighten
out closer to the hand.
Let’s define some structures for the
rendering engine, again leveraging the vector library in the
appendix:
struct Vertex {
    vec3 Position;
    float Padding0;
    vec2 TexCoord;
    vec2 BoneWeights;
    unsigned short BoneIndices;
    unsigned short Padding1;
};

typedef std::vector<Vertex> VertexList;
typedef std::vector<GLushort> IndexList;
typedef std::vector<mat4> MatrixList;

struct Skeleton {
    IndexList Indices;
    VertexList Vertices;
};

struct SkinnedFigure {
    GLuint IndexBuffer;
    GLuint VertexBuffer;
    MatrixList Matrices;
};
Given a Skeleton object,
computing a list of model-view matrices is a bit tricky; see Example 1. This computes a sequence of matrices for the
joints along a single limb.
Example 1. Generation of bones matrices
void ComputeMatrices(const Skeleton& skeleton, MatrixList& matrices)
{
    mat4 modelview = mat4::LookAt(Eye, Target, Up);

    float x = 0;
    IndexList::const_iterator lineIndex = skeleton.Indices.begin();
    for (int boneIndex = 0; boneIndex < BoneCount; ++boneIndex) {

        // Compute the length, orientation, and midpoint of this bone:
        float length;
        vec3 orientation, midpoint;
        {
            vec3 a = skeleton.Vertices[*lineIndex++].Position;
            vec3 b = skeleton.Vertices[*lineIndex++].Position;
            length = (b - a).Length();
            orientation = (b - a) / length;
            midpoint = (a + b) * 0.5f;
        }

        // Find the endpoints of the "unflexed" bone
        // that sits at the origin:
        vec3 a(0, 0, 0);
        vec3 b(length, 0, 0);
        if (StickFigureBones[boneIndex].IsBlended) {
            a.x += x;
            b.x += x;
        }
        x = b.x;

        // Compute the matrix that transforms the
        // unflexed bone to its current state:
        vec3 A = orientation;
        vec3 B = vec3(-A.y, A.x, 0);
        vec3 C = A.Cross(B);
        mat3 basis(A, B, C);
        vec3 T = (a + b) * 0.5;
        mat4 rotation = mat4::Translate(-T) * mat4(basis);
        mat4 translation = mat4::Translate(midpoint);
        matrices[boneIndex] = rotation * translation * modelview;
    }
}
|
2. Skinning with OpenGL ES 2.0
Example 2 shows the
vertex shader for skinning; this lies at the heart of the
technique.
Example 2. Vertex shader for vertex skinning
const int BoneCount = 17;

attribute vec4 Position;
attribute vec2 TextureCoordIn;
attribute vec2 BoneWeights;
attribute vec2 BoneIndices;

uniform mat4 Projection;
uniform mat4 Modelview[BoneCount];

varying vec2 TextureCoord;

void main(void)
{
    vec4 p0 = Modelview[int(BoneIndices.x)] * Position;
    vec4 p1 = Modelview[int(BoneIndices.y)] * Position;
    vec4 p = p0 * BoneWeights.x + p1 * BoneWeights.y;
    gl_Position = Projection * p;
    TextureCoord = TextureCoordIn;
}
|
Note that we’re applying only two bones at a
time for this demo. By modifying the shader, you could potentially blend
between three or more bones. This can be useful for situations that go
beyond the classic elbow example, such as soft-body animation. Imagine a
wibbly-wobbly blob that lurches around the screen; it could be rendered
using a network of several “bones” that meet up at its center.
The fragment shader for the stick figure demo
is incredibly simple; see Example 3. As you can see,
all the real work for skinning is on the vertex shader side of
things.
Example 3. Fragment shader for vertex skinning
varying mediump vec2 TextureCoord;
uniform sampler2D Sampler;

void main(void)
{
    gl_FragColor = texture2D(Sampler, TextureCoord);
}
|
The ES 2.0 rendering code is fairly
straightforward; see Example 4.
Example 4. ES 2.0 Render method for vertex skinning
GLsizei stride = sizeof(Vertex);
mat4 projection = mat4::Ortho(-1, 1, -1.5, 1.5, -100, 100);

// Draw background:
...

// Render the stick figure:
glUseProgram(m_skinning.Program);

glUniformMatrix4fv(m_skinning.Uniforms.Projection, 1,
                   GL_FALSE, projection.Pointer());

glUniformMatrix4fv(m_skinning.Uniforms.Modelview,
                   m_skinnedFigure.Matrices.size(),
                   GL_FALSE,
                   m_skinnedFigure.Matrices[0].Pointer());

glBindTexture(GL_TEXTURE_2D, m_textures.Circle);
glEnable(GL_BLEND);
glBlendFunc(GL_SRC_ALPHA, GL_ONE_MINUS_SRC_ALPHA);

glEnableVertexAttribArray(m_skinning.Attributes.Position);
glEnableVertexAttribArray(m_skinning.Attributes.TexCoord);
glEnableVertexAttribArray(m_skinning.Attributes.BoneWeights);
glEnableVertexAttribArray(m_skinning.Attributes.BoneIndices);

glBindBuffer(GL_ELEMENT_ARRAY_BUFFER, m_skinnedFigure.IndexBuffer);
glBindBuffer(GL_ARRAY_BUFFER, m_skinnedFigure.VertexBuffer);

glVertexAttribPointer(m_skinning.Attributes.BoneWeights, 2,
                      GL_FLOAT, GL_FALSE, stride,
                      _offsetof(Vertex, BoneWeights));
glVertexAttribPointer(m_skinning.Attributes.BoneIndices, 2,
                      GL_UNSIGNED_BYTE, GL_FALSE, stride,
                      _offsetof(Vertex, BoneIndices));
glVertexAttribPointer(m_skinning.Attributes.Position, 3,
                      GL_FLOAT, GL_FALSE, stride,
                      _offsetof(Vertex, Position));
glVertexAttribPointer(m_skinning.Attributes.TexCoord, 2,
                      GL_FLOAT, GL_FALSE, stride,
                      _offsetof(Vertex, TexCoord));

size_t indicesPerBone = 12 + 6 * (NumDivisions + 1);
int indexCount = BoneCount * indicesPerBone;
glDrawElements(GL_TRIANGLES, indexCount, GL_UNSIGNED_SHORT, 0);
|
This is the largest number of attributes
we’ve ever enabled; as you can see, it can be quite a chore to set them
all up. One thing I find helpful is creating my own variant of the
offsetof macro, useful for passing a byte offset to
glVertexAttribPointer. Here’s how I define
it:
#define _offsetof(TYPE, MEMBER) (GLvoid*) (offsetof(TYPE, MEMBER))
The compiler will complain if you use
offsetof on a type that it doesn’t consider to be a
POD type. This is mostly done just to conform to the ISO C++ standard;
in practice, it’s usually safe to use offsetof on
simple non-POD types. You can turn off the warning by adding
-Wno-invalid-offsetof to the gcc command line. (To
add gcc command-line arguments in Xcode, right-click the source file,
and choose Get Info.)