If you want to distribute your application to end users,
you’ll need to return to the Developer Portal, generate a different set of
profiles, and rebuild your application, signing it this time with your new
distribution profile rather than the development profile you have used
thus far.
1. Ad Hoc DistributionAd hoc builds of your application are used to distribute
your application outside your own development environment, and
are intended to allow you to distribute your application to beta testers. In the same
way you registered your iPhone or iPod touch for development, you must
register all of the devices onto which you intend to distribute your
application using an ad hoc build. You can register up to 100 devices
per year in the iPhone Program Portal. This is a firm limit; deleting
already registered devices will not allow you to add further
devices.
Note:
Normally when you distribute applications via the ad hoc method,
no application artwork is displayed when the user looks at your
application inside the iTunes interface. However, if you place a copy
of the 512×512-pixel PNG of your icon in your application bundle and
name it iTunesArtwork
without any file extension, this will be used by iTunes.
To deploy your application to your users via the ad hoc method,
you need to create a distribution certificate, register
any devices you plan to use, and create an ad hoc provisioning profile in the
iPhone Developer Program Portal.
1.1. Obtaining a distribution certificate
The first thing you need is a distribution
certificate, and to obtain that you need to generate a
certificate-signing request (CSR) using the Keychain Access application:
As you did for the CSR you generated for the development
certificate , launch the Keychain Access
application.
Select Keychain Access→Preferences from the menu. Go to the
Certificates preference pane to confirm that the Online
Certificate Status Protocol (OCSP) and Certificate Revocation List
(CRL) options are turned off.
Select Keychain Access→Certificate Assistant→Request a Certificate from a Certificate
Authority from the Keychain Access menu, and enter the email
address you selected as your Apple ID during the sign-up process
and your name. Click the “Saved to disk” radio button, check the
“Let me specify key pair information” checkbox, and click
Continue. You’ll be prompted for a filename for your certificate
request.
Accept the defaults (a key size of 2,048 bits using the RSA
algorithm) and click Continue.
The application will proceed to generate a CSR file and save it
to disk.
In the iPhone Developer Program Portal (sign in to http://developer.apple.com/iphone and look for the
program portal link), click on the Certificates link and in the
Distribution tab click Request Certificate (if you already have a
certificate, this option will be unavailable as you need only one).
Follow the instructions that appear, and upload your CSR to the portal
when asked.
If you joined the development program as an individual, you need
to approve the signing request (in the Distribution tab of the
Certificates section of the portal) before proceeding to download the
new certificate. If you are part of a team, the nominated development
team administrator needs to do this. After the request is approved,
you may need to click on the Distribution tab to refresh the page.
When you see a Download button, click it to save the certificate to
disk.
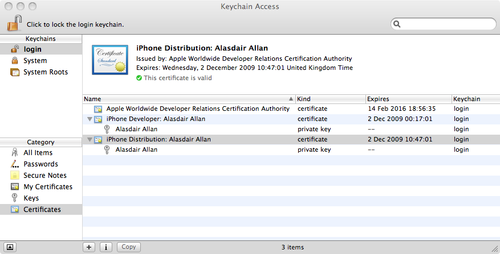
Once the certificate file has downloaded, double-click it to
install it into your Mac OS X login keychain, as shown in Figure 1.
1.2. Registering devices
Before you create the provisioning profile, you’ll need
to register the devices you want the profile to support.
To do this you’ll need the unique device identifier (UDID) of all of
these devices.
In the Program Portal, click Devices, select the Manage tab, and
click Add Devices. Enter a device name in the appropriate box and the
UDID in the box labeled Device ID, and click the Submit button. (You
can click the + button to add more rows so that you can add several
devices at once.) You have now registered the device; you need to do
this for all of the devices to which you intend to distribute ad hoc
builds.
1.3. Creating a provisioning profile
Now you’re ready to create a mobile provisioning profile. Go to
the Provisioning section of the iPhone Developer Program
Portal, select the Distribution tab, and click New Profile.
Enter a profile name; you may be creating a number of ad hoc
profiles, so naming your first distribution profile “Ad-hoc
Distribution Profile” probably isn’t a great idea. You may want to
name it after the application you’re distributing, so perhaps “City
Guide Beta Test Profile” would be a good choice for distributing a
beta of the City Guide application to testers.
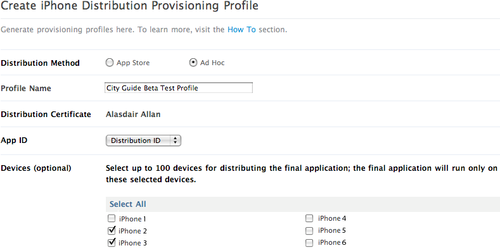
Next, select the App ID you used for the application you’re
going to distribute, and then select all of the devices for which this
profile will be valid, as shown in Figure 2.
Click Submit to generate the new mobile provisioning profile
that you’ll use to distribute the application to your beta testers.
The status will appear as pending; click the Distribution tab to
reload it until it is no longer pending. When the profile is ready,
click the Download button and download the provisioning profile to
your Mac. Now drag the provisioning file onto the Xcode icon in the
dock to make it available to the development environment.
1.4. Building your application for ad hoc distribution
Let’s make an ad hoc build of the City Guide application.
Double-click the project icon at the top of the Group & Files pane
and select the Configurations tab. Select the Release configuration in
the main pane, and click the Duplicate button located at the bottom
left of the configuration list. Name the duplicate configuration
“Ad-hoc”, as shown in Figure 3.

Return to the main Xcode window and use the Overview drop down
to set the active configuration to be the new ad hoc configuration,
and the active SDK to be the iPhone device rather than iPhone
Simulator.
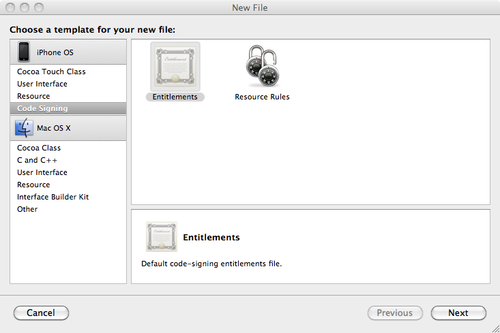
Now, in the Groups & Files pane of the Xcode interface,
right-click on the Resources group and select Add→New File. Choose Code Signing and select an
Entitlement (see Figure 4). Click Next,
and name the file “dist.plist” when prompted. Click Finish.
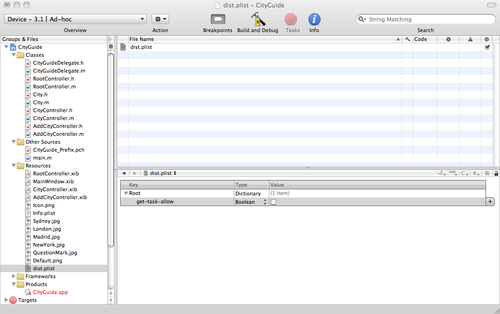
In the Groups & Files pane, click on the
dist.plist file and (very important) uncheck the
get-task-allow
Boolean property in the editor window, as shown in Figure 5. This step is
necessary to turn off the ability for other processes (such as the
debugger) to attach to your application, as this is disallowed by
distribution profiles.
Now, double-click on the project icon at the top of the Groups
& Files pane to reopen the Project Info window. Click the Build
tab and scroll down to the Code Signing section. Double-click on the
Code Signing Entitlements value field, type
dist.plist in the entitlements list, and click
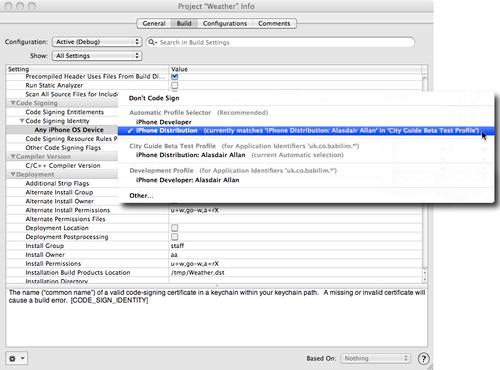
OK. Now click on the menu to the right of the Code Signing
Identity→Any iPhone OS Device line and
select the iPhone Distribution profile. Xcode should match this
against the City Guide Beta Test profile we installed earlier, as
shown in Figure 6.
Close the Project Info window. Before building your application,
open the CityGuide-Info.plist file and make sure
the Bundle Identifier in your Info.plist file
matches the one used to create the ad hoc mobile provisioning profile.
Now select Build→Build from the
Xcode menu to build, but not to deploy, your application. You may be
prompted to allow Xcode to access your private key by the Keychain
application; you must permit the access to build the
application.
1.5. Distributing an ad hoc build
Once you’ve made your build, go to the Products group in the
Groups & Files pane in the Xcode interface and double-click to
open the group if it is not already open. Inside you should find a
single file called CityGuide.app. Right-click on
this file and select Reveal in Finder to open a Finder window in the
directory containing the application bundle.
Copy the application bundle file onto your desktop and create a
ZIP file containing both it and the ad hoc mobile provisioning profile
you created earlier. This ZIP file is your ad hoc build and can be
distributed directly to your users.
Users receiving an ad hoc build should follow these
steps:
Plug their iPhone or iPod touch into their Mac.
Ensure that iTunes is running and can see their
device.
Unzip the distribution archive file.
Drag the provisioning profile onto the iTunes icon in the
dock.
Drag the application bundle file onto the iTunes icon in the
dock.
If the user checks the Applications section of his iTunes
library, he should now be able to see the new ("Ad-hoc”) application,
and he can install it onto his iPhone or iPod touch in the normal way
by syncing his device with iTunes.
2. Developer-to-Developer Distribution
Apple intended ad hoc distribution to be a way for you
to distribute your software to beta testers. However,
developers have used it extensively for other purposes, including
bypassing the App Store entirely and selling directly to the consumer (a
somewhat torturous process).
If your intended end user is another developer, you can vastly
simplify the ad hoc distribution process. Just create a normal
development build, as though you were going to deploy the code to your
own device, and send a copy of the binary to your colleague. He can then
re-sign the binary with his own developer certificate using the Xcode
command line codesign utility:
#! /bin/bash
export CODESIGN_ALLOCATE=/Developer/Platforms/iPhoneOS.platform\
/Developer/usr/bin/codesign_allocate
codesign -f -s "iPhone Developer" $1.app
Once he has re-signed the binary, he can use the Xcode Organizer
window to install it onto his device. In the Applications section of the
Summary tab, he should click the + symbol and select the binary. Xcode
will then install it onto his iPhone or iPod touch.
3. App Store Distribution
Open the iPhone Developer Program Portal in a browser (start at
http://developer.apple.com/iphone/ and follow the
links to the Program Portal), and in the Provisioning section, select
the Distribution tab and click New Profile. Enter a profile name; you’ll
need only one App Store profile, so unlike the ad hoc profile, a good
choice might be “App Store Distribution Profile”.
Finally, select the App ID you used for the application you’re
going to distribute; since this is an App Store provisioning profile,
there is no need to select devices this time around.
Click Submit to generate the new mobile provisioning profile. The
status will appear as pending; click the Distribution tab to reload it
until it is no longer pending. When the profile is ready, click the
Download button and download the provisioning profile to your Mac. Drag
the provisioning file onto the Xcode icon in the dock to make it
available to the development environment.
3.1. Building your application for App Store distribution
Let’s make an App Store build of our City Guide application.
Double-click on the project icon at the top of the Groups & Files
pane and select the Configurations tab. Select the Release
configuration in the main pane, and click the Duplicate button located
at the bottom left of the configuration list, just as you did for the
ad hoc build, but this time around name the duplicate configuration
“Distribution”.
Return to the main Xcode window and use the Overview drop down
to set the active configuration to be the new distribution
configuration, and the active SDK to be the iPhone device rather than
iPhone Simulator.
Now double-click on the project icon at the top of the Groups
& Files pane to reopen the Project Info window. Open the Build tab
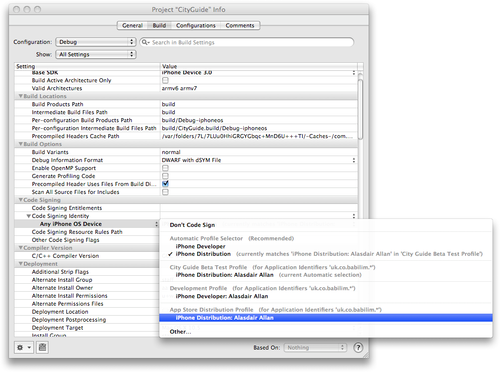
and scroll down to the Code Signing section. Click on the menu to the
right of the Code Signing Identity→Any
iPhone OS Device line and select the App Store distribution profile.
Xcode will not automatically match this profile by default as it did
with your developer profile. You must make this selection manually, as
shown in Figure 7.
Close the Project Info window. Before building your application,
check the Info.plist file for your app (such as
CityGuide-Info.plist) and make sure the Bundle
Identifier matches the one used to create the App Store provisioning
profile. Now select Build→Build from
the Xcode menu to build, but not to deploy, your application. Unless
you’ve already clicked Always Allow on a previous build, you’ll be
prompted to grant access to your keychain. You must allow this
access.
Once you’ve made your build, go to the Products group in the
Groups & Files pane in the Xcode interface and double-click to
open the group. Inside you should find a single file called
CityGuide.app. Right-click on this file and
select Reveal in Finder to open a Finder window in the directory
containing the application bundle. Copy the application bundle file
onto your desktop. It’s this file that you’d upload to the iTunes
Connect site to release it onto the App Store.