Developers always ask about
ways to integrate with the underlying platform. This is especially true
for a mobile device where mobile devices users want to perform actions
with as little effort as possible. One popular use case is manipulating
pictures taken with the built-in camera. Many applications allow photo
manipulation directly on the device so integrating these application as
much as possible to the Pictures Hub benefits the end-user.
Integrated experiences are a key differentiator for
Windows Phone 7 and this is extended to developers as well. You can
build applications that integrate with the Pictures hub such that your
application can be launched directly from the Extras menu.
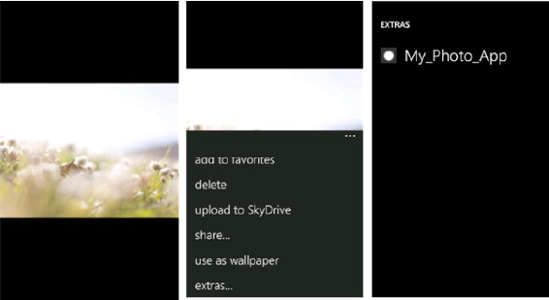
A Photos Extra application is accessible from within
the Pictures hub Single Photo Viewer (SPV). When in the SPV, swipe up
the Application Bar to expose the extras... menu item to launch a Photo
Extra application to work on the currently displayed image. Note that
images are the only media type that can be added to the Media Library,
so once a Photos Extra performs its magic on an image, it can be saved
back to the media library to be shared with others. Figure 6-9 shows the Photos Extra UI.
The next section covers how to create a Photos Extra application.
1. Creating a Photos Extra App
This section covers how easy it is to integrate with
the Pictures hub. Building a Photos Extra application includes the
following two major steps:
We will turn this project into a Photos Extra App and use
MVVM Light as part of the sample. We will take advantage of messaging to
communicate between the image editing View named
ImageEditorView.xamland the backing ViewModel class named PictureEditingViewModel.cs.
We also will use a few type converters as well. Fist we need to edit
the project so that it shows up in the Photos Extra menu. The next
section covers how to create the Extras.xml file.
1.1. Extras.xml File
The Extras.xml file is pretty easy to create. Here are its contents:
<Extras>
  <PhotosExtrasApplication>
    <Enabled>true</Enabled>
  </PhotosExtrasApplication>
</Extras>
Run the application to test that the WP7 Book Photos Extra is added to the Extras
menu when in the Single Picture Viewer in the Pictures hub. When
selected, the application just launches normally and doesn't present an
editing mode but the test is successful with the application appearing
in the menu. The next section covers how to capture the current picture.
1.2. Retrieving the Selected Photo
Retrieving the selected photo is performed in the OnNavigatedTo
method override of the application. A set of parameters are passed in
when the application is launched from the Single Photo Viewer in the
Pictures hub. This allows the application to know when it is launched as
a Photos Extra or when the application is simply launched from the
application list or Start screen tile if pinned to the Start screen
because no query parameters are present.
To retrieve the query parameters, you use the NavigationContext.QueryString property. The QueryString object is a Dictionary<string, string> object. Look for the pre-defined QueryString["token"] to know that the application was launched as a Photos Extra. Use the query value to also obtain a handle to the image.
To get started, we override OnNavigatedTo in Main.xaml.cs in order to capture the query string value to set the correct picture on PictureEditingViewModel.PictureToEdit property. Listing 1 has the code for PhotosExtraAppMainPage.xaml.cs.
Example 1. PhotosExtraApp MainPage.xaml.cs Code File
using System;
using System.Collections.Generic;
using System.Windows.Controls;
using GalaSoft.MvvmLight.Messaging;
using Microsoft.Phone.Controls;
using Microsoft.Xna.Framework.Media;

namespace PhotosExtraApp
{
  public partial class MainPage : PhoneApplicationPage
  {
    // Constructor
    public MainPage()
    {
      InitializeComponent();
    }

    protected override void OnNavigatedTo(System.Windows.Navigation.NavigationEventArgs e)
    {
      base.OnNavigatedTo(e);
      //Process query string
      IDictionary<string, string> queryStrings = this.NavigationContext.QueryString;
      if (NavigationContext.QueryString.Count > 0 &&
        NavigationContext.QueryString.ContainsKey("token"))
      {
        MediaLibrary library = new MediaLibrary();
        Picture picture = library.GetPictureFromToken(queryStrings["token"]);
        //Remove this query string item so that when the user clicks
        //"back" from the ImageEditorView page the app doesn't loop back
        //over to the ImageEditorView in an endless loop of navigation because
        //the query string value is still present and picked up by
        //MainPage.OnNavigateTo each time...
        NavigationContext.QueryString.Remove("token");

        //Send Message with Picture object
        SetPictureAndNavigate(picture);
      }
}

    private void ListBox_SelectionChanged(object sender, System.Windows.Controls.SelectionChangedEventArgs e)
    {
      ListBox lb = sender as ListBox;
      SetPictureAndNavigate(lb.SelectedItem as Picture);
    }

    void SetPictureAndNavigate(Picture picture)
    {
      Messenger.Default.Send<Picture>(picture, "PictureToEdit");
      NavigationService.Navigate(new Uri("/ImageEditorView.xaml", UriKind.Relative));
    }
  }
}
|
The query string value for the token parameter is obtained and the MediaLibrary.GetPictureFromToken method is called to obtain the correct image from the Picture hub. The picture is passed to the SetPictureAndNavigate method shown in Listing 6-9. This same method is called when an image is selected from the ListBox in MainPage.xaml via the ListBox_SelectionChanged method also in Listing 1.
Notice in the SetPictureAndNavigate method, it uses the MVVM Light Messenger.Default.Send to pass the picture as a message. The message is registered for and received in the PictureEditingViewModel class constructor in this line of code:
Messenger.Default.Register<Picture>(
  this, "PictureToEdit",
  (picture) => { PictureToEdit = picture; });
The PictureEditorView.xamlView databinds to the PictureEditingViewModel so that the Image control on that page can data bind to the PictureEditingViewModel.PictureToEdit
property. This allows the UI to data bind to a ViewModel without
directly accessing the ViewModel by using MVVM Light Toolkit Messaging.
Let's finish discussing the MainPage.xaml
functionality before diving further into the picture edit page. The
ListBox in MainPage.xaml data binds to the List<Picture> Pictures
property in the MainViewModel class. The interesting part of the
MainViewModel class is loading the images:
private void CreateDataCollections()
{
  Pictures = new List<Picture>();
  Picture picture = null;
  for (int i = 0; i < _mediaLibrary.Pictures.Count; i++)
  {
    picture = _mediaLibrary.Pictures[i];
    Pictures.Add(picture);
    if (i > 30)
      break;
  }
}
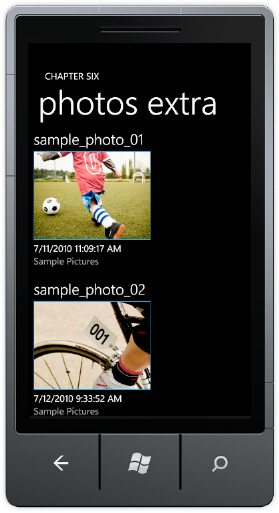
The CreateDataCollections method is hard coded to just load the first 30 pictures found into the MainViewModel.Pictures property. Figure 2
shows the MainPage.xaml UI with sample images from the Emulator
rendered in a basic data template that shows the name, the image, and
the album it is from.
The ListBox data binds to the List<Picture> Pictures collection. The data template includes an Image control. It leverages a value converter named ImageSourceConverter that calls Picture.GetImage() and sets it on the Source property for the Image control in the Data Template. Picture.GetThumbnail
would be a better choice for the ListBox template, because it is a
small image but we use the same converter when displaying the image on
the edit screen and GetImage returns the full image and so looks better when full screen.
MainPage.xaml only displays when launched from the
App List. When an image is touched, it opens to the picture editing View
named PictureEditorView.xaml. When launched from the Photos Extra menu
with the QueryStrings value present, the application goes straight to
the picture editing view as shown in Figure 3.
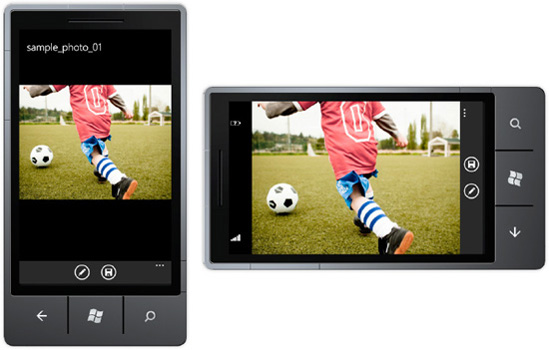
Notice that in both Figure 6-10 and Figure 6-11 that the name does not include the extension. The TextBlock data binds to the Picture.Name property that includes the extension but it is parsed out. This is accomplished by a simple value converter named ImageNameConverter that has a simple line of code to obtain just the name portion:
return ((string)value).Split('.')[0];
Notice also that in Figure 6-11,
when the UI is in Landscape mode the text title disappears to maximize
space for image viewing and editing. This is also achieved via a value
converter. The TextBlock's Visibility property Element data binds to the Orientation of the Page. The value converter sets Visibility to Collapsed if the phone is in Landscape mode. Otherwise the TextBlock's Visibility is configured to Visible. The PictureEditorView data binds to the PictureEditingViewModel class shown in Listing 2.
Example 2. PictureEditingViewModel.cs Code File
using System.IO;
using System.Windows.Media.Imaging;
using GalaSoft.MvvmLight;
using GalaSoft.MvvmLight.Command;
using GalaSoft.MvvmLight.Messaging;
using Microsoft.Xna.Framework.Media;
namespace PhotosExtraApp.ViewModel
{
  public class PictureEditingViewModel : ViewModelBase
  {
    private MediaLibrary mediaLibrary;

    public PictureEditingViewModel()
    {
      mediaLibrary = new MediaLibrary();

      //Register to receive message with picture object from Picture Hub
      //This message is sent from MainPage.xaml.cs in OnNavigateTo
      Messenger.Default.Register<Picture>(
       this, "PictureToEdit",
       (picture) => { PictureToEdit = picture; });

      //Instantiate Commands
      SaveImageCommand = new RelayCommand(
        () => SaveImage());

      SaveImageAsCommand = new RelayCommand<string>(
        param => SaveImageAs(param));

      RevertToSavedImageCommand = new RelayCommand(
        () => EditImage());
      EditImageCommand = new RelayCommand(
        () => RevertToSavedImage());
    }

    #region Image State
    public const string PictureToEditPropertyName = "PictureToEdit";
    private Picture _pictureToEdit = null;
    public Picture PictureToEdit
    {
      get
      {
        return _pictureToEdit;
      }

      set
      {
        if (_pictureToEdit == value)
        {
          return;
        }
        var oldValue = _pictureToEdit;
        _pictureToEdit = value;
        RaisePropertyChanged(PictureToEditPropertyName);
      }
    }


    public const string ModifiedPicturePropertyName = "ModifiedPicture";
    private WriteableBitmap _modifiedPicture = null;
public WriteableBitmap ModifiedPicture
    {
      get { return _modifiedPicture; }
      set
      {
        if (_modifiedPicture == value)
        { return; }
        var oldValue = _modifiedPicture;
        _modifiedPicture = value;
        RaisePropertyChanged(ModifiedPicturePropertyName);
      }
    }

    //Property to data bind to for SaveAs input UI
    //Used for SaveAs command
    public const string ImageSaveAsNamePropertyName = "ImageSaveAsName";
    private string _imageSaveAsName = null;
    public string ImageSaveAsName
    {
      get { return _imageSaveAsName;}
      set
      {
        if (_imageSaveAsName == value)
        { return; }
        var oldValue = _imageSaveAsName;
        _imageSaveAsName = value;
        RaisePropertyChanged(ImageSaveAsNamePropertyName);
      }
    }

    public const string ImageIsDirtyPropertyName = "ImageIsDirty";
    private bool _imageIsDirety = false;
    public bool ImageIsDirty
    {
      get { return _imageIsDirety; }
      set
      {
        if (_imageIsDirety == value)
        { return; }

        var oldValue = _imageIsDirety;
        _imageIsDirety = value;
        RaisePropertyChanged(ImageIsDirtyPropertyName);
      }
    }
    #endregion

    #region Image Actions for RelayCommand Objects
    private void EditImage()
    {
      //Editing, unsaved changes pending
      ImageIsDirty = true;
    }
//View must set the writable bitmap area
    //prior to executing this command
    //This Save action takes a new name
    private void SaveImageAs(string saveAsName)
    {
      using (MemoryStream jpegStream = new MemoryStream())
      {
        //Tell the UI to update the WriteableBitmap property
        Messenger.Default.Send<bool>(true, "UpdateWriteableBitmap");
        ModifiedPicture.SaveJpeg(jpegStream, ModifiedPicture.PixelWidth,
          ModifiedPicture.PixelHeight, 0, 100);
        //Update current Picture to reflect new modified image
        PictureToEdit = mediaLibrary.SavePicture(saveAsName, jpegStream);
        //Saved, not editing
        ImageIsDirty = false;
      };
    }

    //View must set the writable bitmap area
    //prior to executing this command
    //This save action overwrites existing image
    private void SaveImage()
    {
      using (MemoryStream jpegStream = new MemoryStream())
      {
        //Tell the UI to update the WriteableBitmap property
        Messenger.Default.Send<bool>(true, "UpdateWriteableBitmap");
        ModifiedPicture.SaveJpeg(jpegStream, ModifiedPicture.PixelWidth,
          ModifiedPicture.PixelHeight, 0, 100);
        //Update current Picture to reflect new modified image
        PictureToEdit = mediaLibrary.SavePicture(PictureToEdit.Name, jpegStream);
        //Saved, not editing
        ImageIsDirty = false;
      };
    }

    //PictureEditingView registers to receive this message
    //It would clear out any edits at the UI level.
    private void RevertToSavedImage()
    {
      Messenger.Default.Send<bool>(true, "UndoImageChanges");
    }
    #endregion

    #region Image Editing Commmands
    public RelayCommand SaveImageCommand { get; private set; }
    public RelayCommand<string> SaveImageAsCommand { get; private set; }
    public RelayCommand EditImageCommand { get; private set; }
    public RelayCommand RevertToSavedImageCommand { get; private set; }
    #endregion
  }
}
|
The PictureEditingViewModel class has two primary data properties: PictureToEdit of type Picture and the ModifiedPicture of type WriteableBitmap. The idea is to display the selected picture to be modified in an Image control.
The user can then edit the image in the UI. The
modifications under the covers would result in additional Silverlight
controls added to the XAML with the Grid WritableBitMapSourceArea as the
top-level parent. When the user clicks save, the Grid is passed into
the WriteableBitmap to turn it into a bitmap image.
You can pass any UIElement into the WriteableBitmap.Render method and it will turn the element and its children into an image. In the SaveImageCommand (SaveImage()) and SaveImageAsCommand (SaveImageAs()) commands, a message is sent to the UI to update the ModifiedPicture
property on the VM prior to saving. We could do this in a way without
tying the View to the ViewModel via additional messages, but for our
example this is sufficient.
The PictureEditingViewModel class also sends a message to the UI to ask the View to undo modifications to the image. Listing 3 has the PictureEditorView code-behind file.
Example 3. PictureEditorView .xaml.cs Code File
using System.Windows.Controls;
using GalaSoft.MvvmLight.Messaging;
using Microsoft.Phone.Controls;
using PhotosExtraApp.ViewModel;

namespace PhotosExtraApp
{
  /// <summary>
  /// Description for ImageEditorView.
  /// </summary>
  public partial class PictureEditorView : PhoneApplicationPage
  {
    PictureEditingViewModel vm;
    /// <summary>
    /// Initializes a new instance of the ImageEditorView class.
    /// </summary>
    public PictureEditorView()
    {
      InitializeComponent();

      vm = DataContext as PictureEditingViewModel;

      //Register for message to undo changes
      Messenger.Default.Register<bool>(
        this, "UndoImageChanges",
        (param) => UndoImageChanges());

      Messenger.Default.Register<bool>(
this, "UpdateWriteableBitmap",
        (param) => UpdateWriteableBitmap());
    }

    private void UpdateWriteableBitmap()
    {
      //Update WriteableBitmap so it is ready to save
      vm.ModifiedPicture.Render(WriteableBitmapSourceArea, null);
    }

    private void UndoImageChanges()
    {
      //Undo Image changes
      //Reset WriteableBitmapSourceArea Grid to just hold
      //the original image content only
      Image img = ImageToEdit;
      WriteableBitmapSourceArea.Children.Clear();
      WriteableBitmapSourceArea.Children.Add(img);
    }

    private void EditAppBarBtn_Click(object sender, System.EventArgs e)
    {
      vm.EditImageCommand.Execute(null);
    }

    private void saveAppBarBtn_Click(object sender, System.EventArgs e)
    {
      vm.SaveImageCommand.Execute(null);
    }

    private void SaveAsAppMenItem_Click(object sender, System.EventArgs e)
    {
      vm.SaveImageAsCommand.Execute(vm.ImageSaveAsName);
    }

    private void RevertToLastSaveMenuItem_Click(object sender, System.EventArgs e)
    {
      vm.RevertToSavedImageCommand.Execute(null);
    }
  }
}
|
This code walkthrough
demonstrates how to set up all the infrastructure for a picture
modifying Photos Extra application. It does not actually perform edits,
that we leave to the enterprising reader to build the next great Photos
Extra application.