3. Changing the Display Name
The name displayed beneath your application icon on the iPhone
home screen is, by default, the name of your Xcode project. However, only a limited number of characters are displayed
before an ellipsis is inserted and your application name is truncated.
This is fairly messy, and generally users don’t like it. Fortunately,
you can change your application’s display name by editing the “Bundle
display name” field in the application’s Info.plist
file.
If you look at our City Guide application, you’ll notice that the
display name is the same as our project name: “CityGuide”. While the
name is not long enough to be truncated when displayed on the iPhone’s
home screen, we might want it to be displayed as “City Guide” instead.
Let’s make that change now.
Open the CityGuide project in Xcode and click
on the CityGuide-Info.plist file to open it in the
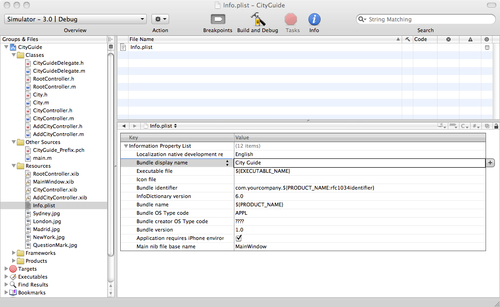
Xcode editor. Double-click on the Value field in the “Bundle display
name” field and change the ${PRODUCT_NAME} macro to City Guide, as shown in Figure 7.
If you rebuild the application and deploy it in iPhone Simulator,
you’ll notice that the name displayed below the City Guide application
icon has changed from “CityGuide” to “City Guide”.

4. Enabling Rotation
Until now, all of the applications we have built in the book have
been in portrait mode and would not rotate into landscape mode, as many iPhone
applications do when the user rotates the phone. Enabling this
functionality is actually amazingly easy. In your view controller class,
add the following method:
- (BOOL)shouldAutorotateToInterfaceOrientation:
  (UIInterfaceOrientation)interfaceOrientation {
    // Return YES for all supported orientations
    return YES;
}
If you rebuild your application and rotate your device, or if you select
Hardware→Rotate Left or Hardware→Rotate Right in the simulator, your UI will
rotate into landscape mode. If you have multiple view controllers (such
as RootController.m,
CityController.m, and
AddCityController.m), you need to add this method
to each of them.
Note:
Although the shouldAutorotateToInterfaceOrientation:
method was called in a timely fashion under the 2.0 SDK, this is not
always the case under the 3.0 SDK. To ensure that you are (reliably)
notified of changes in the device orientation, you should register for
notification of orientation change messages.
However, the UI elements will also squash and stretch into the new
orientation. You need to make sure that the individual UI elements can
cope with their new sizes elegantly. You can do that in one of two
ways:
Be careful when using the Size tab in the Inspector window in Interface Builder
to make sure they stretch in the correct fashion. The easiest way to
do this is to make use of the Autosizing, Alignment, and Placement
sections in the Size tab.
Register for orientation change notifications and dynamically
adapt your UI based on those events. For example, the built-in
Calculator application has a different UI in portrait and landscape
modes.
You can start generating orientation change notifications by
calling this method of the UIDevice
class (in the viewDidLoad: method of
your view controller class):
[[UIDevice currentDevice] beginGeneratingDeviceOrientationNotifications];
When you are no longer concerned about orientation changes, you stop such
notifications by calling this method:
[[UIDevice currentDevice] endGeneratingDeviceOrientationNotifications];
After starting notifications, you must also register your class to
receive such messages using the NSNotificationCenter class:
NSNotificationCenter *notificationCenter =
  [NSNotificationCenter defaultCenter];
[notificationCenter addObserver:self
                    selector:@selector(handlerMethod:)
                    name:@"UIDeviceOrientationDidChangeNotification"
                    object:nil];
This would invoke the handlerMethod:
selector (elsewhere in your view controller) in the
current class when such a message was received:
-(void) handlerMethod:(NSNotification *)note {

     /* Deal with rotation of your UI here */
}