Your iPad can hold a great
deal of valuable information. This is especially true if you save
information like the Social Security numbers and birth dates of your
family members. It is a good idea to make sure that anyone who picks up
your iPad can't access all that information. Also, if your children are
like ours, they'll probably pick up your cool iPad and start surfing the
Web or playing a game. You might want to enable some security
restrictions to keep them safe.
1. Setting a Passcode to Lock Your iPad
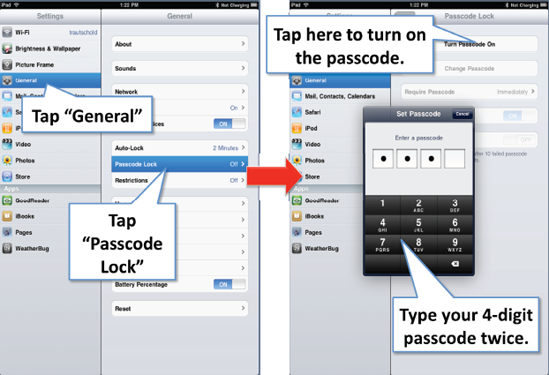
Touch the Settings icon and then the General tab in the left column. Now scroll down and tap on the Passcode Lock item.
Here you have the option of setting a four-digit
passcode that prevents unauthorized access to your iPad and your
information. If the wrong passcode is entered, however, even you won't
be able to access your information, so it is a good idea to use a code
you'll easily remember or to write it down somewhere secure. (See Figure 1.)
Use the keyboard to enter a four-digit code. You will then be prompted to enter your code once more.

2. Passcode Options: Change Time-Out, Disable Picture Frame, Erase All Data after 10 Attempts
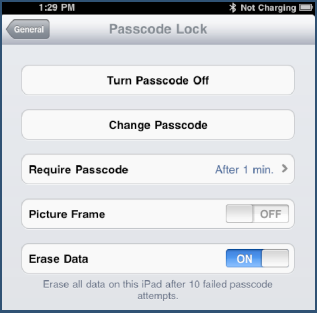
Once you have set your passcode, you will be presented with a few options:
Turn Passcode Off Change Passcode Require Passcode (Immediately, 1 min., 5 min., 15 min., 1 hour, 4 hours)

NOTE
Setting a shorter time for Require Passcode is more secure. Setting the time as Immediately,
the default, is most secure. However, using a setting of one minute may
save you the headache of retyping your passcode if you accidentally
lock your iPad.
Picture Frame (default is ON); set to OFF to prevent the pictures from being seen in locked mode.
Erase Data (default is OFF; if this is set to ON, all data will be erased after ten unsuccessful attempts to enter the passcode.
|
You may want to set Erase Data to OFF
if you have young children who like to bang away at the security to
unlock the keyboard when it comes out of sleep mode and is locked.
Otherwise, you may end up with your iPad being erased frequently.
|
|
3. Setting Restrictions
You might decide you don't want your kids listening
to explicit lyrics in music on your iPad. You may also not want them to
visit YouTube and watch content you find objectionable. Setting these
restrictions is quite easy on your iPad.
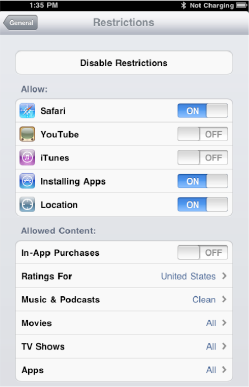
Once again, Touch the General tab under Settings and tap Restrictions.
You will see a large button that says Enable Restrictions.
When you touch this, you'll be prompted to enter a Restrictions Passcode—just pick a four-digit code you will remember.
NOTE
This a separate passcode from your main iPad
passcode, you could set it to be the same to remember it easily, however
that could be problematic if you let your family know the main
passcode, but do not want them adjusting the restrictions.You will need
to enter this passcode to turn off restrictions later.
Notice that you can adjust whether to allow certain apps at all: Safari, YouTube, iTunes, Installing Apps or Location.
OFF = RESTRICTED

You might think that ON
means something is restricted, but it is the opposite. In order to
disable or restrict something, you need to touch the slider next to it
and change it to OFF. If you look at the word Allow: above all the tabs, then it makes sense.

As you can see, you can restrict access to lyrics for Music & Podcasts to what is Clean.
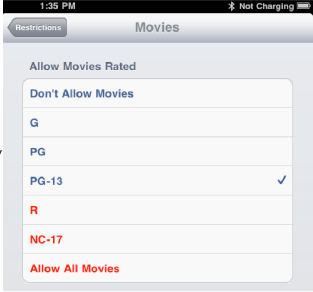
You can also restrict which ratings for Movies, TV Shows and Apps to allow to be played on this iPad.
In the example in the image
to the right, only movies with ratings up to PG-13 can be played. Movies
with ratings of R and NC-17 can't be played.