2. Implement the Game
In this section we start with the default game loop code generated when we created the HelloXNA
project to create a simple space ship shooter game. Our game will be a
simple top-down shooter where alien space ships attempt to strike the
hero ship. The hero ship can shoot missiles at the alien ships to cause
them to explode. Score is based on the number of alien ships blown up.
Now that we have an
understanding of the game play, let's get started. We alternate between
coding and background detail as we develop the game to explain key
concepts. In the Game1.cs code file we declare four variables of type Texture2D named HeroShip, SpaceShip, Missile, and BackgroundImage that are initialized in the LoadContent method:
HeroShip = this.Content.Load<Texture2D>("Sprites/heroship");
SpaceShip = this.Content.Load<Texture2D>("Sprites/spaceship");
Missile = this.Content.Load<Texture2D>("Sprites/missile");
BackgroundImage = this.Content.Load<Texture2D>("Textures/background");
Since these assets are loaded by a ContentManager object, we do not need to worry about releasing the objects in the UnloadContent method. The ContentManager will take care of that for us when it goes out of scope.
Now that we loaded the content, we next cover modifications to the Update() and Draw() methods. We cover Draw first because we want to draw the background on the screen. To actually do the drawing to the graphics device you use a SpriteBatch object.
By default, the XNA Game Studio project template creates a member named spritePatch of type SpriteBatch. Within the Draw method, you first call spriteBatch.Begin, then spriteBatch.Draw any number of times, and then spriteBatch.End.It
is more efficient for the graphics hardware to draw to the back buffer
as a batch and then draw to the back buffer to the device as opposed to
drawing items one at a time directly to the graphics device.SpriteBatch.Begin method sets up the back buffer and the call to SpriteBatch.End indicates that the batch is ready to be drawn to the device.
spriteBatch.Begin();
spriteBatch.Draw(BackgroundImage,graphics.GraphicsDevice.Viewport.Bounds, Color.White);
spriteBatch.End();
Figure 3 shows the background image in the Emulator.
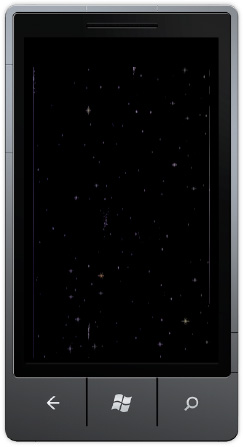
The background is static for our simple game so we are finished with it. We covered Begin and End for the SpriteBatch class but not the Draw method, which has several overloads that look intimidating at first, taking rectangle objects, rotation, scale, etc.
All overloads of the Draw method have a couple of parameters in common in that all of the overloads take a Texture2D(the image to draw) and a position to draw it either in the form of a Vector2 or a Rectangle object. For the background image shown in Figure 3, we draw with this overload:
spriteBatch.Draw(BackgroundImage,graphics.GraphicsDevice.Viewport.Bounds, Color.White);
BackgroundImage is the Texture2D to be drawn. For the place to draw the texture, we pass in the Rectangle size of the entire screen, which is defined by graphics.GraphicsDevice.Viewport.Bounds.
We could hard-code the values to be the shipping screen resolution of
800 × 480. However, we do not want to hardcode this value, because at
some point in the future an additional screen resolution will be
introduced that is 480 × 320. The last parameter in this Draw method overload allows you to tint Texture2D in a particular color. Color.White represents no tint at all.
Now let's shift over to the Update
method. It is in the Update method where calculations are performed to
determine where the alien ship, space ship, and missile should be drawn.
In addition to the variable representing the sprite image, we also need
variables to track the position and speed of the objects as well. First
let's have a quick discussion on vectors.
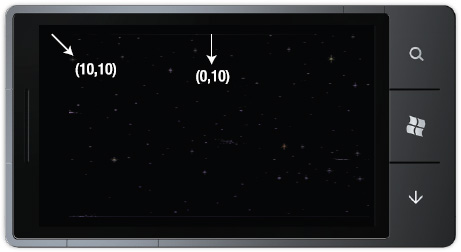
When Windows Phone 7
initially hits the market, the screen resolution is 800 pixels in height
and 480 pixels in width. In XNA Framework, the 2D coordinate system
puts 0,0 in the upper left hand corner of the screen with the positive X
direction flowing to the right and positive Y direction flowing down
the screen, as shown in Figure 4.

A Vector2 consists of an X and Y component that represents a direction and magnitude from the origin. As an example, since the screen is 480 pixels wide, the X axis represented as a Vector2 would have zero for the Y component, and 480 for the X component like this (480,0). Likewise, a Vector2 that represents the Y axis would have zero for the X component and 800 for the Y component like this (0,800).
A Vector2 can represent either a position or a speed. As a position, you set the X and Y
component to be the values you want to place an object on the Cartesian
plane. As an example, to place the upper left-hand corner of a sprite
or image in the middle of the screen, you would set the sprites position
to this value (240,400), which is half the screen width and height
respectively.
|
When you position a sprite, it
is always relative to the upper left-hand corner of the sprite, which
is considered (0,0) in terms of height and width for the sprite. If you
don't take this into account and think you are positioning the center of
a sprite, it will be off by half the height of the sprite toward the
bottom and half the width of the sprite to the right.
|
|
Position is pretty straightforward in a 2D plane. Representing Speed as a Vector2 is similar except that the Vector2
is interpreted by its magnitude or length and direction. Imagine an
arrow with its tail at position (0,0) and its head at (X,Y) such as
(10,10) on a 2D plane, as illustrated in Figure 5.
If the imaginary Vector2 (0,10) represents a speed, it means that the object is moving straight down at 10 pixels per frame. If the Vector2 (10,10) represents a speed, it means that for each frame, the object is moving 10 pixels to the right and 10 pixels down. Figure 6 depicts a ball that has a position of (300, 160). A speed Vectors2 (50,50) is applied to the ball in a given frame.
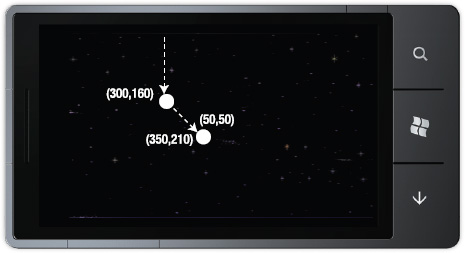
Applying a speed of
(50,50) redirects the ball to a southeastern direction in the plane,
giving a new position of (350, 210) for the ball. We know this
intuitively because X is positive to the right and Y is positive in the
down position, so the Vector2 (50,50) moves the ball 50 pixels to the
right and 50 pixels down. Note that we could just as easily have a speed
of (-50, 50), which would intuitively move the ball to the southwest
direction.
Now that you have a
basic understanding of position and speed as Vector2 objects, let's go
back to the XNA Game Studio project. We will perform speed and position
calculations in the Update method. We
also need to check to see if an object has either collided with another
object/sprite, or if the object collided with an edge of the screen.
If it an object collides
with an object we can do several things. If the object is a golf club
and the other object represents a golf ball, a developer would want to
simulate the club connecting with the ball and send it flying in the
opposite direction based on the ball and club Vector2 position, the
angle of impact. Another example action upon a collision is that if the
collision is between an alien space ship and a missile fired from the
player's space ship, the game could simulate an explosion and the alien
space ship disappears from the screen.
Speaking of the player space ship, the other key component handed in the Update
method is user input, which is also calculated using Vector2 objects.
For Windows Phone 7 user input can be in the form of a screen tap, a
gesture, or the accelerometer as the major game input methods.
With the background on the
screen coordinate system and Vector2D objects out of the way, you should
have a pretty good idea of what the code will look like in the Update
method in pseudo code:
Handle User Input
Apply User Input to objects
Update Position of objects
Detect Object and Edge Collisions
Determine the final state and position of all objects
A key point to consider is that if the Update method takes too long the Game loop will decide to skip a call to the Draw method, resulting in dropped frames. Keep this in mind when writing code in the Update method.
Armed with an understanding of what we need to do in the Update
method in general, let's dive into coding the game logic. We need to
add a couple of member variables to represent the position and speed for
our game objects, which include the hero ship, the enemy space ship,
and the missile. We need to track each object's position, and speed so
we declare six additional variables:
//Define Speed and Position vectors for objects that move
Vector2 HeroShipPosition;
Vector2 HeroShipSpeed;
Vector2 SpaceShipPosition;
Vector2 SpaceShipSpeed;
Vector2 MissilePosition;
Vector2 MissileSpeed;
We initialize these values in a separate method named InitializeObjects executed in LoadContent just after we load the related sprite images.
private void InitializeObjects()
{
   //Initialize Positon and Speed
   SpaceShipPosition = new Vector2(
       graphics.GraphicsDevice.Viewport.Width / 2 - SpaceShip.Width / 2, -SpaceShip.Height);
   SpaceShipSpeed = new Vector2(0, 2); // 2 pixels / frame "down"

   //Center hero ship width wise along the X axis
   //Place hero ship with 20 pixels underneath it in the Y axis
   HeroShipPosition = new Vector2(
graphics.GraphicsDevice.Viewport.Width / 2 - HeroShip.Width / 2,
       graphics.GraphicsDevice.Viewport.Height - HeroShip.Height - 20f);
   HeroShipSpeed = Vector2.Zero;

   //Center Missile on Space Ship and put it 50 pixels further down
   //off screen "below" hereoship
   MissilePosition = HeroShipPosition +
      new Vector2(HeroShip.Width / 2 - Missile.Width / 2, HeroShip.Height + 20f);
   MissileSpeed = new Vector2(0, −6); // 6 pixels / frame "up"

}
I mentioned this earlier
but it is worth restating: when you draw a sprite, the position provided
to the Draw method is the origin of the sprite when drawn meaning that
the provided position becomes the upper left-hand corner of the sprite.
In order to draw the alien spaceship and hero spaceship centered
width-wise on the screen, we subtract half of the sprite's width from
the position so that the middle of the sprite is centered on the screen.
I already covered how to draw
in the Draw method, and we are already drawing the background, which was
easy to position since it fills the entire screen. We haven't written
the code to draw the hero ship, the alien spaceship, or the missile.
Since we now have position information for these objects to reference in
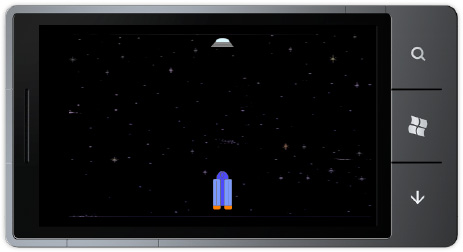
the form of the initialized variables, let's update the Draw method. We add these three lines of code to the Draw method right after we draw the background image:
spriteBatch.Draw(SpaceShip, SpaceShipPosition, Color.White);
spriteBatch.Draw(Missile, MissilePosition, Color.White);
spriteBatch.Draw(HeroShip, HeroShipPosition, Color.White);
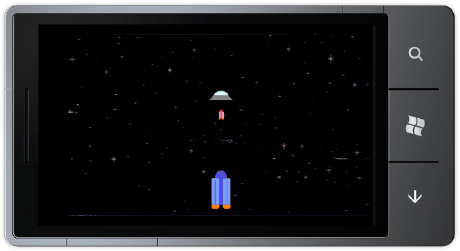
Figure 7 shows the results.
We are pretty much down with the Draw method for our simple game and will focus on the Update method to make the game interactive. The first thing we do is add the basic update formula for all three objects to the Update method:
HeroShipPosition += HeroShipSpeed;
SpaceShipPosition += SpaceShipSpeed;
MissilePosition += MissileSpeed;
If you run the game right now,
you will see the enemy spaceship move down the screen and the missile
move up the screen at a slightly faster rate. Figure 8 shows a snapshot of the movement.
While pretty cool, it
doesn't do much. The sprites pass through each other and then fly off to
infinity in the up direction for the missile and the down direction for
the alien spaceship. We can make a couple of modifications to make it
somewhat more interesting as well as explain a couple of concepts.
The first modification that we make is edge detection. In the Update Method we type CheckScreenBoundaryCollision(gameTime); and then right-click on it and select Generate => Method Stub.
In the newly generated
method, we check to see if the missile, which has a default speed of −4
pixels / frame in the Y direction, has flown off the top of the screen,
which would be a negative Y value. Since the alien space ship drops
straight down at 2 pixels per frame, we check to see if it has a Y value
greater than the screen height. Here is the method:
private void CheckScreenBoundaryCollision(GameTime gameTime)
{
   //Reset Missile if off the screen
   if  (MissilePosition.Y < 0)
   {
      MissilePosition.Y = graphics.GraphicsDevice.Viewport.Height -
                                HeroShip.Height;
   }

   //Reset enemy spaceship if off the screen
   //to random drop point
   if  (SpaceShipPosition.Y >
             graphics.GraphicsDevice.Viewport.Height)
   {
      SpaceShipPosition.Y = -2*SpaceShip.Height;
   }
}
Notice that we avoid using actual number values. As an example, we could use 480 instead of graphics.GraphicsDevice.Viewport.Height,
but when the second screen resolution becomes available the game will
break, because screen height in landscape mode will be 320.
The second
modification to the game is to detect collisions between the alien
spaceship and the missile. We create a new method, CheckForCollisions(gameTime);
as before and edit the generated stub. There are many different
algorithms available to detect for collisions with different levels of
accuracy. The most accurate method is to compare for equality each point
of the first image with every possible point in the other image. While
most accurate, it is also the most CPU intensive and time consuming.
A simple method to check for
collisions is to use bounding boxes. The idea is to wrap an object in a
rectangle and check for collisions. The rectangle is based on the
maximum length and width of the object. This can be inaccurate for
irregular shapes, but costs much less in terms of CPU and time. In our
simple game we generate two Rectangle objects that wrap the alien spaceship and the missile and then call the Intersects method to detect a collision. Here is the code:
private void CheckForCollisions(GameTime gameTime)
{
   //Alien and Missile
   Rectangle AlienRec = new Rectangle((int)SpaceShipPosition.X,
                    (int)SpaceShipPosition.Y,SpaceShip.Width, SpaceShip.Height);
   Rectangle MissileRec = new Rectangle((int)MissilePosition.X,
                    (int)MissilePosition.Y,Missile.Width, Missile.Height);

   if  (AlienRec.Intersects(MissileRec))
   {
      SpaceShipPosition.Y = -2*SpaceShip.Height;
      MissilePosition.Y = graphics.GraphicsDevice.Viewport.Height - HeroShip.Height;
   }
}
We create the two Rectangle objects and then check for collision by calling if (AlienRec.Intersects(MissileRec)) and then update position similar to when there is a screen edge collision.
We now have an
application that shows a dropping alien spaceship intersected by a
missile over and over again. While not the most functional game,
specifically because it doesn't incorporate user input or interactivity
at all, it allows us to demonstrate key concepts for XNA Game Studio
without inundating you with new concepts. Listing 2 shows the full code for our incomplete game.
Example 2. Modified Game1.cs
using System;
using System.Collections.Generic;
using System.Linq;
using Microsoft.Xna.Framework;
using Microsoft.Xna.Framework.Audio;
using Microsoft.Xna.Framework.Content;
using Microsoft.Xna.Framework.GamerServices;
using Microsoft.Xna.Framework.Graphics;
using Microsoft.Xna.Framework.Input;
using Microsoft.Xna.Framework.Input.Touch;
using Microsoft.Xna.Framework.Media;

namespace HelloXNA
{
   /// <summary>
   /// This is the main type for your game
   /// </summary>
   public class Game1 : Microsoft.Xna.Framework.Game
{
      GraphicsDeviceManager graphics;
      SpriteBatch spriteBatch;

      //Define Texture2D objects to hold game content
      Texture2D HeroShip;
      Texture2D SpaceShip;
      Texture2D BackgroundImage;
      Texture2D Missile;

      //Define Speed and Position vectors for objects that move
      Vector2 HeroShipPosition;
      Vector2 HeroShipSpeed;
      Vector2 SpaceShipPosition;
      Vector2 SpaceShipSpeed;
      Vector2 MissilePosition;
      Vector2 MissileSpeed;

      public Game1()
      {
          graphics = new GraphicsDeviceManager(this);
          Content.RootDirectory = "Content";

          // Frame rate is 30 fps by default for Windows Phone.
          TargetElapsedTime = TimeSpan.FromTicks(333333);

      }

      /// <summary>
      /// Allows the game to perform any initialization it needs to before starting to run.
      /// This is where it can query for any required services and load any non-graphic
      /// related content.  Calling base.Initialize will enumerate through any components
      /// and initialize them as well.
      /// </summary>
      protected override void Initialize()
      {
         // TODO: Add your initialization logic here

         base.Initialize();
      }

      /// <summary>
      /// LoadContent will be called once per game and is the place to load
      /// all of your content.
      /// </summary>
     protected override void LoadContent()
     {
        // Create a new SpriteBatch, which can be used to draw textures.
        spriteBatch = new SpriteBatch(GraphicsDevice);

        HeroShip = this.Content.Load<Texture2D>("Sprites/heroship");
        SpaceShip = this.Content.Load<Texture2D>("Sprites/spaceship");
        Missile = this.Content.Load<Texture2D>("Sprites/missile");
        BackgroundImage = this.Content.Load<Texture2D>("Textures/background");
InitializeObjects();
    }

    private void InitializeObjects()
    {
       //Initialize Positon and Speed
       SpaceShipPosition = new Vector2(
           graphics.GraphicsDevice.Viewport.Width / 2 - SpaceShip.Width / 2, -SpaceShip.Height);
       SpaceShipSpeed = new Vector2(0, 2); // 2 pixels / frame "down"

       //Center hero ship width wise along the X axis
       //Place hero ship with 20 pixels underneath it in the Y axis
       HeroShipPosition = new Vector2(
           graphics.GraphicsDevice.Viewport.Width / 2 - HeroShip.Width / 2,
           graphics.GraphicsDevice.Viewport.Height - HeroShip.Height - 20f);
       HeroShipSpeed = Vector2.Zero;

       //Center Missile on Space Ship and put it 50 pixels further down
       //off screen "below" hereoship
       MissilePosition = HeroShipPosition +
          new Vector2(HeroShip.Width / 2 - Missile.Width / 2, HeroShip.Height + 20f);
       MissileSpeed = new Vector2(0, −6); // 6 pixels / frame "up"

     }

     /// <summary>
     /// UnloadContent will be called once per game and is the place to unload
     /// all content.
     /// </summary>
     protected override void UnloadContent()
     {
        // TODO: Unload any non ContentManager content here
     }

     /// <summary>
     /// Allows the game to run logic such as updating the world,
     /// checking for collisions, gathering input, and playing audio.
     /// </summary>
     /// <param name="gameTime">Provides a snapshot of timing values.</param>
     protected override void Update(GameTime gameTime)
     {
        // Allows the game to exit
        if (GamePad.GetState(PlayerIndex.One).Buttons.Back == ButtonState.Pressed)
          this.Exit();

       // TODO: Add your update logic here
       CheckScreenBoundaryCollision(gameTime);
       CheckForCollisions(gameTime);

       HeroShipPosition += HeroShipSpeed;
       SpaceShipPosition += SpaceShipSpeed;
       MissilePosition += MissileSpeed;
base.Update(gameTime);
    }

    private void CheckForCollisions(GameTime gameTime)
    {
       //Alien and Missile
       Rectangle AlienRec = new Rectangle((int)SpaceShipPosition.X,
                        (int)SpaceShipPosition.Y, SpaceShip.Width, SpaceShip.Height);
      Rectangle MissileRec = new Rectangle((int)MissilePosition.X,
                        (int)MissilePosition.Y, Missile.Width, Missile.Height);

      if (AlienRec.Intersects(MissileRec))
      {
         SpaceShipPosition.Y = −2 * SpaceShip.Height;
         MissilePosition.Y = graphics.GraphicsDevice.Viewport.Height - HeroShip.Height;
      }
    }

    private void CheckScreenBoundaryCollision(GameTime gameTime)
    {
       //Reset Missile if off the screen
       if (MissilePosition.Y < 0)
       {
         MissilePosition.Y = graphics.GraphicsDevice.Viewport.Height -
                                   HeroShip.Height;
       }

      //Reset enemy spaceship if off the screen
      //to random drop point
      if (SpaceShipPosition.Y >
              graphics.GraphicsDevice.Viewport.Height)
      {
         SpaceShipPosition.Y = −2 * SpaceShip.Height;
      }
    }

     /// <summary>
     /// This is called when the game should draw itself.
     /// </summary>
     /// <param name="gameTime">Provides a snapshot of timing values.</param>
     protected override void Draw(GameTime gameTime)
     {
        GraphicsDevice.Clear(Color.CornflowerBlue);

        // TODO: Add your drawing code here
        spriteBatch.Begin();
        spriteBatch.Draw(BackgroundImage, graphics.GraphicsDevice.Viewport.Bounds, Color.White);
        spriteBatch.Draw(SpaceShip, SpaceShipPosition, Color.White);
        spriteBatch.Draw(Missile, MissilePosition, Color.White);
        spriteBatch.Draw(HeroShip, HeroShipPosition, Color.White);
        spriteBatch.End();
base.Draw(gameTime);
    }
  }
}
|