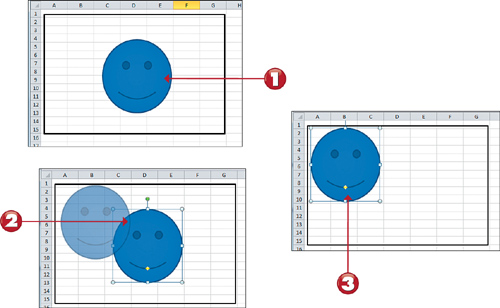
IT tutorials
 
Office
 

Microsoft Excel 2010 : Working with Graphics - Moving an Object, Resizing an Object , Deleting an Object

- Free product key for windows 10
- Free Product Key for Microsoft office 365
- Product Key Free : Microsoft Office 2019 – Serial Number
11/4/2014 8:33:51 PM

Moving an Object

When you draw an object on or add an object to a worksheet, you might not like its placement. Perhaps the object obscures the worksheet data, or maybe it needs to be moved a little closer to (or farther away from) the data. Fortunately, you can easily move an object.


1. Select the object you want to move; selection handles appear around the edges of the object.

2. Click directly on the object or its border (not the selection handles) and hold the left mouse button while dragging the object to the new location.

3. Release the mouse button to drop the object in the new location. The object is moved.


Tip: Copying Objects

To copy an object, press and hold down the Ctrl key on your keyboard as you drag; a copy of the original object will be moved, with the original remaining intact where it is.


Note: Moving an Object to Another Worksheet

You can move your target object to a separate worksheet by following these simple steps. Right-click the target object, and select Cut. Next, move to the new sheet, right-click in the spot where you want the object to appear, and then select Paste. You can also use these steps to move your object to a different workbook.
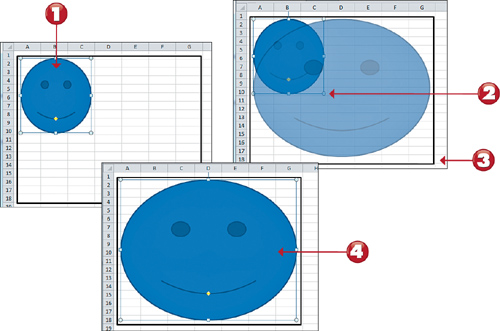

Resizing an Object

If an object is too big (or too small), change the size. You can modify any type of object, including a picture, chart, or drawn object you added. In addition, you can continue to resize the object over and over until it is the size you want.


1. Select the object you want to resize; selection handles appear around the edges of the object.

2. Move the pointer over one of the selection handles (here, a corner handle). When the pointer is in the right spot, it changes to a two-headed arrow.

3. Click the handle, drag it, and release the mouse button when the object is the desired size.

4. The object is resized.

Note: Corners Versus Sides

Dragging the sides increases or decreases the height or width of an object, whereas dragging the corners increases or decreases the height and width of an object at the same time.


Note: Resizing Proportionally

If you hold the Shift key down while dragging a corner, the image enlarges or decreases in proportion.


Deleting an Object

As you experiment with charts, drawings, and pictures, you might go overboard, or you might make a mistake and want to start over. In any case, if you add an object and no longer want to include it, you can delete it, as described here.


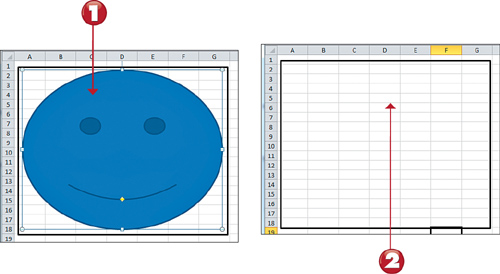
1. Select the object you want to delete; selection handles appear around the edges of the object.

2. Press the Delete key on your keyboard. Excel deletes the object.


Note: Undoing a Deletion

If you accidentally delete an object, click the Undo button on the Quick Access Toolbar to undo the deletion. Alternatively, you can use the Ctrl+Z shortcut on your keyboard.

 
Others
 
- Microsoft Excel 2010 : Working with Graphics - Selecting an Object, Formatting an Object
- Microsoft Powerpoint 2010 : Extending PowerPoint with Third-Party Software - Getting Creative with Third-Party Templates, Backgrounds, and Clip Art
- Microsoft Powerpoint 2010 : Extending PowerPoint with Third-Party Software - Camtasia Studio, Articulate Rapid E-Learning Studio, Adobe Presenter
- Microsoft Powerpoint 2010 : Customizing Themes and Backgrounds - Applying and Customizing Backgrounds
- Microsoft Visio 2013 : A Visual Orientation to a Visual Product - Minimizing and restoring the Visio ribbon, Understanding shapes, masters, stencils, and templates
- Microsoft Visio 2013 : A Visual Orientation to a Visual Product - Understanding tool tabs and add-in tabs
- Microsoft Visio 2013 : A Visual Orientation to a Visual Product - Exploring the Visio ribbon
- Microsoft Visio 2013 : A Visual Orientation to a Visual Product - Working with the ribbon
- Microsoft Visio 2013 : A Visual Orientation to a Visual Product - Identifying new features of Visio 2013
- Microsoft Project 2010 : Setting Up Project for Your Use - Defining Project Information (part 2) - Defining Project Properties
 
 
Top 10
 
- Microsoft Visio 2013 : Adding Structure to Your Diagrams - Finding containers and lists in Visio (part 2) - Wireframes,Legends
- Microsoft Visio 2013 : Adding Structure to Your Diagrams - Finding containers and lists in Visio (part 1) - Swimlanes
- Microsoft Visio 2013 : Adding Structure to Your Diagrams - Formatting and sizing lists
- Microsoft Visio 2013 : Adding Structure to Your Diagrams - Adding shapes to lists
- Microsoft Visio 2013 : Adding Structure to Your Diagrams - Sizing containers
- Microsoft Access 2010 : Control Properties and Why to Use Them (part 3) - The Other Properties of a Control
- Microsoft Access 2010 : Control Properties and Why to Use Them (part 2) - The Data Properties of a Control
- Microsoft Access 2010 : Control Properties and Why to Use Them (part 1) - The Format Properties of a Control
- Microsoft Access 2010 : Form Properties and Why Should You Use Them - Working with the Properties Window
- Microsoft Visio 2013 : Using the Organization Chart Wizard with new data
Technology FAQ
- Is possible to just to use a wireless router to extend wireless access to wireless access points?
- Ruby - Insert Struct to MySql
- how to find my Symantec pcAnywhere serial number
- About direct X / Open GL issue
- How to determine eclipse version?
- What SAN cert Exchange 2010 for UM, OA?
- How do I populate a SQL Express table from Excel file?
- code for express check out with Paypal.
- Problem with Templated User Control
- ShellExecute SW_HIDE
programming4us programming4us