To really demonstrate the power of the Search function in
OneNote you need at least a bit of content on the pages in your
notebook(s). Hopefully, if you’ve been following along and tried some
of the features along the way, you should have enough stuff in your
practice notebook to give the search features a whirl.
The other reason I didn’t delve right into searching
is because I wanted to first point out the various organizational
options you have available in OneNote, some of which can make searching
easier or more efficient. By learning about all of the ways in which
you can stay organized in OneNote, you can now better decide whether
you think those features are quick and easy enough for your particular
style of organization, or if you know in your heart that you’d rather
toss everything into a single notebook and rely entirely on the search
features to retrieve information again when you need it.
There is no right or wrong decision—OneNote fully
supports both styles of note-taking and personal organization, so go
with what feels most natural to you.
You’ve seen how fast and simple OneNote can search
for tagged notes. Before you perform a regular notebook search for the
first time, take a quick look at a couple of options that can affect
the results and speed of your searches.
Turning Audio Search On or Off
If you frequently record audio or video clips with
OneNote 2010, you have the option to include spoken words in these
clips in your notebook searches. OneNote can recognize your search text
in spoken audio, provided that the volume and sound quality is fairly
good and that the recording does not have too much ambient noise. Audio
search is supported for spoken English, French, German, Italian,
Japanese, Korean, Spanish, as well as traditional and simplified
Chinese.
Audio searching is initially turned off, so if you want to include your audio notes right from the start, follow these steps:
1. | Click the File tab and then click Options.
|
2. | In the OneNote Options dialog box, click the Audio and Video category in the list on the left.
|
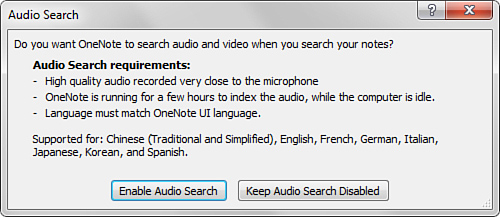
3. | On
the right, under Audio Search, click to select the check box labeled
Enable Searching Audio and Video Recordings for Words. (If you have no
audio clips in your notes yet, you don’t need to enable this option.)
When you click the check box, OneNote displays a confirmation message
to remind you of the system requirements for audio search (see Figure 1).
|
4. | |
As the label of the check box indicates, audio
search works with both audio clips and the audio portion of video clips
that you record with or import into OneNote.
|
Although audio search is a remarkably useful
feature, it is turned off by default for a reason. Depending on their
length, audio files and the audio portion of video files can result in
very large file sizes. When audio search is enabled, OneNote must scan
these files completely to see whether the search text can be
recognized. If you’re using OneNote 2010 on a slow computer or your
notebooks contain several large audio or video files, you might want to
keep audio search disabled for your routine text searches unless you
really need it.
|
Turning Text Recognition in Pictures On or Off
You might remember that OneNote 2010 has built-in
text recognition for pictures and screen clippings. This option is
turned on by default, which means that if your search text is found in
any of the pictures or screen clippings in your notes, OneNote will
include that text in your search results.
If you want to turn this feature off, do the following:
1. | Click the File tab and then click Options.
|
2. | In the OneNote Options dialog box, click the Advanced category in the list on the left.
|
3. | On the right, scroll down to the Text Recognition in Pictures heading near the end of the list.
|
4. | To
disable finding text in pictures, click to select the check box labeled
Disable Text Recognition in Pictures. If the option is currently
disabled and the box is checked, you can reenable this functionality by
clicking to deselect this check box again.
|
5. | Click OK. |